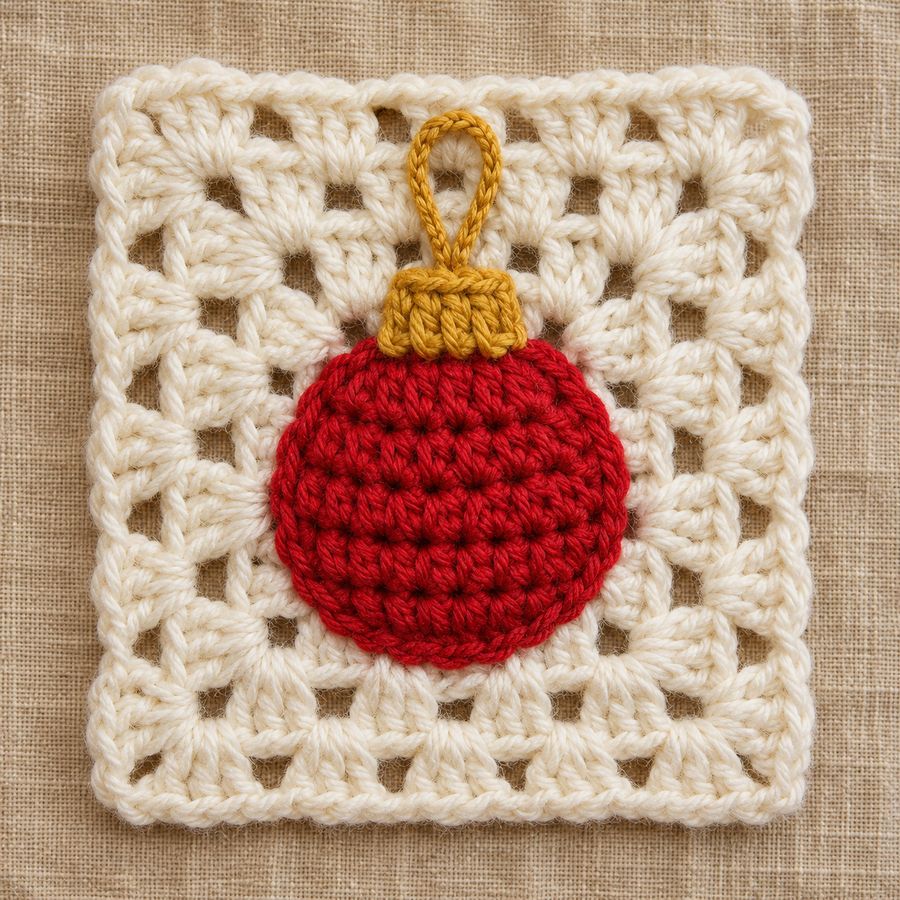
A bauble granny square pattern makes a 7 in (18 cm) square from a red double crochet circle squared off in cream, a cream Frame of granny clusters and a gold cap with a hanging loop. It uses CYC 4, medium (worsted) yarn, Red 5 m (5 yd), Cream 25 m (27 yd) and Gold 2 m (2 yd), a 5 mm (H-8) hook for the square and a 4 mm (G-6) hook for the cap, with a stitch count on every round and row.
The bauble is Square 6 of the 12 squares in Christmas Granny Square Patterns: 12 Free Squares and a Blanket, and every square ends at the same size, so it joins any other square in the set. The full free pattern follows. Step photos and stitch diagrams sit beside the rounds they show, so you can check your work as you go.
What you need for the bauble granny square
The bauble granny square needs 4, medium (worsted) yarn in three colours, two hooks and four small tools. You use Red only for the circle, so you need just 5 m (5 yd). Gold is smaller still. Cream does the most work, because it squares off the circle in Round 4 and then works all four Frame rounds, 25 m (27 yd) in all. Weight 4 is the category the Craft Yarn Council names Medium in its “Standard Yarn Weight System”, and worsted, Afghan and Aran yarns all sit in it, so any of the three suits your square once your gauge matches. Check the label.
Yarn
Worsted / Aran weight 4 acrylic or cotton blend, in 3 colours (Red, Cream and Gold)
| Detail | |
|---|---|
| Yarn category | 4 |
| Metres per 100 g | About 150 to 220 m per 100 g, the usual range for worsted and Aran yarn (weight 4). Check your yarn label. |
Colours
| Colour | Used for | Amount |
|---|---|---|
| Red | Centre (Rounds 1 to 3) | 5 m / 5 yd |
| Cream | Centre Round 4 and the Frame (Rounds 1 to 4) | 25 m / 27 yd |
| Gold | Cap and hanging loop | 2 m / 2 yd |
Hooks
- 5 mm (US H/8) for the squares, join and border; 4 mm (US G/6) for the appliques
Supplies
- Yarn needle
- Scissors
- Stitch markers
- Pins
:::tips Materials
- Choose a smooth acrylic or cotton blend in worsted weight. Very fuzzy yarn hides the clusters and the motifs lose their crisp edges.
- Check your gauge on one Solid Centre before you buy yarn for a whole blanket.
- Buy all the Cream for a blanket from one dye lot; it is the colour you see most. :::
Gauge and finished size
The bauble square measures 18 cm / 7 in when Rounds 1 to 3 of a Solid Centre measure 8.5 cm / 3.25 in. Your bauble centre is a circle, not a Solid Centre. So you make your swatch as a separate piece: three solid rounds worked with The Solid Corner below, written out round by round in Snowflake Granny Square Pattern: Free Step by Step Photo Guide. Always make a gauge swatch and compare it to the pattern gauge, whatever size your hook is, as the Craft Yarn Council states in “Steel Crochet Hook & Crochet Thread Sizes”. Measure it flat. UK patterns call gauge tension.
Rnds 1 to 3 of a Solid Centre = 8.5 cm / 3.25 in square. Finished square = 18 cm / 7 in
Hook: 5 mm (US H/8) for the squares, join and border; 4 mm (US G/6) for the appliques
If your swatch is too big
You crochet loosely. Use a smaller hook and make a new swatch.
If your swatch is too small
You crochet tightly. Use a bigger hook and make a new swatch.
A correct stitch count can still cup or ruffle with a different yarn or tension. If a flat piece cups, try a bigger hook. If it ruffles, try a smaller hook.
Abbreviations in US and UK terms
The bauble square pattern is written in US terms; the UK name of each stitch sits in the same row. Read Round 4 with care. It uses four stitch heights, and you meet a different UK name for each one: US single crochet is UK double crochet, half double crochet is half treble, double crochet is treble and treble is double treble, according to the Craft Yarn Council “Crochet Abbreviations Master List”. Learned in UK terms? Read each name one step up.
| Abbreviation | Meaning | In plain words |
|---|---|---|
| ch | chain | Yarn over and pull through the loop on the hook. |
| sl st | slip stitch | Insert the hook, yarn over and pull through the stitch and the loop on the hook. |
| sc | single crochet (UK: double crochet) | Insert the hook, pull up a loop, yarn over and pull through both loops. |
| hdc | half double crochet (UK: half treble) | Yarn over, insert the hook, pull up a loop, yarn over and pull through all 3 loops. |
| dc | double crochet (UK: treble) | Yarn over, insert the hook, pull up a loop, then pull through 2 loops twice. |
| tr | treble crochet (UK: double treble) | Yarn over twice, insert the hook, pull up a loop, then pull through 2 loops three times. |
| st(s) | stitch(es) | One finished stitch. You count these. |
| sp(s) | space(s) | |
| Rnd(s) | round(s) | One trip around the piece. |
| rep | repeat | |
| ring | magic ring |
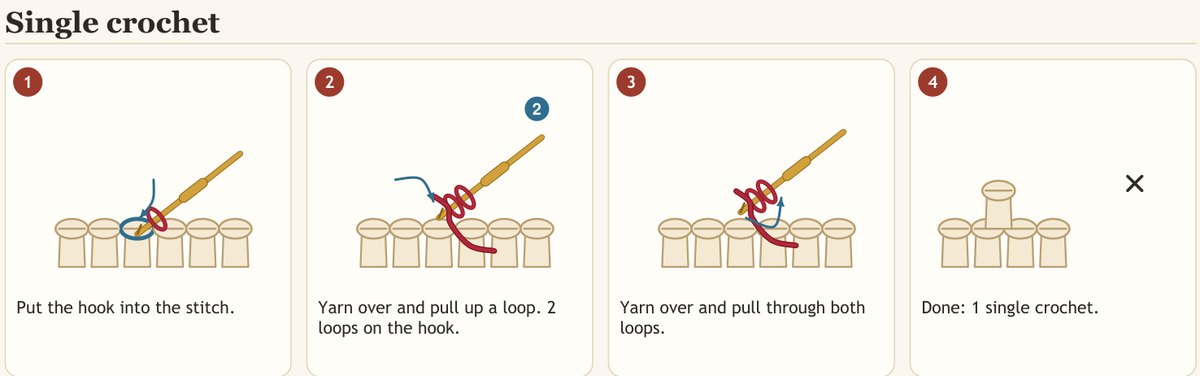
You work the middle of each Round 4 side, the last Frame round and every row of the cap in single crochet.
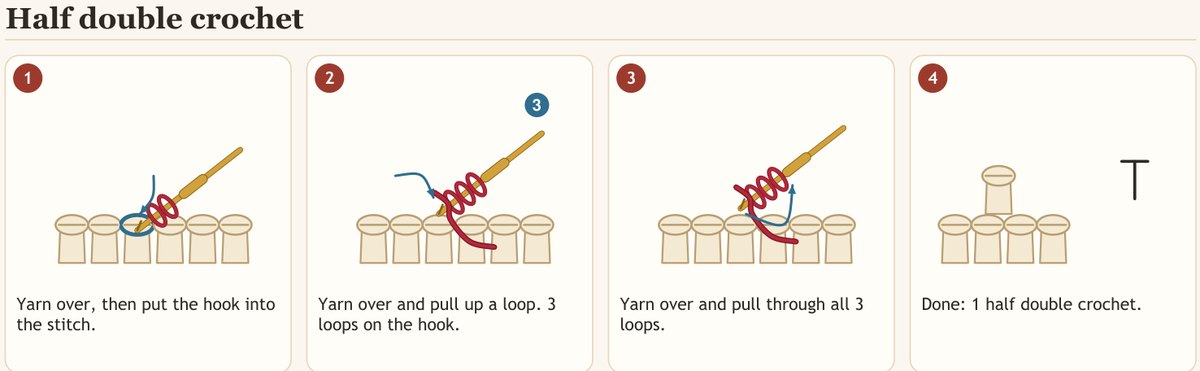
Round 4 places two half double crochet on each side of the single crochet, so the edge rises gently toward the corners.
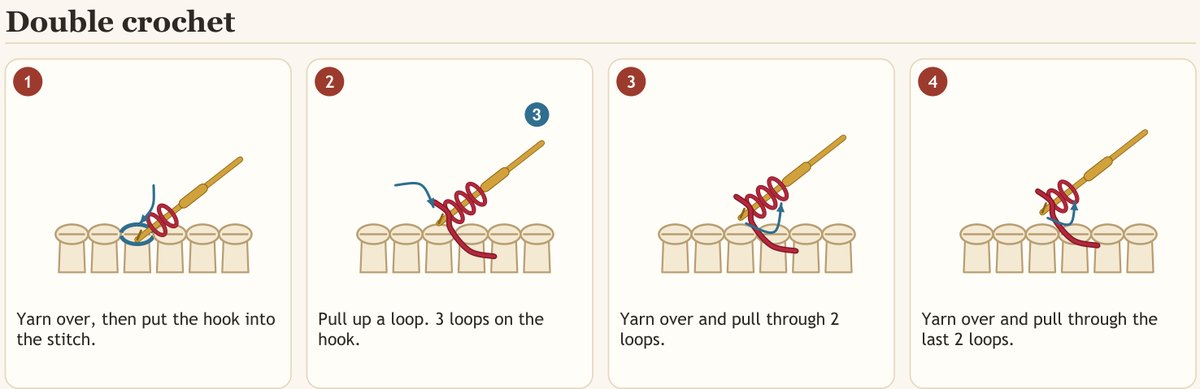
Every stitch of your red circle and every granny cluster in the Frame is a double crochet.
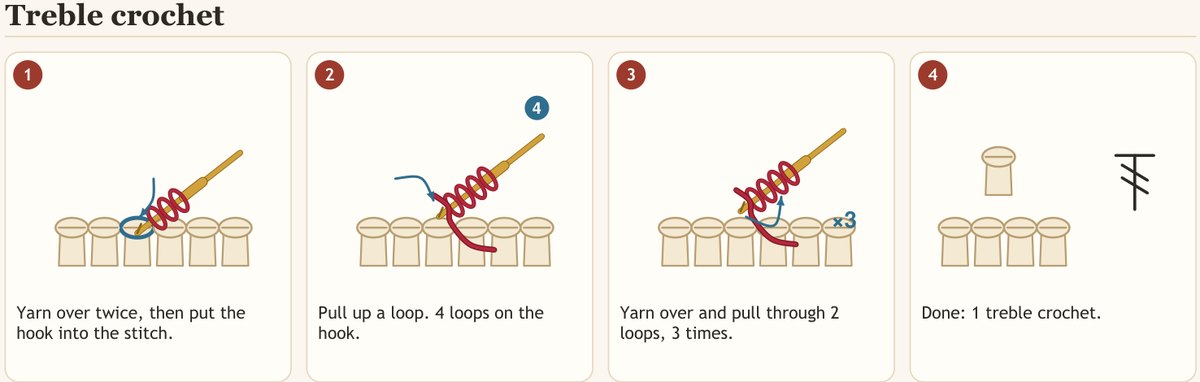
The treble crochet is the tallest stitch here, and you use it only in the four corners of Round 4.
Techniques used in this square
Seven techniques build this square: the magic ring, starting and joining rounds, joining a new colour, the solid corner, granny clusters, sewing the appliques and the surface chain. Four of them make the square. The solid corner is for the gauge swatch only. The last two finish the bauble, because you sew on the cap and chain the loop over the top.
Magic Ring
Wrap the yarn twice around two fingers, insert the hook under both strands, pull up a loop and ch 1 (this ch does not count). Work the stitches of Rnd 1 into the ring, then pull the tail to close the centre tightly.
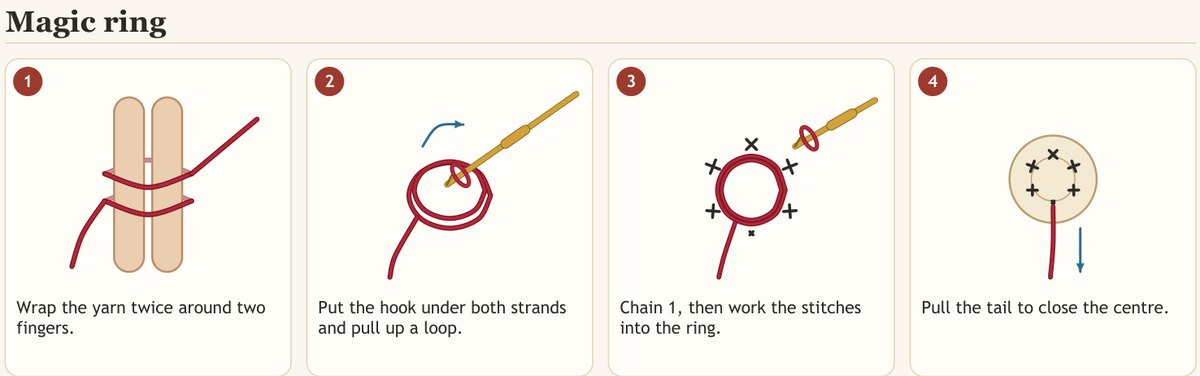
You start the red circle with a magic ring, so the middle of the bauble closes with no hole.
Starting and Joining Rounds
The squares are worked in joined rounds with the right side facing you; you never turn. Start each round with ch 3, which counts as the first dc. If the round begins with a tr, start with ch 4 instead (counts as the first tr); if it begins with an sc, start with ch 1 (does not count). Each round is written as one full repeat: the starting chain takes the place of the first stitch of the first repeat. End every round with a sl st in the top of the starting chain (or in the first sc).
Round 4 of the bauble begins with a treble, so you start it with ch 4.
Joining a New Colour
When a round names a new colour, fasten off the old colour and join the new one with a sl st in the place where the round begins: any corner sp on a square round, any loop on a flower round, or any st on a circle round. Leave 10 cm / 4 in tails and weave them into stitches of the same colour.
The Solid Corner
Eight of the centres use solid rounds: (2 dc, ch 2, 2 dc) in each corner sp and 1 dc in every st along the sides. Each round adds 4 sts to every side: 3, 7, then 11.
The bauble centre does not use this corner, because Round 4 squares the circle instead. You need it for the gauge swatch only.
Granny Clusters
A cluster is 3 dc worked into the same place. In the Frame, Rnd 1 places the clusters into stitches; Rnds 2 and 3 place them into the ch-1 sps of the round below, with ch 1 between clusters and (3 dc, ch 2, 3 dc) in every corner.
Sewing the Appliques
Pin each piece in place first. With the piece’s own yarn tail, sew small stitches through the outer loops of the piece and into the square behind it, about every second stitch. Weave the tail in on the back of the square.
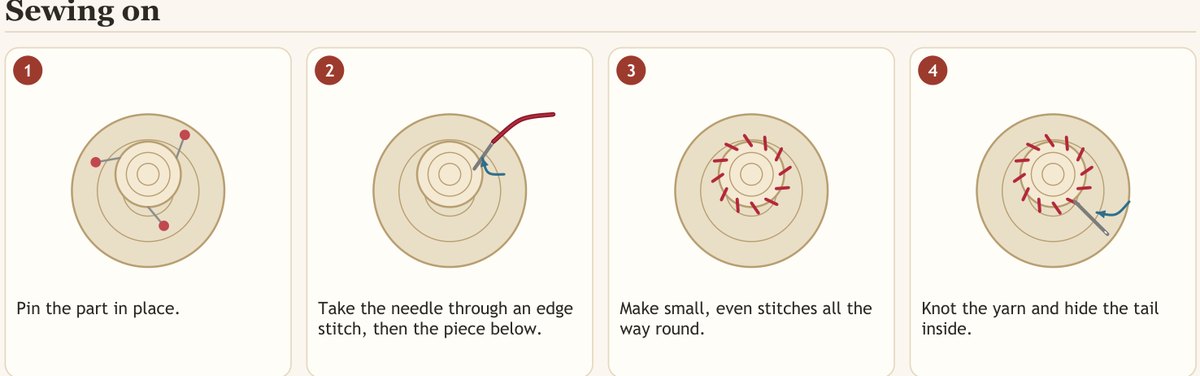
The strip shows you how to pin a piece and sew it down with small stitches, which is how the gold cap goes onto the red circle.
Surface Slip Stitch and Surface Chain
Hold the yarn at the back of the work. Insert the hook from front to back between two stitches, pull up a loop, then insert the hook in the next space, pull up a loop and draw it through the loop on the hook. Keep it loose so the fabric does not pucker. A surface chain is the same stitch worked in a curve.
The gold hanging loop is a surface chain, so you work it on the finished square instead of making it as a separate piece.
:::tips Techniques
- Practise the magic ring and the solid corner on a scrap before your first square.
- Keep the beginning ch 3 snug; a loose ch 3 leaves a gap at the seam of the round.
- Sew the appliques with the yarn tail of the piece itself and a blunt yarn needle. :::
The basic square, from the first ring to the first cluster round, is in How to Crochet a Granny Square for Beginners if you have never made one.
Bauble granny square pattern, round by round
The bauble granny square is worked in three parts: the red circle squared off in cream, the cream Frame, then the gold cap as a separate piece. Make them in that order. Count every round.
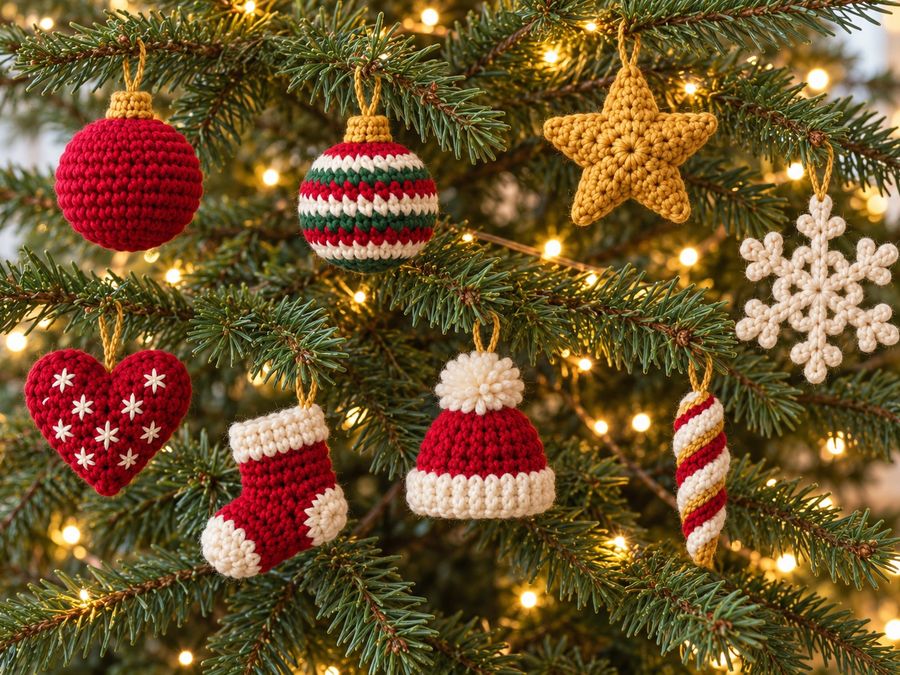
A round red bauble with a gold cap and a gold hanging loop, squared off in cream. Yarn: Red 5 m, Cream 25 m, Gold 2 m.
Overview
| Detail | |
|---|---|
| Make | 1 |
| Parts made separately | Centre x 1, Cap x 1 |
| Rounds and rows | 8 |
| Difficulty | Medium |
| What it involves | You change colour, several parts are sewn together, you turn at the end of each row. |
Centre
Your centre is a circle that you square off in one round: three red rounds of double crochet, then a cream round that grows tall at the corners and short in the middle of each side. Watch the corners.
Colours: Red, Cream · Make: 1
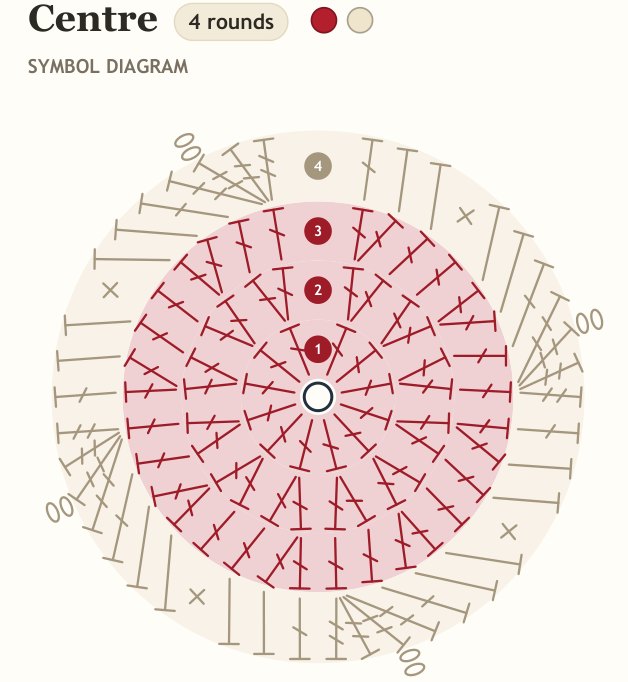
The diagram shows you all four centre rounds, with the four ch-2 corners of Round 4 marked by small chain ovals.
Round 1
Quick read: 12 dc in ring. (12 dc)
- Use Red and make a magic ring.
- Work 12 dc into the ring.
- Pull the tail to close the ring.
Stitch count: 12 dc
Round 2
Quick read: 2 dc in each st around. (24 dc)
- Work 2 dc in each stitch around (12 stitches become 24).
Stitch count: 24 dc
Round 3
Quick read: *dc in each of next 2 sts, 2 dc in next st; rep from * 7 more times. (32 dc)
- Work 1 dc in each of the next 2 stitches.
- Work 2 dc in the next stitch.
- Repeat steps 1 and 2 seven more times (8 times in all).
Stitch count: 32 dc Check: 8 repeats x 4 sts = 32 Positions: Increases in every 3rd stitch of the round before, starting with stitch 3 (8 in all).
Round 4
Quick read: *(2 tr, ch 2, 2 tr) in next st, dc in next st, hdc in each of next 2 sts, sc in next st, hdc in each of next 2 sts, dc in next st; rep from * 3 more times. (44 sts, 4 ch-2 sps)
- Change to Cream and work 2 tr, ch 2 and 2 tr, all in the next stitch.
- Work 1 dc in the next stitch.
- Work 1 hdc in each of the next 2 stitches.
- Work 1 sc in the next stitch.
- Work 1 hdc in each of the next 2 stitches.
- Work 1 dc in the next stitch.
- Repeat steps 1 to 6 three more times (4 times in all).
Stitch count: 44 sts Check: 4 repeats x 11 sts = 44 Positions: Stitch groups in every 8th stitch of the round before, starting with stitch 1 (4 in all). What it looks like now: The piece is growing wider. It has 44 stitches around after 4 rounds.
Continue with the Frame (Frame Rnds 1 to 4) in Cream.
Count table: Centre
| Round | Start count | Change | End count |
|---|---|---|---|
| 1 | MR | +12 | 12 dc |
| 2 | 12 | +12 | 24 dc |
| 3 | 24 | +8 | 32 dc |
| 4 | 32 | +12 | 44 sts |
The Frame (all 12 squares)
You work the Frame in Cream straight onto Round 4. So count 11 sts along each side first: 2 tr, 1 dc, 2 hdc, 1 sc, 2 hdc, 1 dc and 2 tr.
Every square finishes with the same four Cream rounds. This is what makes the twelve designs the same size, so any square joins to any other. Each centre ends with 11 sts along every side and a ch-2 sp at each corner; the Frame starts from there.
Colour: Cream
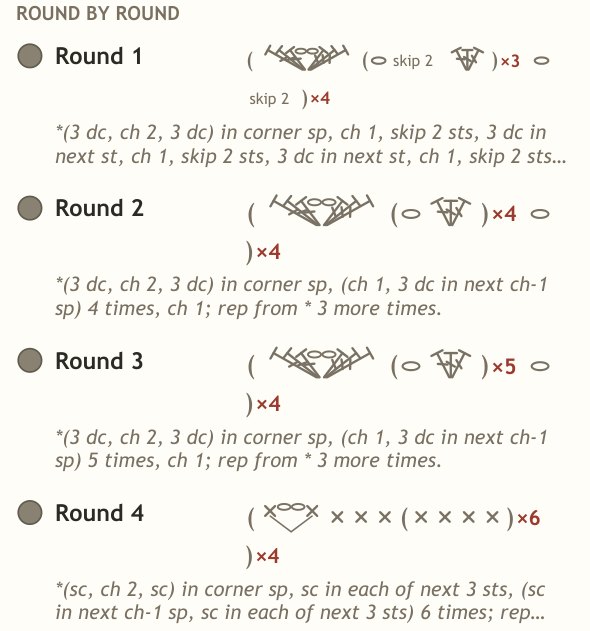
Rnd 1 sets three clusters along each side, Rnds 2 and 3 each add one more, and you close the Frame with Rnd 4 in single crochet.
Frame Rnd 1: *(3 dc, ch 2, 3 dc) in corner sp, ch 1, skip 2 sts, 3 dc in next st, ch 1, skip 2 sts, 3 dc in next st, ch 1, skip 2 sts, 3 dc in next st, ch 1, skip 2 sts; rep from * 3 more times. (60 dc, 4 ch-2 sps, 16 ch-1 sps) Frame Rnd 2: *(3 dc, ch 2, 3 dc) in corner sp, (ch 1, 3 dc in next ch-1 sp) 4 times, ch 1; rep from * 3 more times. (72 dc, 4 ch-2 sps, 20 ch-1 sps) Frame Rnd 3: *(3 dc, ch 2, 3 dc) in corner sp, (ch 1, 3 dc in next ch-1 sp) 5 times, ch 1; rep from * 3 more times. (84 dc, 4 ch-2 sps, 24 ch-1 sps) Frame Rnd 4: *(sc, ch 2, sc) in corner sp, sc in each of next 3 sts, (sc in next ch-1 sp, sc in each of next 3 sts) 6 times; rep from * 3 more times. (116 sc, 4 ch-2 sps)
Fasten off and weave in the ends. Each side now has 29 sc between the corner ch-2 sps, and the square measures about 18 cm / 7 in.
:::tips The Frame
- Work the Frame in one colour without cutting the yarn between rounds: sl st into the next corner sp to reach the start of the next round.
- In Frame Rnd 1 the skips of 2 sts place three clusters evenly along each side. Count them before you finish the round: 3 clusters between the corners.
- If your squares come out smaller or larger than 18 cm / 7 in, change the hook for the Frame only; the centres can stay as they are. :::
Cap (Gold)
The cap is the only part you make on its own, in rows with the 4 mm (G-6) hook, so you turn at the end of every row.
Colour: Gold · Make: 1
Foundation chain
Quick read: ch 5. (5 ch)
- Use Gold and make a slip knot, then ch 5.
Stitch count: 5 ch
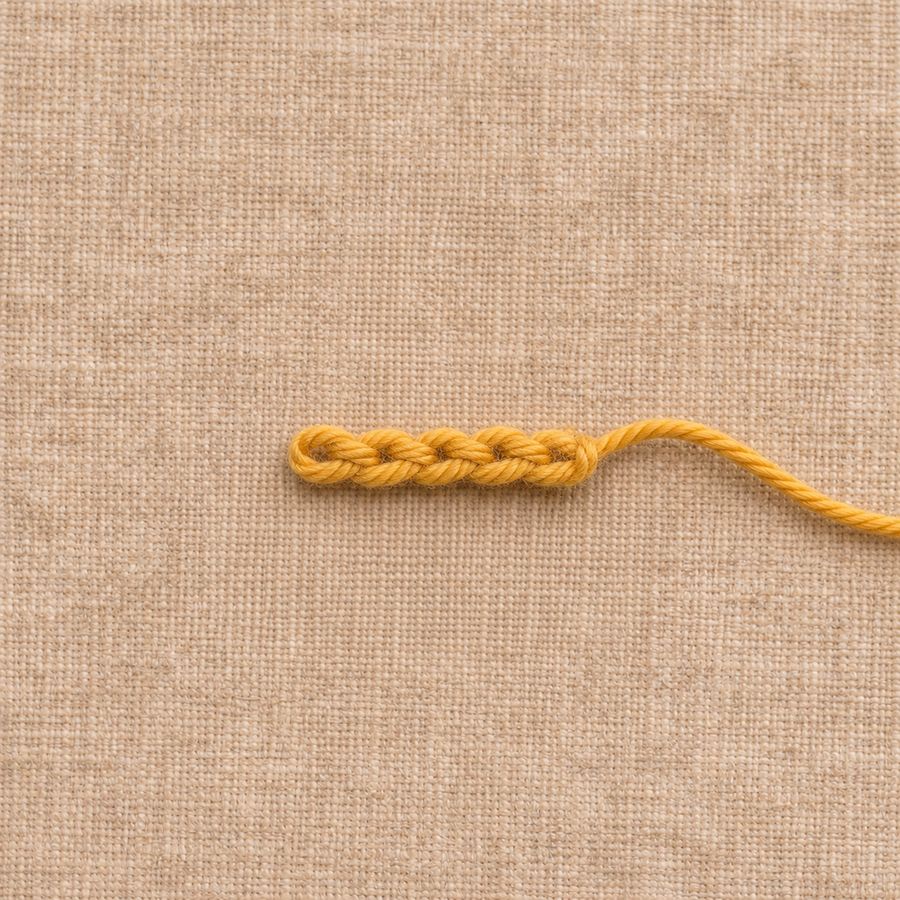
Your foundation chain has 5 ch, counted without the loop on the hook.
Row 1
Quick read: sc in 2nd ch from hook, sc in each of next 3 ch. (4 sc)
- Work 1 sc in the 2nd chain from the hook.
- Work 1 sc in each of the next 3 chains.
Stitch count: 4 sc Check: 1 + 3 = 4
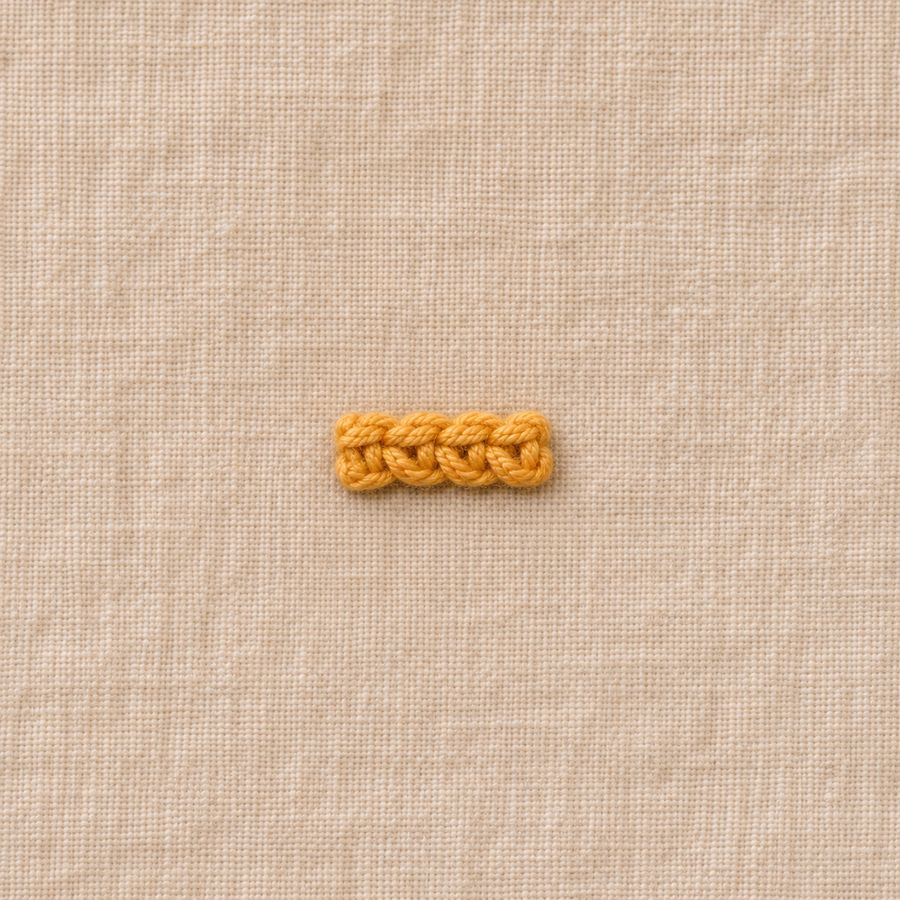
Row 1 gives you 4 sc, one fewer than the chain, because the first chain is skipped.
Rows 2 to 3
Quick read: ch 1, turn, sc in each st across. (4 sc)
- Ch 1 and turn. This ch 1 does not count as a stitch.
- Work 1 sc in each stitch to the end of the row (4 stitches).
- Work this row 2 times in all: Rows 2 and 3.
Stitch count: 4 sc (at the end of each row) What it looks like now: A flat piece 4 stitches wide, after 3 rows.
Fasten off, leaving a tail.
Count table: Cap
| Row | Start count | Change | End count |
|---|---|---|---|
| Foundation chain | - | - | 5 ch |
| 1 | 5 | -1 | 4 sc |
| 2 | 4 | 0 | 4 sc |
| 3 | 4 | 0 | 4 sc |
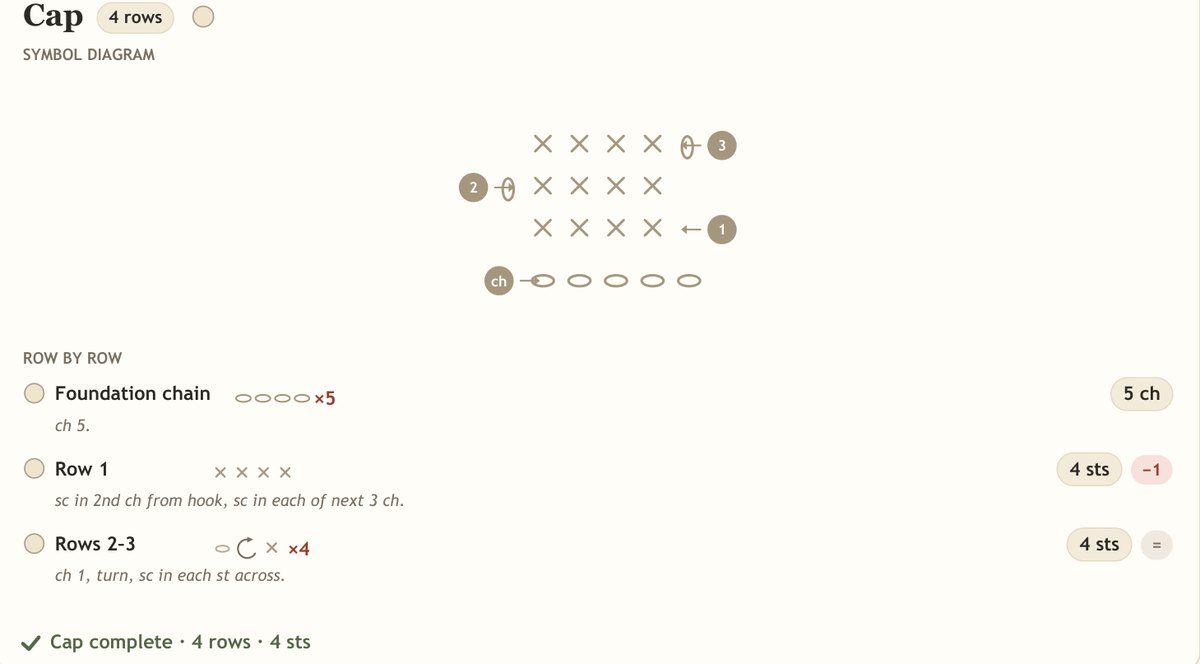
The cap diagram shows you the turning chain at the start of Rows 2 and 3 and 4 sc in every row.
Finishing and blocking the bauble
Block the square and the cap flat first, then sew the cap to the top of the red circle and work the gold loop above it. Blocking comes first because a flat cap sits square on the circle. Keep your cap tail long. You sew with it.
Blocking
Before you sew the Bauble, pin each part flat on a towel. Matching parts should be the same size. Mist them lightly with water and let them dry. Do not iron them.
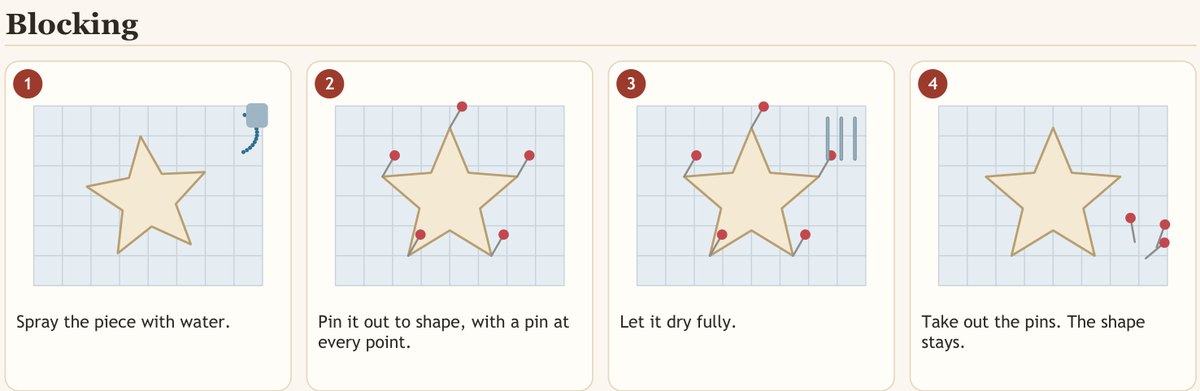
The strip pins a star on a board; for your square and cap, you pin them flat on a towel first, then mist them and let them dry.
Finishing
-
Decide which side of the square is the top. Sew the cap to the red circle, centred on that side.
-
With Gold, make a hanging loop above the cap: surface chain stitch a small loop of about 2.5 cm / 1 in from the top of the cap.
:::tips Bauble
- In Rnd 3 the increases spread evenly; if your circle ripples, go down half a hook size for Rnds 1 to 3.
- Work the surface chain loop with the yarn held under the fabric and the hook on top, so the loop stands up a little from the square. :::
Common mistakes and fixes
The four mistakes in the bauble square show up at Round 3, in the cap rows or at the colour change. A count catches the first three.
| Problem | Cause | Fix |
|---|---|---|
| You have 31 stitches after Round 3 instead of 32. | An increase was missed. | Count the increases. There should be 8. Undo back to the missing one and work it again. |
| The piece grows by 1 stitch every row. | The turning ch 1 was worked as a stitch. | Skip the ch 1. You should have 4 stitches at the end of Row 3. |
| Row 1 has 5 stitches instead of 4. | The first stitch went into the 1st chain from the hook. | Start in the 2nd chain from the hook. |
| A small step shows where the colour changes. | The new colour was started on a new stitch. | Finish the last stitch of the old colour with the new colour. Keep the steps at the back. |
Troubleshooting for this piece
Two problems show up once your bauble square takes shape: holes at the increases and a different size. Tension, or a thicker or thinner yarn, causes the second.
| Problem | Cause | Fix |
|---|---|---|
| Small holes show at the increases | The first stitch after an increase is loose, or the increase is in the wrong place | Pull the stitch after each increase snug. Check the Positions line for where each increase goes. Use a slightly smaller hook. |
| The finished piece is bigger or smaller than the size given | Your tension is different from the gauge, or the yarn is thicker or thinner | Make a gauge swatch and compare it with the Gauge section. Change the hook size to match, or use the yarn named in Materials. |
Joining the bauble square into a Christmas granny square blanket
Yes, the bauble square joins any other square in the set, because every Frame ends with 29 single crochet along each side. Same edge, same size. The join, the border and three blanket layouts are on Christmas Granny Square Patterns: 12 Free Squares and a Blanket. In a blanket, the granny square bauble is one of twelve same-size blocks, so you can place it anywhere. If you searched for a christmas ornament granny square to hang on the tree, those 3D baubles are on Crochet Christmas Ornament Patterns: 15 Types to Make. Every free guide you can make next is listed on Free Crochet Patterns with Step by Step Photos.
Care and washing
- Weave in every end along stitches of the same colour, taking each tail in two directions so it cannot work loose.
- Block single squares before joining if they are not quite the same size: pin each to 18 cm / 7 in on a towel, mist with water and leave to dry.
- Block the finished blanket after the border in the same way.
- Hand wash or use a gentle cool wash in a laundry bag, then dry flat. Do not tumble dry the appliques.
Questions makers ask
How big is a bauble granny square?
A finished bauble granny square measures 18 cm / 7 in across, with 29 single crochet along each side after the last Frame round. Check your gauge on a Solid Centre first: Rounds 1 to 3 should measure 8.5 cm / 3.25 in, because the bauble's own centre is a circle and cannot be measured that way.
How much yarn does one bauble granny square use?
One bauble granny square uses 5 m (5 yd) of Red, 25 m (27 yd) of Cream and 2 m (2 yd) of Gold, all 4, medium (worsted) yarn. Red works the three circle rounds. Cream works the square-off round and the four Frame rounds, so it is by far the largest amount.
Is the bauble crocheted into the square or sewn on?
Mostly crocheted in. The red circle is the centre of the square, and one cream round of treble, double, half double and single crochet squares it off. Only the gold cap is a separate piece, worked in rows and sewn on. The hanging loop is a surface chain worked over the square.
How do I keep the red circle flat?
Place the Round 3 increases evenly: one 2 dc increase in every third stitch, 8 in all, for 32 dc. If the circle still ripples, go down half a hook size for Rounds 1 to 3 only. Count 31 stitches and an increase is missing, so undo back to it and work it again.
Is the bauble granny square pattern in US or UK terms?
US terms, with the UK name of each stitch in the abbreviations table. Round 4 uses four stitch heights, so read them carefully: US sc is UK double crochet, hdc is UK half treble, dc is UK treble and tr is UK double treble. A UK reader works each one a size up in name.
Can the bauble square join the other Christmas granny squares?
Yes. All twelve squares in the set finish with the same four cream Frame rounds, 29 single crochet per side and about 18 cm / 7 in across, so the bauble square joins any other square in any order. The join, the border and three blanket layouts are on the Christmas Granny Square Patterns page.