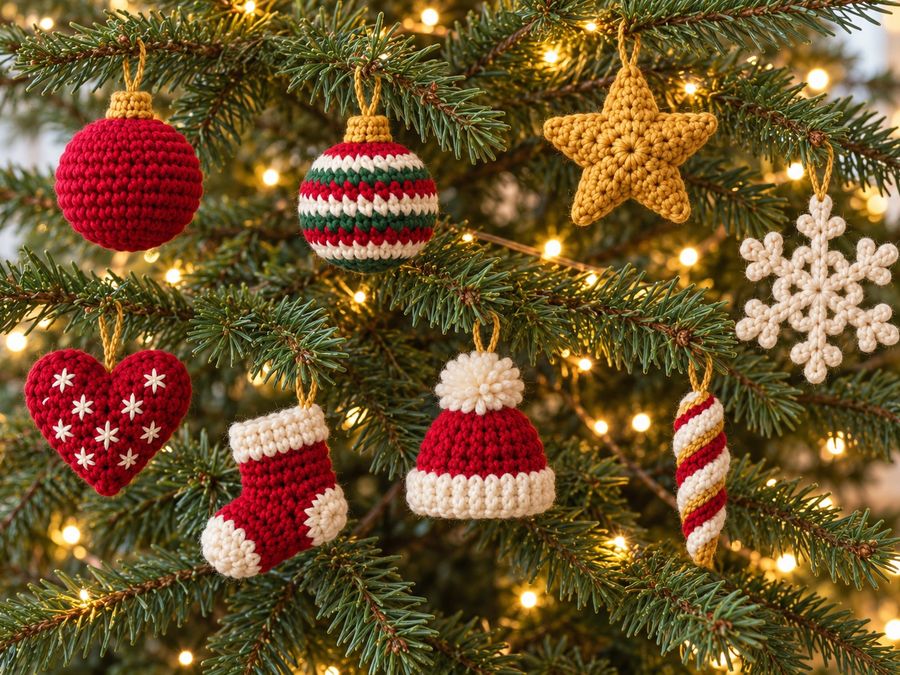
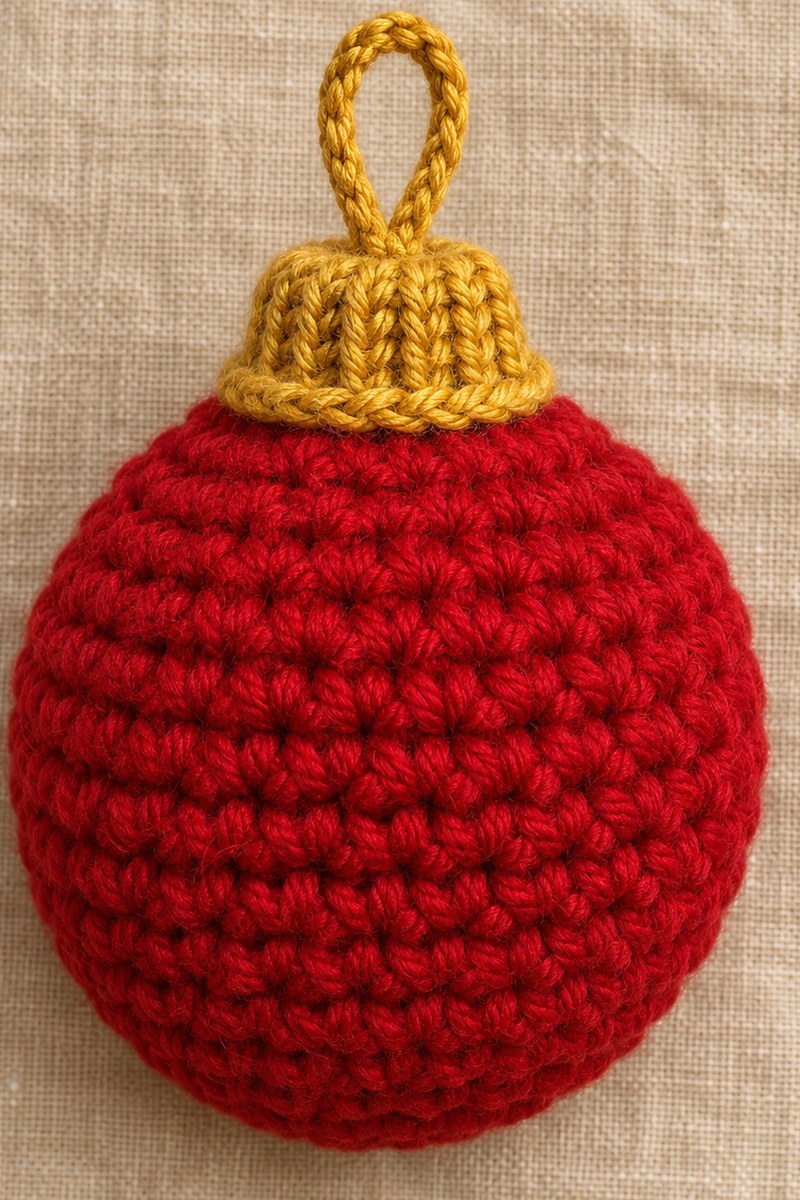
These free crochet Christmas ornament patterns are 20 small ornaments, from a Classic Bauble to a Mini Sweater, each written in full with the stitch count at the end of every round and row. All twenty use weight 4 (medium, worsted) yarn in red, cream, green and gold, plus a little brown, on a 3.5 mm (E-4) hook, and each finishes at about 4.5 to 12 cm (1.75 to 4.75 in).
You get three baubles, two stars, two trees, two hearts and eleven single shapes, from a snowflake to a mini sweater. Most are worked in the round from a magic ring and lightly stuffed. The flat ones are blocked instead. Make all 20 and you can dress a small tree.
The 20 free crochet Christmas ornament patterns in this set
Twenty crochet Christmas ornaments sit in this set, and every one is written in full further down this page: three baubles, a flower medallion, two stars, a bell, two trees, a snowflake, two hearts, an icicle, a mini wreath, a mini stocking, a mitten, a gift box, a pompom hat, a crescent moon and a mini sweater. Each card gives you the size, the build, the parts, the colours, the yarn and the difficulty the pattern itself gives that ornament, Easy or Medium. You need one hook for all of them, a 3.5 mm (E-4). That keeps the set even.
Still choosing which kind of ornament to make? The guide Crochet Christmas Ornament Patterns: 15 Types to Make compares fifteen ornament types by yarn, hook and skill. This page is for making them.
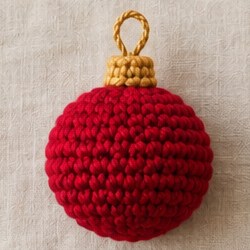
Classic Bauble
- Size
- About 5 cm / 2 in across, 7.5 cm / 3 in tall with cap and loop
- Build
- Spiral rounds from a magic ring, stuffed
- Parts
- Ball x 1, Cap x 1
- Colours
- Red (ball), Gold (cap and loop)
- Yarn
- Weight 4 (medium, worsted), about 13 m / 14 yd in total
- Hook
- 3.5 mm (E-4)
- Difficulty
- Medium
Striped Bauble
- Size
- About 5 cm / 2 in across, 7.5 cm / 3 in tall with cap and loop
- Build
- Spiral rounds in one round stripes, stuffed
- Parts
- Ball x 1, Cap x 1
- Colours
- Red, Cream, Green (ball), Gold (cap and loop)
- Yarn
- Weight 4 (medium, worsted), about 13 m / 14 yd in total
- Hook
- 3.5 mm (E-4)
- Difficulty
- Medium
Teardrop Bauble
- Size
- About 5 cm / 2 in across, 9 cm / 3.5 in tall with cap and loop
- Build
- Spiral rounds in 6 Red and Cream sections, stuffed, Gold outlines
- Parts
- Body x 1, Cap x 1
- Colours
- Red, Cream (body), Gold (cap, outlines and loop)
- Yarn
- Weight 4 (medium, worsted), about 13 m / 14 yd in total
- Hook
- 3.5 mm (E-4)
- Difficulty
- Medium
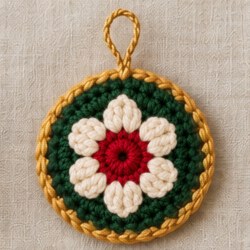
Flower Medallion
- Size
- About 6.5 cm / 2.5 in across
- Build
- Two flat layers joined with a Gold round
- Parts
- Front x 1, Back x 1
- Colours
- Red (flower centre), Cream (petals), Green (front and back), Gold (edge and loop)
- Yarn
- Weight 4 (medium, worsted), about 11 m / 12 yd in total
- Hook
- 3.5 mm (E-4)
- Difficulty
- Medium
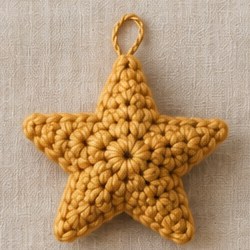
Puffy Star
- Size
- About 7 cm / 2.75 in across
- Build
- Two stars with 5 points each, joined and lightly stuffed
- Parts
- Star x 2, Points x 10
- Colours
- Gold
- Yarn
- Weight 4 (medium, worsted), about 10 m / 11 yd in total
- Hook
- 3.5 mm (E-4)
- Difficulty
- Easy
Flat Star
- Size
- About 7.5 cm / 3 in across
- Build
- One flat layer with 5 points and a Red edge
- Parts
- Star x 1, Points x 5
- Colours
- Cream (star), Red (edge), Gold (loop)
- Yarn
- Weight 4 (medium, worsted), about 6 m / 7 yd in total
- Hook
- 3.5 mm (E-4)
- Difficulty
- Medium
Christmas Bell
- Size
- About 6 cm / 2.4 in across the rim, 6.5 cm / 2.5 in tall
- Build
- Rounds from a magic ring with a flared rim, not stuffed; stuffed clapper
- Parts
- Bell x 1, Clapper x 1
- Colours
- Gold (bell and clapper), Cream (band), Red (rim)
- Yarn
- Weight 4 (medium, worsted), about 12 m / 13 yd in total
- Hook
- 3.5 mm (E-4)
- Difficulty
- Medium
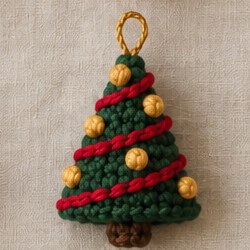
Mini Cone Tree
- Size
- About 4.5 cm / 1.75 in across the base, 7 cm / 2.75 in tall with trunk
- Build
- Spiral rounds into a cone, stuffed; chain garland and French knots
- Parts
- Tree x 1, Trunk x 1
- Colours
- Green (tree), Red (garland), Gold (baubles and loop), Brown (trunk)
- Yarn
- Weight 4 (medium, worsted), about 11 m / 12 yd in total
- Hook
- 3.5 mm (E-4)
- Difficulty
- Medium
Flat Tree
- Size
- About 8.5 cm / 3.25 in wide, 8.5 cm / 3.25 in tall with trunk
- Build
- Rows from a foundation chain, Cream edge, trunk worked onto the edge
- Parts
- Tree x 1
- Colours
- Green (tree), Cream (edge), Red (baubles), Brown (trunk), Gold (loop)
- Yarn
- Weight 4 (medium, worsted), about 8 m / 9 yd in total
- Hook
- 3.5 mm (E-4)
- Difficulty
- Medium
Snowflake
- Size
- About 8.5 cm / 3.25 in across, arm tip to arm tip
- Build
- 3 rounds with 6 chain arms, starched
- Parts
- Snowflake x 1
- Colours
- Cream (snowflake), Gold (loop)
- Yarn
- Weight 4 (medium, worsted), about 5 m / 5 yd in total
- Hook
- 3.5 mm (E-4)
- Difficulty
- Medium
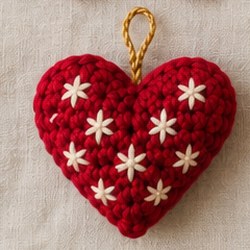
Puffy Heart
- Size
- About 6.5 cm / 2.5 in wide, 6 cm / 2.4 in tall
- Build
- Two bumps joined into one body, stuffed; cross stitch stars
- Parts
- Bumps x 2
- Colours
- Red (heart), Cream (stars), Gold (loop)
- Yarn
- Weight 4 (medium, worsted), about 10 m / 11 yd in total
- Hook
- 3.5 mm (E-4)
- Difficulty
- Easy
Scandi Heart
- Size
- About 7 cm / 2.75 in wide, 6.5 cm / 2.5 in tall
- Build
- Rows from 2 chains, two bumps, Red edge, running stitch
- Parts
- Heart x 1, Flower x 1, Leaves x 4
- Colours
- Cream (heart), Red (edge, stitching and flower), Green (leaves), Gold (loop)
- Yarn
- Weight 4 (medium, worsted), about 8 m / 9 yd in total
- Hook
- 3.5 mm (E-4)
- Difficulty
- Medium
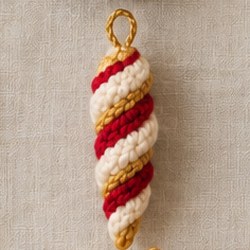
Spiral Icicle
- Size
- About 2 cm / 0.75 in across, 9 cm / 3.5 in long
- Build
- 3 stitches in each chain, then a Red row and a Gold row along the edge; it curls into a spiral
- Parts
- Icicle x 1
- Colours
- Cream (icicle), Red and Gold (spiral stripes and loop)
- Yarn
- Weight 4 (medium, worsted), about 8 m / 9 yd in total
- Hook
- 3.5 mm (E-4)
- Difficulty
- Medium
Mini Wreath
- Size
- About 6 cm / 2.4 in across
- Build
- A stuffed tube of 8 stitches joined into a ring
- Parts
- Ring x 1, Bow x 1, Berries x 5
- Colours
- Green (wreath), Gold (bow and loop), Red (berries)
- Yarn
- Weight 4 (medium, worsted), about 12 m / 13 yd in total
- Hook
- 3.5 mm (E-4)
- Difficulty
- Medium
Mini Stocking
- Size
- About 6.5 cm / 2.5 in tall, 5 cm / 2 in from heel to toe
- Build
- Spiral rounds from the toe, heel added at the end, lightly stuffed
- Parts
- Stocking x 1
- Colours
- Red (foot and leg), Cream (toe, heel and cuff), Gold (loop)
- Yarn
- Weight 4 (medium, worsted), about 13 m / 14 yd in total
- Hook
- 3.5 mm (E-4)
- Difficulty
- Medium
Mini Mitten
- Size
- About 4.5 cm / 1.75 in wide, 6.5 cm / 2.5 in tall
- Build
- Spiral rounds with a back loop cuff, pressed flat, thumb sewn on
- Parts
- Hand x 1, Thumb x 1
- Colours
- Green (mitten and thumb), Cream (cuff and snowflake), Gold (loop)
- Yarn
- Weight 4 (medium, worsted), about 10 m / 11 yd in total
- Hook
- 3.5 mm (E-4)
- Difficulty
- Medium
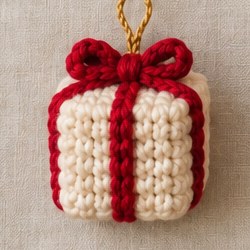
Gift Box
- Size
- About 4.5 cm / 1.75 in on each side
- Build
- 6 flat squares sewn into a box, lightly stuffed, chain ribbon
- Parts
- Square x 6, Bow x 1
- Colours
- Cream (box), Red (ribbon and bow), Gold (loop)
- Yarn
- Weight 4 (medium, worsted), about 20 m / 22 yd in total
- Hook
- 3.5 mm (E-4)
- Difficulty
- Medium
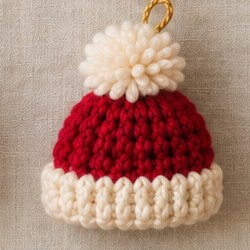
Pompom Hat
- Size
- About 5 cm / 2 in across, 6.5 cm / 2.5 in tall with pompom
- Build
- Spiral rounds, folded back loop brim, stuffed, sewn base, pompom
- Parts
- Hat x 1, Base x 1
- Colours
- Red (hat and base), Cream (brim and pompom), Gold (loop)
- Yarn
- Weight 4 (medium, worsted), about 15 m / 16 yd in total
- Hook
- 3.5 mm (E-4)
- Difficulty
- Medium
Crescent Moon
- Size
- About 7 cm / 2.75 in tall
- Build
- Two graded crescents joined and lightly stuffed
- Parts
- Moon x 2
- Colours
- Gold (moon), Cream (stars and loop)
- Yarn
- Weight 4 (medium, worsted), about 7 m / 8 yd in total
- Hook
- 3.5 mm (E-4)
- Difficulty
- Easy
Mini Sweater
- Size
- About 12 cm / 4.75 in across the sleeves, 6 cm / 2.4 in tall
- Build
- Two body pieces and two sleeves in rows, sewn together
- Parts
- Body x 2, Sleeves x 2
- Colours
- Green (body and sleeves), Cream (ribbing and band), Red (band), Gold (loop)
- Yarn
- Weight 4 (medium, worsted), about 16 m / 18 yd in total
- Hook
- 3.5 mm (E-4)
- Difficulty
- Medium
Each card stands for one ornament you make from start to finish, and you can read its pattern in the section with the same number:
- Classic Bauble: a red ball with a ribbed gold cap, and the base shape for the next two.
- Striped Bauble: the same ball, in stripes.
- Teardrop Bauble: a long point in six Red and Cream sections, outlined in Gold.
- Flower Medallion: two flat layers, a cream flower on the front, joined with a Gold edge.
- Puffy Star: two Gold stars, lightly stuffed.
- Flat Star: one cream layer with five points and a red edge.
- Christmas Bell: a gold bell with a cream band, a red rim and a clapper inside.
- Mini Cone Tree: a standing green cone with a red garland and gold French knots.
- Flat Tree: three green tiers in rows with a cream edge and red baubles.
- Snowflake: six cream arms with little branches.
- Puffy Heart: a plump red heart with ten cream cross stitch stars.
- Scandi Heart: a flat cream heart with a red edge, a running stitch border and a small flower.
- Spiral Icicle: cream, red and gold rows that curl into a spiral.
- Mini Wreath: a stuffed green tube joined into a ring, with a gold bow and five red berries.
- Mini Stocking: a red stocking with a cream toe, heel and cuff.
- Mini Mitten: a green mitten with a cream cuff and an embroidered snowflake.
- Gift Box: cream box, red ribbon and bow.
- Pompom Hat: you fold the cream brim up.
- Crescent Moon: gold crescent, small cream stars.
- Mini Sweater: a green sweater with a red and cream checked band across the chest.
Pattern Overview
Twenty different Christmas ornaments, enough to dress a small tree on their own. Most are worked in the round from a magic ring and lightly stuffed; the flat pieces (stars, tree, snowflake, heart) are worked in rounds or rows and blocked. Each ornament has its own size, colours, yarn amount and step by step instructions, with the stitch count at the end of every round and row.
The 20 Ornaments
| No. | Ornament | No. | Ornament |
|---|---|---|---|
| 1 | Classic Bauble | 11 | Puffy Heart |
| 2 | Striped Bauble | 12 | Scandi Heart |
| 3 | Teardrop Bauble | 13 | Spiral Icicle |
| 4 | Flower Medallion | 14 | Mini Wreath |
| 5 | Puffy Star | 15 | Mini Stocking |
| 6 | Flat Star | 16 | Mini Mitten |
| 7 | Christmas Bell | 17 | Gift Box |
| 8 | Mini Cone Tree | 18 | Pompom Hat |
| 9 | Flat Tree | 19 | Crescent Moon |
| 10 | Snowflake | 20 | Mini Sweater |
- Start with the Classic Bauble. Ornaments 2 and 3 use the same rhythm of increases, so they will feel easy afterwards.
- Make all 20 in the same yarn and hook so the set matches in size and colour.
- Keep a little bag of each colour beside you; most ornaments use two or three colours.
How to read this pattern
- Every round or row has its own heading, for example Round 3.
- Quick read is the short pattern line, for crocheters who already know the stitches.
- The numbered steps say the same thing in full, one action per line.
- Stitch count is how many stitches you should have at the end of the round or row.
- Check is a small sum that proves the stitch count.
- Positions tell you exactly which stitches get the increases, decreases or added parts.
- Each part ends with a count table. Tick off each round as you finish it.
Example: 1. Classic Bauble, Ball
Round 3 Quick read: (sc, inc) 6 times (18)
- Work 1 sc in the next stitch.
- Increase: work 2 sc in the next stitch.
- Repeat steps 1 and 2 five more times (6 times in all).
Stitch count: 18 sc Check: 6 repeats x 3 sts = 18 Positions: Increases in every 2nd stitch of the round before, starting with stitch 2 (6 in all).
General pattern notes
- US crochet terms throughout. UK terms are in the abbreviations table.
- Stuffed ornaments are worked in continuous spiral rounds. Do not join the rounds; place a stitch marker in the first st of each round and move it up as you go.
- Flat pieces are worked in rows. The ch 1 at the start of a row does not count as a stitch.
- The number in brackets at the end of each round or row is the stitch count at the end of it.
- Instructions in brackets are repeated the number of times stated: (sc 2, inc) 6 times means sc in the next 2 sts, then inc in the next st, six times in all.
- “With Cream” at the start of a round means change to Cream for that round (see Colour Changes).
- Every ornament ends with a hanging loop. Make them all the same length so the set hangs evenly.
- Every round and row ends with a Stitch count line. Count your stitches there before you go on.
- Count stitches from the first stitch of the round, where the marker is.
- Stitch positions such as stitches 3, 6 and 9 are counted from the first stitch of the round.
- Work through both loops of each stitch, unless the round says back loop only or front loop only.
- Decorative parts (arm) are not counted in the stitch count.
- Joining slip stitches are not counted in the stitch count.
- Weave in each end as soon as you finish a part, so the ends do not pile up at the end.
Time: the smaller flat ornaments take about 20 minutes each and the stuffed ones 40 to 60 minutes, so the whole set is roughly 12 to 15 hours of crochet. Left handed crocheters can follow the pattern as written; the ornaments come out mirrored, which makes no difference to any of the shapes.
Abbreviations
| Abbreviation | Meaning | In plain words |
|---|---|---|
| MR | magic ring | A loop of yarn you work the first round into, then pull closed. |
| ch | chain | Yarn over and pull through the loop on the hook. |
| sl st | slip stitch | Insert the hook, yarn over and pull through the stitch and the loop on the hook. |
| st(s) | stitch(es) | One finished stitch. You count these. |
| sc | single crochet (UK: double crochet) | Insert the hook, pull up a loop, yarn over and pull through both loops. |
| hdc | half double crochet (UK: half treble) | Yarn over, insert the hook, pull up a loop, yarn over and pull through all 3 loops. |
| dc | double crochet (UK: treble) | Yarn over, insert the hook, pull up a loop, then pull through 2 loops twice. |
| Rnd(s) | round(s) | One trip around the piece. |
| inc | 2 sc in the same st | Two stitches in one stitch. The piece grows by 1. |
| dec | sc 2 sts together (invisible decrease in rounds) | Two stitches worked together into one. The piece shrinks by 1. |
| sc2tog | sc 2 sts together | Two stitches worked together into one sc. |
| sc3tog | sc 3 sts together | Three stitches worked together into one sc. |
| BLO | back loop only | Put the hook under the back loop only. |
| picot | ch 3, sl st in the 3rd ch from the hook | A tiny bump made of chains, for decoration. |
Materials
Yarn
Worsted / Aran weight 4 acrylic or cotton blend, in 5 colours (amounts below)
| Detail | |
|---|---|
| Yarn category | 4 |
Colours
| Colour | Used for | Amount |
|---|---|---|
| Red | Pieces 1, 2, 3, 4, 6, 7, 8, 9, 11, 12, 13, 14, 15, 17, 18 and 20 | About 65 m / 71 yd |
| Cream | Pieces 2, 3, 4, 6, 7, 9, 10, 11, 12, 13, 15, 16, 17, 18, 19 and 20 | About 65 m / 71 yd |
| Green | Pieces 2, 4, 8, 9, 12, 14, 16 and 20 | About 50 m / 55 yd |
| Gold | Pieces 1, 2, 3, 4, 5, 6, 7, 8, 9, 10, 11, 12, 13, 14, 15, 16, 17, 18, 19 and 20 | About 45 m / 49 yd (mustard yellow, or a gold metallic worsted yarn) |
| Brown | Pieces 8 and 9 | About 2 m / 2 yd, for the two tree trunks |
Hooks
- 3.5 mm (US E/4): All pieces (1 to 20)
3.5 mm (US E/4), several sizes smaller than the yarn label suggests, so the fabric is firm and the stuffing does not show
Supplies
- About 30 g / 1 oz polyester fibrefill
- Yarn needle
- Scissors
- A stitch marker
- Pins
- Optional fabric stiffener or spray starch for the snowflake and bell
- Choose a smooth acrylic or cotton blend. Fuzzy yarn hides the stitches and the shapes lose their crisp edges.
- If your fabric looks loose or the stuffing shows through, go down to a 3.25 mm hook.
- Buy one ball of each colour: the amounts above are well under a standard 100 g ball.
Gauge
9 sc and 10 rows = 5 cm / 2 in in a flat swatch. Gauge is not critical, but a firm fabric matters
Hook: 3.5 mm (US E/4)
Make a gauge swatch
- Ch 10.
- Row 1: work 1 sc in the 2nd chain from the hook and in each chain to the end (9 sc).
- Rows 2 to 10: ch 1, turn, work 1 sc in each stitch to the end (9 sc).
- Fasten off and lay the swatch flat without stretching it.
- Measure it: 9 sc should be 5 cm / 2 in wide and 10 rows should be 5 cm / 2 in tall.
If your swatch is too big
You crochet loosely. Use a smaller hook and make a new swatch.
If your swatch is too small
You crochet tightly. Use a bigger hook and make a new swatch.
Target for your first piece
Your first piece, the Classic Bauble, should measure about 5 cm / 2 in across, 7.5 cm / 3 in tall with cap and loop.
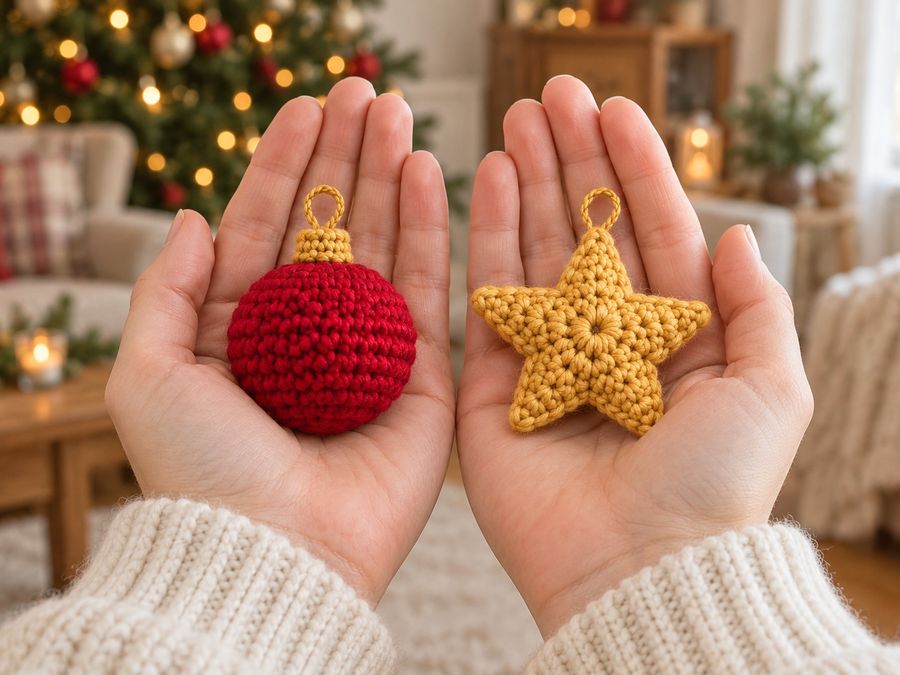 A Classic Bauble at about 5 cm (2 in) across fits in your palm.
A correct stitch count can still cup or ruffle with a different yarn or tension. If a flat piece cups, try a bigger hook. If it ruffles, try a smaller hook.
Stitches you will use
Every stitch and technique in this pattern is explained here, one step at a time. Read the ones you do not know before you start. The hook is held in your right hand in these steps. Left-handed crocheters mirror the directions.
Chain (ch)
- Make a slip knot and put it on the hook.
- Yarn over: wrap the yarn over the hook from back to front.
- Pull the yarn through the loop on the hook. That is 1 chain.
- Repeat steps 2 and 3 for each chain.
- Keep the chains loose and even, so it is easy to work into them.
- The loop on the hook is never counted as a chain.
Slip stitch (sl st)
- Put the hook into the stitch the pattern names.
- Yarn over.
- Pull the yarn through the stitch and through the loop on the hook in one move.
- One loop stays on the hook. A slip stitch adds almost no height.
Single crochet (sc)
- Put the hook into the stitch.
- Yarn over and pull up a loop. There are 2 loops on the hook.
- Yarn over again.
- Pull the yarn through both loops. One loop is left. That is 1 sc.
Half double crochet (hdc)
- Yarn over, then put the hook into the stitch.
- Yarn over and pull up a loop. There are 3 loops on the hook.
- Yarn over and pull through all 3 loops. One loop is left. That is 1 hdc.
Double crochet (dc)
- Yarn over, then put the hook into the stitch.
- Yarn over and pull up a loop. There are 3 loops on the hook.
- Yarn over and pull through the first 2 loops. There are 2 loops on the hook.
- Yarn over and pull through the last 2 loops. One loop is left. That is 1 dc.
Increase (inc)
- Work 1 stitch into the stitch, as normal.
- Work a second stitch of the same kind into the same stitch.
- You now have 2 stitches where there was 1, so the count goes up by 1.
- Unless the pattern says otherwise, an inc is 2 stitches of the kind named in that round.
Back loop only (BLO) and front loop only (FLO)
- Look at the top of a stitch. It is a V made of two loops.
- The loop nearer to you is the front loop. The loop farther away is the back loop.
- For BLO, put the hook under the back loop only. For FLO, put it under the front loop only.
- Finish the stitch as normal.
- The loop you did not use stays on the piece and makes a small ridge.
Picot
- A picot is a tiny loop of chains, closed with a slip stitch, that makes a small bump.
- Chain the number given in the Abbreviations table.
- Slip stitch into the stitch or chain the table names to close the loop.
- Pull the yarn snug so the picot stands up neatly.
Turning at the end of a row
- At the end of the row, chain the number the pattern gives. This is the turning chain.
- Turn your work so the other side faces you.
- Start the next row in the stitch the pattern names.
- A turning chain counts as a stitch only when the pattern says so.
Skipping stitches
- To skip a stitch, do not work into it.
- Go on to the next stitch the pattern names.
- The skipped stitch stays in the row or round below. It simply has no new stitch in it.
- Skipped stitches are already counted in the Start count, so use the Count table to check.
Working in a spiral
- Do not join the rounds and do not turn the work.
- Put a stitch marker in the first stitch of the round.
- When you reach the marked stitch, work it, then move the marker into the stitch you just made.
- The marker shows you where each round starts, so you can count each round.
Sewing pieces together
- Pin the pieces in place first.
- Thread a yarn needle with the long tail or with matching yarn.
- Sew small stitches through the outer loops of both pieces, one stitch for each stitch.
- Check from the front now and then that the pieces sit straight.
- Fasten off and weave in the end.
Fastening off and weaving in ends
- After the last stitch, cut the yarn and leave a tail.
- Pull the cut end all the way through the loop on the hook and pull it tight.
- Thread the tail onto a yarn needle.
- Weave it through the backs of the stitches for a few stitches in one direction, then back the other way.
- Trim the end close to the work. Do not trim the tail if you still need it for sewing.
Techniques
Magic Ring (MR)
Wrap the yarn twice around two fingers, insert the hook under both strands, pull up a loop and ch 1 (this ch does not count). Work the stitches of Rnd 1 into the ring, then pull the tail to close the centre tightly.
Invisible Decrease (dec in rounds)
Insert the hook into the front loop only of the next st, then into the front loop only of the following st (3 loops on the hook), yarn over and pull through 2 loops, yarn over and pull through the last 2 loops. It hides the decrease better than a standard sc2tog on stuffed pieces.
Colour Changes
Work the last stitch of the old colour until 2 loops remain on the hook, then finish it with the new colour. Leave 10 cm / 4 in tails and weave them in on the inside. For one round stripes, the small step at the colour change sits at the back of the ornament.
Tapestry Colour Change (Teardrop Bauble)
Lay the colour you are not using along the top of the round below and work your stitches over it, so it is carried inside. Change colour on the last stitch of each section, as for an ordinary colour change.
Surface Slip Stitch
Hold the yarn at the back of the work. Insert the hook from front to back between two stitches, pull up a loop, then insert the hook in the next space, pull up a loop and draw it through the loop on the hook. Keep it loose so the fabric does not pucker.
French Knot and Simple Embroidery
For a French knot, bring the needle up, wrap the yarn twice around the needle and take it back down right next to where it came up. Cross stitch stars are 2 or 3 straight stitches about 6 mm / 0.25 in long crossing in the middle. A running stitch is a simple in and out line of equal stitches.
Hanging Loop
With Gold, ch 15 and fasten off, leaving a 15 cm / 6 in tail at each end. Fold the chain in half and sew both ends securely to the top of the ornament, then hide the tails inside. Make every loop the same way so the set matches.
Stuffing and Closing
Use small pieces of fibrefill and add them a little at a time, shaping as you go. To close, thread the tail through the front loops of the last round, pull tight and take the needle through the middle of the ornament a few times before cutting the yarn.
- Practise the magic ring on a scrap before Rnd 1 of your first bauble.
- Move the stitch marker up at the start of every round; most counting mistakes come from a lost marker.
- Embroider with a blunt yarn needle and keep the stitches loose, so they sit on top of the fabric.
1. Classic Bauble
A smooth round bauble with a ribbed gold cap. This is the base shape for Ornaments 2 and 3, so it is a good one to start with.
Your Classic Bauble ends up as a smooth red ball under a ribbed gold cap.
Overview
| Detail | Classic Bauble |
|---|---|
| Finished size | About 5 cm / 2 in across, 7.5 cm / 3 in tall with cap and loop |
| Colours | Red (ball), Gold (cap and loop) |
| Yarn used | About 13 m / 14 yd in total |
| Make | 1 |
| Parts made separately | Ball x 1, Cap x 1 |
| Rounds and rows | 18 |
| Difficulty | Medium |
| What it involves | You change colour, several parts are sewn together, you add and remove stitches to shape it. |
Ball
Colour: Red · Hook: 3.5 mm (US E/4) · Make: 1
Work these rounds in a spiral. Do not join them. Move the marker up to the first stitch of each new round.
Round 1
Quick read: with Red, 6 sc in MR (6)
- Use Red and make a magic ring.
- Work 6 sc into the ring.
- Pull the tail to close the ring.
Stitch count: 6 sc
Round 2
Quick read: inc 6 times (12)
- Increase 6 times: work 2 sc in each of the next 6 stitches.
Stitch count: 12 sc Check: 6 repeats x 2 sts = 12
Round 3
Quick read: (sc, inc) 6 times (18)
- Work 1 sc in the next stitch.
- Increase: work 2 sc in the next stitch.
- Repeat steps 1 and 2 five more times (6 times in all).
Stitch count: 18 sc Check: 6 repeats x 3 sts = 18 Positions: Increases in every 2nd stitch of the round before, starting with stitch 2 (6 in all).
Round 4
Quick read: (sc 2, inc) 6 times (24)
- Work 1 sc in each of the next 2 stitches.
- Increase: work 2 sc in the next stitch.
- Repeat steps 1 and 2 five more times (6 times in all).
Stitch count: 24 sc Check: 6 repeats x 4 sts = 24 Positions: Increases in every 3rd stitch of the round before, starting with stitch 3 (6 in all).
Round 5
Quick read: (sc 3, inc) 6 times (30)
- Work 1 sc in each of the next 3 stitches.
- Increase: work 2 sc in the next stitch.
- Repeat steps 1 and 2 five more times (6 times in all).
Stitch count: 30 sc Check: 6 repeats x 5 sts = 30 Positions: Increases in every 4th stitch of the round before, starting with stitch 4 (6 in all). What it looks like now: A flat circle with 30 stitches around, made in 5 rounds.
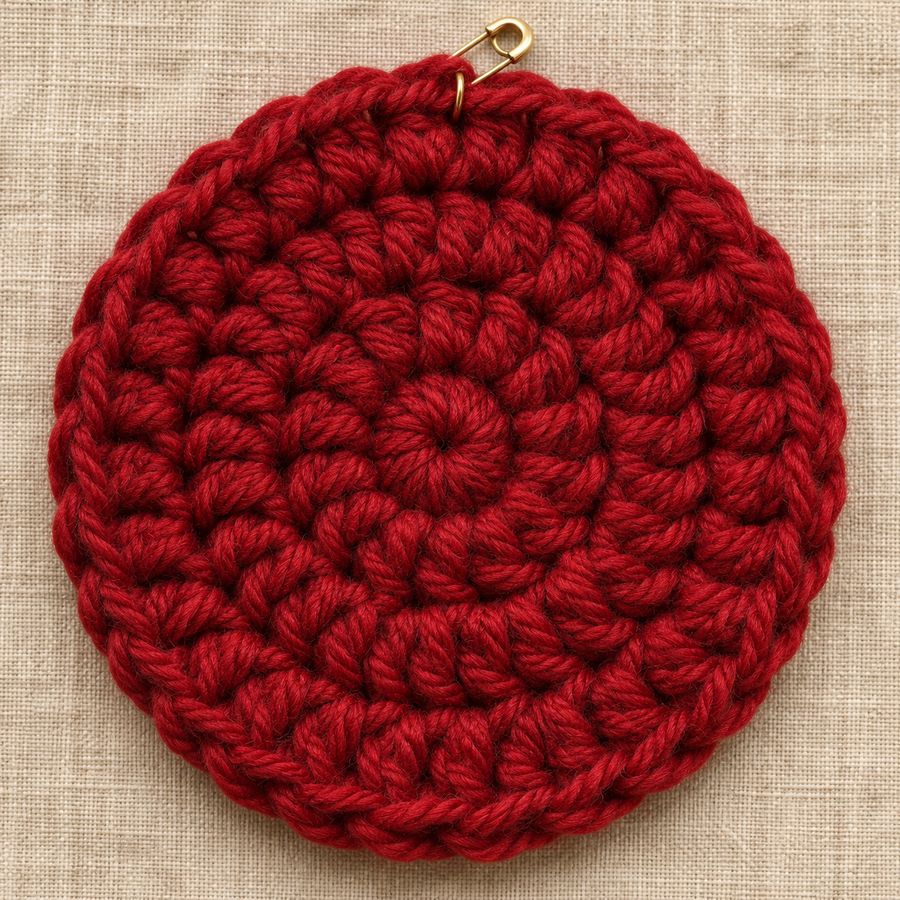 After Round 5 your bauble is still a flat circle of 30 stitches.
Rounds 6 to 10
Quick read: sc in each st around (30)
- Work 1 sc in each stitch around (30 stitches).
- Work this round 5 times in all: Rounds 6, 7, 8, 9 and 10.
Stitch count: 30 sc (at the end of each round) What it looks like now: The sides go straight up like a tube with 30 stitches around, after 5 rounds without shaping.
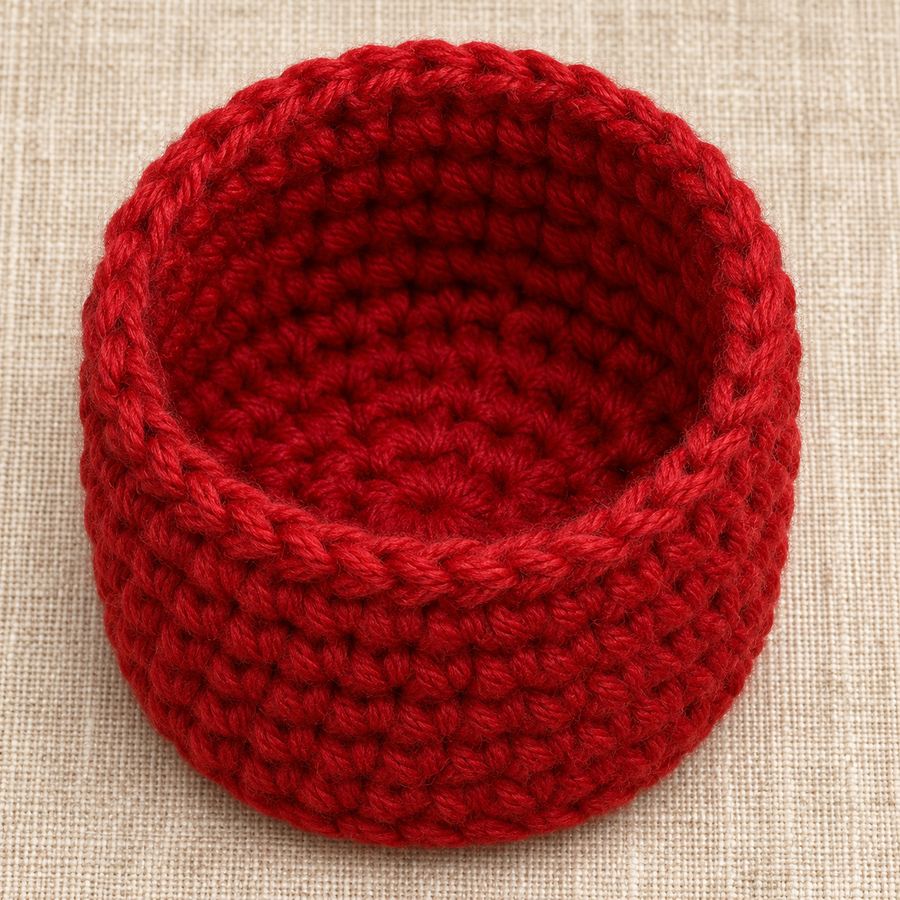 Five plain rounds turn the circle up into straight sides.
Round 11
Quick read: (sc 3, dec) 6 times (24)
- Work 1 sc in each of the next 3 stitches.
- Decrease: work the next 2 stitches together as 1 sc.
- Repeat steps 1 and 2 five more times (6 times in all).
Stitch count: 24 sc Check: 6 repeats x 4 sts = 24 Positions: Decreases over stitches 4-5 of the round before, then every 5 stitches (6 in all).
Round 12
Quick read: (sc 2, dec) 6 times (18)
- Work 1 sc in each of the next 2 stitches.
- Decrease: work the next 2 stitches together as 1 sc.
- Repeat steps 1 and 2 five more times (6 times in all).
Stitch count: 18 sc Check: 6 repeats x 3 sts = 18 Positions: Decreases over stitches 3-4 of the round before, then every 4 stitches (6 in all).
Stuff the ball firmly, pushing the stuffing out to the sides so it stays round.
Round 13
Quick read: (sc, dec) 6 times (12)
- Work 1 sc in the next stitch.
- Decrease: work the next 2 stitches together as 1 sc.
- Repeat steps 1 and 2 five more times (6 times in all).
Stitch count: 12 sc Check: 6 repeats x 2 sts = 12 Positions: Decreases over stitches 2-3 of the round before, then every 3 stitches (6 in all).
Round 14
Quick read: dec 6 times (6)
- Decrease 6 times in a row: each time, work 2 stitches together as 1 sc.
Stitch count: 6 sc Check: 6 repeats x 1 st = 6 Positions: Decreases over stitches 1-2 of the round before, then every 2 stitches (6 in all). What it looks like now: The piece is closing in and has 6 stitches left around the opening, after 4 rounds of decreasing.
Fasten off, leaving a short tail. Weave the tail through the front loops of the last 6 sts, pull tight to close and hide the end inside the ball.
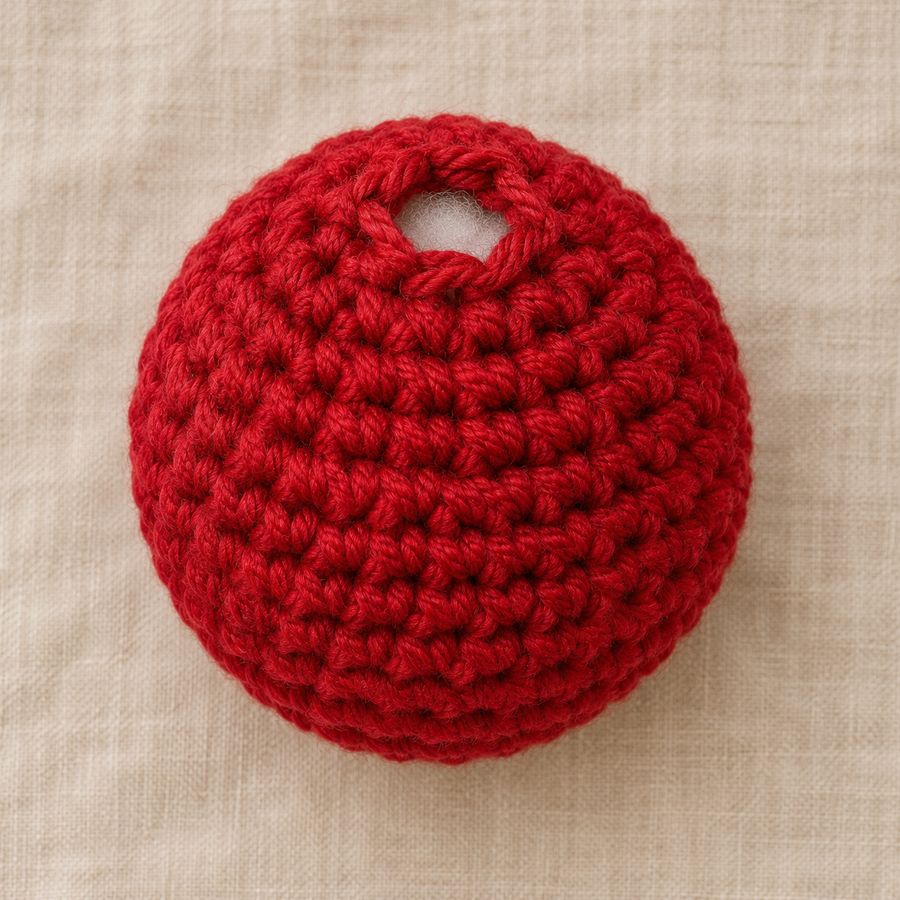 You stuff after Round 12, so the ball is full before the opening gets small.
Count table: Ball
| Round | Start count | Change | End count |
|---|---|---|---|
| 1 | MR | +6 | 6 sc |
| 2 | 6 | +6 | 12 sc |
| 3 | 12 | +6 | 18 sc |
| 4 | 18 | +6 | 24 sc |
| 5 | 24 | +6 | 30 sc |
| 6 | 30 | 0 | 30 sc |
| 7 | 30 | 0 | 30 sc |
| 8 | 30 | 0 | 30 sc |
| 9 | 30 | 0 | 30 sc |
| 10 | 30 | 0 | 30 sc |
| 11 | 30 | -6 | 24 sc |
| 12 | 24 | -6 | 18 sc |
| 13 | 18 | -6 | 12 sc |
| 14 | 12 | -6 | 6 sc |
Cap
Colour: Gold · Hook: 3.5 mm (US E/4) · Make: 1
Work these rounds in a spiral. Do not join them. Move the marker up to the first stitch of each new round.
Round 1
Quick read: with Gold, 6 sc in MR (6)
- Use Gold and make a magic ring.
- Work 6 sc into the ring.
- Pull the tail to close the ring.
Stitch count: 6 sc
Round 2
Quick read: inc 6 times (12)
- Increase 6 times: work 2 sc in each of the next 6 stitches.
Stitch count: 12 sc Check: 6 repeats x 2 sts = 12 What it looks like now: A flat circle with 12 stitches around, made in 2 rounds.
Round 3
Quick read: sc in BLO in each st around (12)
- Work 1 sc in each stitch around (12 stitches).
- Work into the back loop only.
Stitch count: 12 sc
Round 4
Quick read: sc in each st around (12)
- Work 1 sc in each stitch around (12 stitches).
Stitch count: 12 sc What it looks like now: The sides go straight up like a tube with 12 stitches around, after 2 rounds without shaping.
Sl st in the next st and fasten off, leaving a 20 cm / 8 in tail.
Count table: Cap
| Round | Start count | Change | End count |
|---|---|---|---|
| 1 | MR | +6 | 6 sc |
| 2 | 6 | +6 | 12 sc |
| 3 | 12 | 0 | 12 sc |
| 4 | 12 | 0 | 12 sc |
Assembly
-
Place the cap over the closed end of the ball (Rnd 14) so the ribbed edge sits evenly all the way round.
-
Sew the last round of the cap to the ball with small whip stitches.
-
Make a hanging loop (see Techniques) and sew it to the centre of the cap.
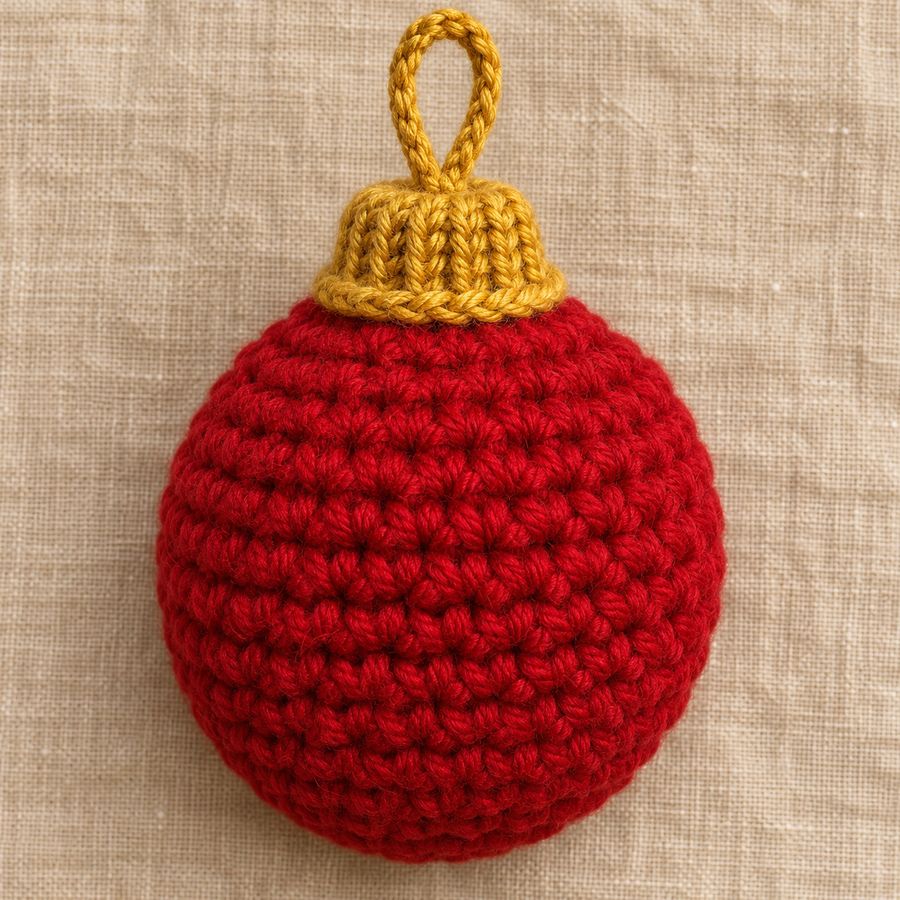 Sewn on, the cap hides the closed end of the ball.
- Push the stuffing outwards, not just into the middle, and the ball stays round.
- Count Rnds 6 to 10 on your fingers as you go: 5 plain rounds.
- Sew the cap with the same Gold tail you finished it with, so there is one less end to weave in.
Common mistakes and fixes
| Problem | Cause | Fix |
|---|---|---|
| You have 29 stitches after Round 5 instead of 30. | An increase was missed. | Count the increases. There should be 6. Undo back to the missing one and work it again. |
| You have 25 stitches after Round 11 instead of 24. | A decrease was missed. | Count the decreases. There should be 6. Undo back to the missing one and work it again. |
| No ridge shows at Round 3. | The round was worked through both loops. | Undo the round and work it into the back loop only. |
| A small step shows where the colour changes. | The new colour was started on a new stitch. | Finish the last stitch of the old colour with the new colour. Keep the steps at the back. |
| The count is off after several plain rounds. | The marker moved or fell out. | Put the marker in the first stitch of every round and count before you move it. |
Troubleshooting for this piece
| Problem | Cause | Fix |
|---|---|---|
| The stuffing shows through the stitches | The stitches are loose, or the piece is stuffed too tightly | Use a smaller hook and work firmly. Stuff in small pieces and stop when the shape is firm. |
| The opening will not close neatly at the end | A decrease was missed, so too many stitches are left | Count the stitches against the last row of the Count table. Fix the round if it does not match. Then thread the tail through the front loops of the last stitches and pull tight. |
| Small holes show at the increases | The first stitch after an increase is loose, or the increase is in the wrong place | Pull the stitch after each increase snug. Check the Positions line for where each increase goes. Use a slightly smaller hook. |
| The finished piece is bigger or smaller than the size given | Your tension is different from the gauge, or the yarn is thicker or thinner | Make a gauge swatch and compare it with the Gauge section. Change the hook size to match, or use the yarn named in Materials. |
2. Striped Bauble
The Classic Bauble shape worked in one round stripes of Red, Cream and Green.
Overview
| Detail | Striped Bauble |
|---|---|
| Finished size | About 5 cm / 2 in across, 7.5 cm / 3 in tall with cap and loop |
| Colours | Red, Cream, Green (ball), Gold (cap and loop) |
| Yarn used | About 13 m / 14 yd in total |
| Make | 1 |
| Parts made separately | Ball x 1, Cap x 1 |
| Rounds and rows | 18 |
| Difficulty | Medium |
| What it involves | You change colour, several parts are sewn together, you add and remove stitches to shape it. |
Ball
Colours: Red, Cream, Green · Hook: 3.5 mm (US E/4) · Make: 1
Work these rounds in a spiral. Do not join them. Move the marker up to the first stitch of each new round.
Round 1
Quick read: with Red, 6 sc in MR (6)
- Use Red and make a magic ring.
- Work 6 sc into the ring.
- Pull the tail to close the ring.
Stitch count: 6 sc
Round 2
Quick read: inc 6 times (12)
- Increase 6 times: work 2 sc in each of the next 6 stitches.
Stitch count: 12 sc Check: 6 repeats x 2 sts = 12
Round 3
Quick read: with Cream, (sc, inc) 6 times (18)
- Change to Cream and work 1 sc in the next stitch.
- Increase: work 2 sc in the next stitch.
- Repeat steps 1 and 2 five more times (6 times in all), staying in the new colour.
Stitch count: 18 sc Check: 6 repeats x 3 sts = 18 Positions: Increases in every 2nd stitch of the round before, starting with stitch 2 (6 in all).
Round 4
Quick read: with Green, (sc 2, inc) 6 times (24)
- Change to Green and work 1 sc in each of the next 2 stitches.
- Increase: work 2 sc in the next stitch.
- Repeat steps 1 and 2 five more times (6 times in all), staying in the new colour.
Stitch count: 24 sc Check: 6 repeats x 4 sts = 24 Positions: Increases in every 3rd stitch of the round before, starting with stitch 3 (6 in all).
Round 5
Quick read: with Cream, (sc 3, inc) 6 times (30)
- Change to Cream and work 1 sc in each of the next 3 stitches.
- Increase: work 2 sc in the next stitch.
- Repeat steps 1 and 2 five more times (6 times in all), staying in the new colour.
Stitch count: 30 sc Check: 6 repeats x 5 sts = 30 Positions: Increases in every 4th stitch of the round before, starting with stitch 4 (6 in all). What it looks like now: A flat circle with 30 stitches around, made in 5 rounds.
Round 6
Quick read: with Red, sc in each st around (30)
- Change to Red and work 1 sc in each stitch around (30 stitches).
Stitch count: 30 sc
Round 7
Quick read: with Cream, sc in each st around (30)
- Change to Cream and work 1 sc in each stitch around (30 stitches).
Stitch count: 30 sc
Round 8
Quick read: with Green, sc in each st around (30)
- Change to Green and work 1 sc in each stitch around (30 stitches).
Stitch count: 30 sc
Round 9
Quick read: with Cream, sc in each st around (30)
- Change to Cream and work 1 sc in each stitch around (30 stitches).
Stitch count: 30 sc
Round 10
Quick read: with Red, sc in each st around (30)
- Change to Red and work 1 sc in each stitch around (30 stitches).
Stitch count: 30 sc What it looks like now: The sides go straight up like a tube with 30 stitches around, after 5 rounds without shaping.
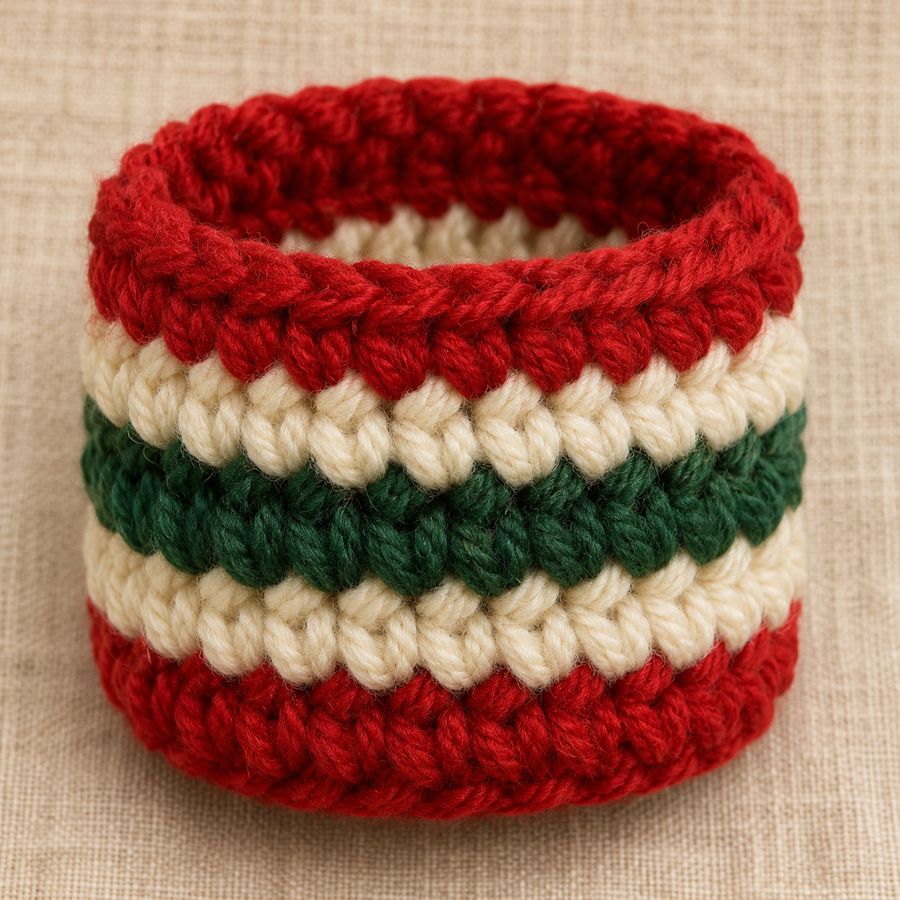 Your stripes run Red, Cream, Green, Cream, Red up the straight sides.
Round 11
Quick read: with Cream, (sc 3, dec) 6 times (24)
- Change to Cream and work 1 sc in each of the next 3 stitches.
- Decrease: work the next 2 stitches together as 1 sc.
- Repeat steps 1 and 2 five more times (6 times in all), staying in the new colour.
Stitch count: 24 sc Check: 6 repeats x 4 sts = 24 Positions: Decreases over stitches 4-5 of the round before, then every 5 stitches (6 in all).
Round 12
Quick read: with Green, (sc 2, dec) 6 times (18)
- Change to Green and work 1 sc in each of the next 2 stitches.
- Decrease: work the next 2 stitches together as 1 sc.
- Repeat steps 1 and 2 five more times (6 times in all), staying in the new colour.
Stitch count: 18 sc Check: 6 repeats x 3 sts = 18 Positions: Decreases over stitches 3-4 of the round before, then every 4 stitches (6 in all).
Stuff the ball firmly.
Round 13
Quick read: with Cream, (sc, dec) 6 times (12)
- Change to Cream and work 1 sc in the next stitch.
- Decrease: work the next 2 stitches together as 1 sc.
- Repeat steps 1 and 2 five more times (6 times in all), staying in the new colour.
Stitch count: 12 sc Check: 6 repeats x 2 sts = 12 Positions: Decreases over stitches 2-3 of the round before, then every 3 stitches (6 in all).
Round 14
Quick read: with Red, dec 6 times (6)
- Change to Red and decrease 6 times in a row: each time, work 2 stitches together as 1 sc.
Stitch count: 6 sc Check: 6 repeats x 1 st = 6 Positions: Decreases over stitches 1-2 of the round before, then every 2 stitches (6 in all). What it looks like now: The piece is closing in and has 6 stitches left around the opening, after 4 rounds of decreasing.
Fasten off and close the opening as for the Classic Bauble.
Count table: Ball
| Round | Start count | Change | End count |
|---|---|---|---|
| 1 | MR | +6 | 6 sc |
| 2 | 6 | +6 | 12 sc |
| 3 | 12 | +6 | 18 sc |
| 4 | 18 | +6 | 24 sc |
| 5 | 24 | +6 | 30 sc |
| 6 | 30 | 0 | 30 sc |
| 7 | 30 | 0 | 30 sc |
| 8 | 30 | 0 | 30 sc |
| 9 | 30 | 0 | 30 sc |
| 10 | 30 | 0 | 30 sc |
| 11 | 30 | -6 | 24 sc |
| 12 | 24 | -6 | 18 sc |
| 13 | 18 | -6 | 12 sc |
| 14 | 12 | -6 | 6 sc |
Cap
Colour: Gold · Hook: 3.5 mm (US E/4) · Make: 1
Work these rounds in a spiral. Do not join them. Move the marker up to the first stitch of each new round.
Round 1
Quick read: with Gold, 6 sc in MR (6)
- Use Gold and make a magic ring.
- Work 6 sc into the ring.
- Pull the tail to close the ring.
Stitch count: 6 sc
Round 2
Quick read: inc 6 times (12)
- Increase 6 times: work 2 sc in each of the next 6 stitches.
Stitch count: 12 sc Check: 6 repeats x 2 sts = 12 What it looks like now: A flat circle with 12 stitches around, made in 2 rounds.
Round 3
Quick read: sc in BLO in each st around (12)
- Work 1 sc in each stitch around (12 stitches).
- Work into the back loop only.
Stitch count: 12 sc
Round 4
Quick read: sc in each st around (12)
- Work 1 sc in each stitch around (12 stitches).
Stitch count: 12 sc What it looks like now: The sides go straight up like a tube with 12 stitches around, after 2 rounds without shaping.
Sl st in the next st and fasten off, leaving a long tail.
Count table: Cap
| Round | Start count | Change | End count |
|---|---|---|---|
| 1 | MR | +6 | 6 sc |
| 2 | 6 | +6 | 12 sc |
| 3 | 12 | 0 | 12 sc |
| 4 | 12 | 0 | 12 sc |
Assembly
-
Sew the cap over the closed end (Rnd 14) and add a Gold hanging loop.
-
Weave in all colour ends on the inside before you close the ball, or hide them in the stuffing.
- Carry the colours up inside the ball instead of cutting after every stripe; only cut when a colour is not needed for several rounds.
- Turn the colour change steps to the back before you sew on the cap.
Common mistakes and fixes
| Problem | Cause | Fix |
|---|---|---|
| You have 29 stitches after Round 5 instead of 30. | An increase was missed. | Count the increases. There should be 6. Undo back to the missing one and work it again. |
| You have 25 stitches after Round 11 instead of 24. | A decrease was missed. | Count the decreases. There should be 6. Undo back to the missing one and work it again. |
| No ridge shows at Round 3. | The round was worked through both loops. | Undo the round and work it into the back loop only. |
| A small step shows where the colour changes. | The new colour was started on a new stitch. | Finish the last stitch of the old colour with the new colour. Keep the steps at the back. |
Troubleshooting for this piece
| Problem | Cause | Fix |
|---|---|---|
| The stuffing shows through the stitches | The stitches are loose, or the piece is stuffed too tightly | Use a smaller hook and work firmly. Stuff in small pieces and stop when the shape is firm. |
| The opening will not close neatly at the end | A decrease was missed, so too many stitches are left | Count the stitches against the last row of the Count table. Fix the round if it does not match. Then thread the tail through the front loops of the last stitches and pull tight. |
| Small holes show at the increases | The first stitch after an increase is loose, or the increase is in the wrong place | Pull the stitch after each increase snug. Check the Positions line for where each increase goes. Use a slightly smaller hook. |
| The fabric puckers where the colour changes | The yarn carried at the back is pulled too tight | Let the carried yarn lie loose. Check the back of the work every few rows. Spread the stitches on the hook before you carry on. |
3. Teardrop Bauble
A long, pointed teardrop worked in vertical sections of Red and Cream, outlined with Gold. From Rnd 3 the round is worked in 6 equal sections, one for each repeat. Work the sections in this order: Red, Cream, Red, Cream, Red, Cream, and carry the colour you are not using inside the stitches (see Tapestry Colour Change in Techniques).
Overview
| Detail | Teardrop Bauble |
|---|---|
| Finished size | About 5 cm / 2 in across, 9 cm / 3.5 in tall with cap and loop |
| Colours | Red, Cream (body), Gold (cap, outlines and loop) |
| Yarn used | About 13 m / 14 yd in total |
| Make | 1 |
| Parts made separately | Body x 1, Cap x 1 |
| Rounds and rows | 20 |
| Difficulty | Medium |
| What it involves | You change colour, several parts are sewn together, you add and remove stitches to shape it. |
Body
Colours: Red, Cream · Hook: 3.5 mm (US E/4) · Make: 1
Work these rounds in a spiral. Do not join them. Move the marker up to the first stitch of each new round.
Round 1
Quick read: with Red, 6 sc in MR (6)
- Use Red and make a magic ring.
- Work 6 sc into the ring.
- Pull the tail to close the ring.
Stitch count: 6 sc
Round 2
Quick read: sc in each st around (6)
- Work 1 sc in each stitch around (6 stitches).
Stitch count: 6 sc
Round 3
Quick read: inc 6 times (12)
- Increase 6 times: work 2 sc in each of the next 6 stitches.
Stitch count: 12 sc Check: 6 repeats x 2 sts = 12
Round 4
Quick read: sc in each st around (12)
- Work 1 sc in each stitch around (12 stitches).
Stitch count: 12 sc
Round 5
Quick read: (sc, inc) 6 times (18)
- Work 1 sc in the next stitch.
- Increase: work 2 sc in the next stitch.
- Repeat steps 1 and 2 five more times (6 times in all).
Stitch count: 18 sc Check: 6 repeats x 3 sts = 18 Positions: Increases in every 2nd stitch of the round before, starting with stitch 2 (6 in all).
Round 6
Quick read: sc in each st around (18)
- Work 1 sc in each stitch around (18 stitches).
Stitch count: 18 sc
Round 7
Quick read: (sc 2, inc) 6 times (24)
- Work 1 sc in each of the next 2 stitches.
- Increase: work 2 sc in the next stitch.
- Repeat steps 1 and 2 five more times (6 times in all).
Stitch count: 24 sc Check: 6 repeats x 4 sts = 24 Positions: Increases in every 3rd stitch of the round before, starting with stitch 3 (6 in all).
Round 8
Quick read: sc in each st around (24)
- Work 1 sc in each stitch around (24 stitches).
Stitch count: 24 sc
Round 9
Quick read: (sc 3, inc) 6 times (30)
- Work 1 sc in each of the next 3 stitches.
- Increase: work 2 sc in the next stitch.
- Repeat steps 1 and 2 five more times (6 times in all).
Stitch count: 30 sc Check: 6 repeats x 5 sts = 30 Positions: Increases in every 4th stitch of the round before, starting with stitch 4 (6 in all).
Rounds 10 to 12
Quick read: sc in each st around (30)
- Work 1 sc in each stitch around (30 stitches).
- Work this round 3 times in all: Rounds 10, 11 and 12.
Stitch count: 30 sc (at the end of each round) What it looks like now: The sides go straight up like a tube with 30 stitches around, after 3 rounds without shaping.
Round 13
Quick read: (sc 3, dec) 6 times (24)
- Work 1 sc in each of the next 3 stitches.
- Decrease: work the next 2 stitches together as 1 sc.
- Repeat steps 1 and 2 five more times (6 times in all).
Stitch count: 24 sc Check: 6 repeats x 4 sts = 24 Positions: Decreases over stitches 4-5 of the round before, then every 5 stitches (6 in all).
Round 14
Quick read: (sc 2, dec) 6 times (18)
- Work 1 sc in each of the next 2 stitches.
- Decrease: work the next 2 stitches together as 1 sc.
- Repeat steps 1 and 2 five more times (6 times in all).
Stitch count: 18 sc Check: 6 repeats x 3 sts = 18 Positions: Decreases over stitches 3-4 of the round before, then every 4 stitches (6 in all).
Round 15
Quick read: (sc, dec) 6 times (12)
- Work 1 sc in the next stitch.
- Decrease: work the next 2 stitches together as 1 sc.
- Repeat steps 1 and 2 five more times (6 times in all).
Stitch count: 12 sc Check: 6 repeats x 2 sts = 12 Positions: Decreases over stitches 2-3 of the round before, then every 3 stitches (6 in all).
Stuff the body firmly, filling the long point first.
Round 16
Quick read: dec 6 times (6)
- Decrease 6 times in a row: each time, work 2 stitches together as 1 sc.
Stitch count: 6 sc Check: 6 repeats x 1 st = 6 Positions: Decreases over stitches 1-2 of the round before, then every 2 stitches (6 in all). What it looks like now: The piece is closing in and has 6 stitches left around the opening, after 4 rounds of decreasing.
Fasten off and close the opening.
Count table: Body
| Round | Start count | Change | End count |
|---|---|---|---|
| 1 | MR | +6 | 6 sc |
| 2 | 6 | 0 | 6 sc |
| 3 | 6 | +6 | 12 sc |
| 4 | 12 | 0 | 12 sc |
| 5 | 12 | +6 | 18 sc |
| 6 | 18 | 0 | 18 sc |
| 7 | 18 | +6 | 24 sc |
| 8 | 24 | 0 | 24 sc |
| 9 | 24 | +6 | 30 sc |
| 10 | 30 | 0 | 30 sc |
| 11 | 30 | 0 | 30 sc |
| 12 | 30 | 0 | 30 sc |
| 13 | 30 | -6 | 24 sc |
| 14 | 24 | -6 | 18 sc |
| 15 | 18 | -6 | 12 sc |
| 16 | 12 | -6 | 6 sc |
Cap
Colour: Gold · Hook: 3.5 mm (US E/4) · Make: 1
Work these rounds in a spiral. Do not join them. Move the marker up to the first stitch of each new round.
Round 1
Quick read: with Gold, 6 sc in MR (6)
- Use Gold and make a magic ring.
- Work 6 sc into the ring.
- Pull the tail to close the ring.
Stitch count: 6 sc
Round 2
Quick read: inc 6 times (12)
- Increase 6 times: work 2 sc in each of the next 6 stitches.
Stitch count: 12 sc Check: 6 repeats x 2 sts = 12 What it looks like now: A flat circle with 12 stitches around, made in 2 rounds.
Round 3
Quick read: sc in BLO in each st around (12)
- Work 1 sc in each stitch around (12 stitches).
- Work into the back loop only.
Stitch count: 12 sc
Round 4
Quick read: sc in each st around (12)
- Work 1 sc in each stitch around (12 stitches).
Stitch count: 12 sc What it looks like now: The sides go straight up like a tube with 12 stitches around, after 2 rounds without shaping.
Sl st in the next st and fasten off, leaving a long tail.
Count table: Cap
| Round | Start count | Change | End count |
|---|---|---|---|
| 1 | MR | +6 | 6 sc |
| 2 | 6 | +6 | 12 sc |
| 3 | 12 | 0 | 12 sc |
| 4 | 12 | 0 | 12 sc |
Assembly
-
With Gold, work a line of surface slip stitches along each of the 6 lines where the colours meet, from the cap end down to the tip.
-
Sew the cap over the wide end (Rnd 16) and add a Gold hanging loop.
- Keep the carried colour loose, but not loopy, so the sections lie flat.
- The sections lean a little in a spiral. This is normal and gives the teardrop a gentle twist.
- Stuff the long point first with tiny pieces of fibrefill.
Common mistakes and fixes
| Problem | Cause | Fix |
|---|---|---|
| You have 29 stitches after Round 9 instead of 30. | An increase was missed. | Count the increases. There should be 6. Undo back to the missing one and work it again. |
| You have 25 stitches after Round 13 instead of 24. | A decrease was missed. | Count the decreases. There should be 6. Undo back to the missing one and work it again. |
| No ridge shows at Round 3. | The round was worked through both loops. | Undo the round and work it into the back loop only. |
| A small step shows where the colour changes. | The new colour was started on a new stitch. | Finish the last stitch of the old colour with the new colour. Keep the steps at the back. |
| The count is off after several plain rounds. | The marker moved or fell out. | Put the marker in the first stitch of every round and count before you move it. |
Troubleshooting for this piece
| Problem | Cause | Fix |
|---|---|---|
| The stuffing shows through the stitches | The stitches are loose, or the piece is stuffed too tightly | Use a smaller hook and work firmly. Stuff in small pieces and stop when the shape is firm. |
| The opening will not close neatly at the end | A decrease was missed, so too many stitches are left | Count the stitches against the last row of the Count table. Fix the round if it does not match. Then thread the tail through the front loops of the last stitches and pull tight. |
| Small holes show at the increases | The first stitch after an increase is loose, or the increase is in the wrong place | Pull the stitch after each increase snug. Check the Positions line for where each increase goes. Use a slightly smaller hook. |
| The points or petals are uneven | The tension changes from one point to the next, or a count is off by one | Check the Positions line and the counts for each point. Keep the same tension on every point. Shape them gently when you finish. |
4. Flower Medallion
A flat double layer disc with a cream flower on the front, a green back and a gold joining edge.
Your flower sits on the front layer only.
Overview
| Detail | Flower Medallion |
|---|---|
| Finished size | About 6.5 cm / 2.5 in across |
| Colours | Red (flower centre), Cream (petals), Green (front and back), Gold (edge and loop) |
| Yarn used | About 11 m / 12 yd in total |
| Make | 1 |
| Parts made separately | Front x 1, Back x 1 |
| Rounds and rows | 12 |
| Difficulty | Medium |
| What it involves | You change colour, you add and remove stitches to shape it. |
Front
Colours: Red, Cream, Green · Hook: 3.5 mm (US E/4) · Make: 1
Work these rounds in a spiral. Do not join them. Move the marker up to the first stitch of each new round.
Round 1
Quick read: with Red, 6 sc in MR (6)
- Use Red and make a magic ring.
- Work 6 sc into the ring.
- Pull the tail to close the ring.
Stitch count: 6 sc
Round 2
Quick read: inc 6 times (12)
- Increase 6 times: work 2 sc in each of the next 6 stitches.
Stitch count: 12 sc Check: 6 repeats x 2 sts = 12
Round 3
Quick read: with Cream, ((hdc, dc, hdc) in next st, sl st in next st) 6 times (24)
- Change to Cream and work 1 hdc, 1 dc and 1 hdc, all in the next stitch.
- Work 1 sl st in the next stitch.
- Repeat steps 1 and 2 five more times (6 times in all), staying in the new colour.
Stitch count: 24 sts Check: 6 repeats x 4 sts = 24 Positions: Stitch groups in every 2nd stitch of the round before, starting with stitch 1 (6 in all).
Round 4
Quick read: with Green, (sc 3, inc) 6 times (30)
- Change to Green and work 1 sc in each of the next 3 stitches.
- Increase: work 2 sc in the next stitch.
- Repeat steps 1 and 2 five more times (6 times in all), staying in the new colour.
Stitch count: 30 sc Check: 6 repeats x 5 sts = 30 Positions: Increases in every 4th stitch of the round before, starting with stitch 4 (6 in all).
Round 5
Quick read: (sc 4, inc) 6 times (36)
- Work 1 sc in each of the next 4 stitches.
- Increase: work 2 sc in the next stitch.
- Repeat steps 1 and 2 five more times (6 times in all).
Stitch count: 36 sc Check: 6 repeats x 6 sts = 36 Positions: Increases in every 5th stitch of the round before, starting with stitch 5 (6 in all). What it looks like now: The piece is growing wider. It has 36 stitches around after 5 rounds.
Sl st in the next st and fasten off. Weave in the ends on the wrong side.
Count table: Front
| Round | Start count | Change | End count |
|---|---|---|---|
| 1 | MR | +6 | 6 sc |
| 2 | 6 | +6 | 12 sc |
| 3 | 12 | +12 | 24 sts |
| 4 | 24 | +6 | 30 sc |
| 5 | 30 | +6 | 36 sc |
Back
Colour: Green · Hook: 3.5 mm (US E/4) · Make: 1
Work these rounds in a spiral. Do not join them. Move the marker up to the first stitch of each new round.
Round 1
Quick read: with Green, 6 sc in MR (6)
- Use Green and make a magic ring.
- Work 6 sc into the ring.
- Pull the tail to close the ring.
Stitch count: 6 sc
Round 2
Quick read: inc 6 times (12)
- Increase 6 times: work 2 sc in each of the next 6 stitches.
Stitch count: 12 sc Check: 6 repeats x 2 sts = 12
Round 3
Quick read: (sc, inc) 6 times (18)
- Work 1 sc in the next stitch.
- Increase: work 2 sc in the next stitch.
- Repeat steps 1 and 2 five more times (6 times in all).
Stitch count: 18 sc Check: 6 repeats x 3 sts = 18 Positions: Increases in every 2nd stitch of the round before, starting with stitch 2 (6 in all).
Round 4
Quick read: (sc 2, inc) 6 times (24)
- Work 1 sc in each of the next 2 stitches.
- Increase: work 2 sc in the next stitch.
- Repeat steps 1 and 2 five more times (6 times in all).
Stitch count: 24 sc Check: 6 repeats x 4 sts = 24 Positions: Increases in every 3rd stitch of the round before, starting with stitch 3 (6 in all).
Round 5
Quick read: (sc 3, inc) 6 times (30)
- Work 1 sc in each of the next 3 stitches.
- Increase: work 2 sc in the next stitch.
- Repeat steps 1 and 2 five more times (6 times in all).
Stitch count: 30 sc Check: 6 repeats x 5 sts = 30 Positions: Increases in every 4th stitch of the round before, starting with stitch 4 (6 in all).
Round 6
Quick read: (sc 4, inc) 6 times (36)
- Work 1 sc in each of the next 4 stitches.
- Increase: work 2 sc in the next stitch.
- Repeat steps 1 and 2 five more times (6 times in all).
Stitch count: 36 sc Check: 6 repeats x 6 sts = 36 Positions: Increases in every 5th stitch of the round before, starting with stitch 5 (6 in all). What it looks like now: A flat circle with 36 stitches around, made in 6 rounds.
Sl st in the next st and fasten off.
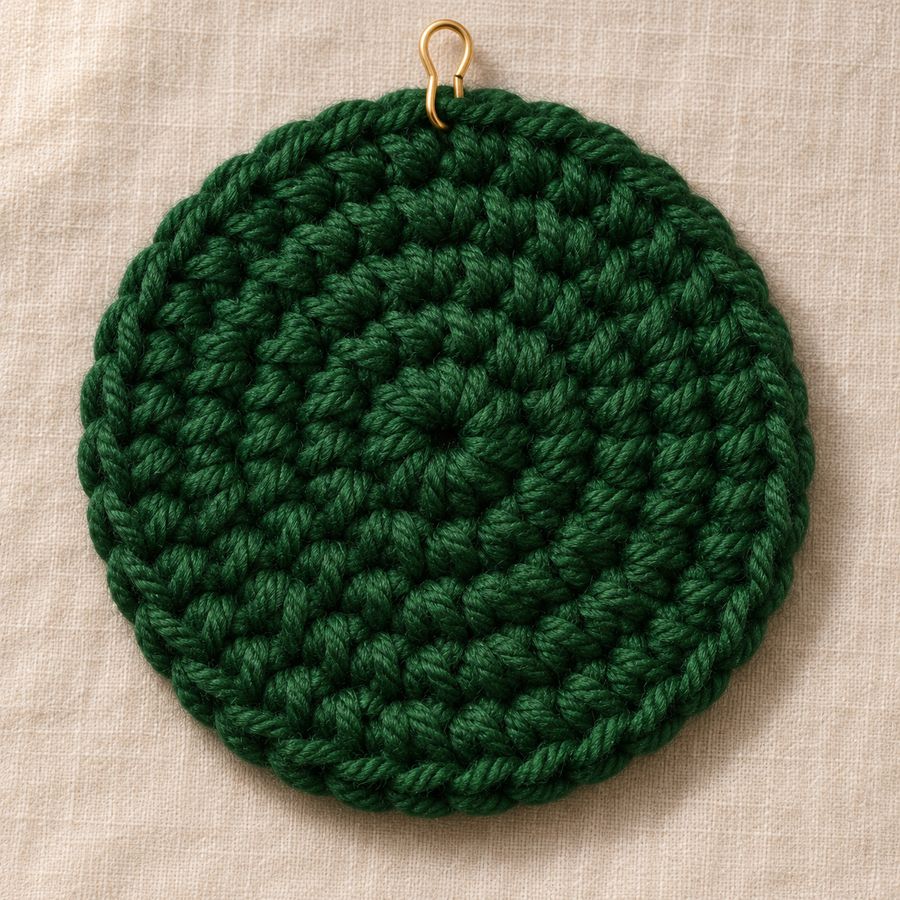 Your back is a plain Green circle.
Count table: Back
| Round | Start count | Change | End count |
|---|---|---|---|
| 1 | MR | +6 | 6 sc |
| 2 | 6 | +6 | 12 sc |
| 3 | 12 | +6 | 18 sc |
| 4 | 18 | +6 | 24 sc |
| 5 | 24 | +6 | 30 sc |
| 6 | 30 | +6 | 36 sc |
Joining
Colour: Gold · Hook: 3.5 mm (US E/4) · Make: 1
Hold the Front and Back with wrong sides together and the Front facing you. Insert the hook through both layers for every stitch.
Joining round
Quick read: with Gold, working through both layers, (sc 5, inc) 6 times (42)
- Use Gold and working through both layers.
- Work 1 sc in each of the next 5 stitches.
- Increase: work 2 sc in the next stitch.
- Repeat steps 2 and 3 five more times (6 times in all).
Stitch count: 42 sc Check: 6 repeats x 7 sts = 42 Positions: Increases in every 6th stitch of the round before, starting with stitch 6 (6 in all).
Sl st in the first st, make a hanging loop at the top and fasten off.
Count table: Joining
| Round | Start count | Change | End count |
|---|---|---|---|
| Joining round | 36 | +6 | 42 sc |
- Work the petals loosely so they lie flat around the red centre.
- Both layers have 36 sts before joining. If the counts differ, the edge will ripple.
Common mistakes and fixes
| Problem | Cause | Fix |
|---|---|---|
| You have 41 stitches after Joining round instead of 42. | An increase was missed. | Count the increases. There should be 6. Undo back to the missing one and work it again. |
| A small step shows where the colour changes. | The new colour was started on a new stitch. | Finish the last stitch of the old colour with the new colour. Keep the steps at the back. |
| Your piece is bigger or smaller than about 6.5 cm / 2.5 in across. | Your tension is different from the gauge. | Check your gauge. Use a smaller hook if it is too big and a bigger hook if it is too small. |
Troubleshooting for this piece
| Problem | Cause | Fix |
|---|---|---|
| The flat part curls up like a bowl | Too few stitches in a round, or tension that is very tight | Check each round against the Count table. Undo to the last round that matches. Go up half a hook size. |
| Small holes show at the increases | The first stitch after an increase is loose, or the increase is in the wrong place | Pull the stitch after each increase snug. Check the Positions line for where each increase goes. Use a slightly smaller hook. |
| The points or petals are uneven | The tension changes from one point to the next, or a count is off by one | Check the Positions line and the counts for each point. Keep the same tension on every point. Shape them gently when you finish. |
| The flat part ripples like a ruffle | Too many stitches in a round, or tension that is very loose | Recount every round. Undo to the last correct round. Go down half a hook size. |
5. Puffy Star
Two five point stars joined and lightly stuffed so the star stands out on the branch.
Two stars back to back, a little stuffing between them, and the star stands out on the branch.
Overview
| Detail | Puffy Star |
|---|---|
| Finished size | About 7 cm / 2.75 in across |
| Colours | Gold |
| Yarn used | About 10 m / 11 yd in total |
| Make | 1 |
| Parts made separately | Star x 2, Points x 10 |
| Rounds and rows | 9 |
| Difficulty | Easy |
| What it involves | It uses only basic stitches, you turn at the end of each row, you add and remove stitches to shape it. |
Star (make 2)
Colour: Gold · Hook: 3.5 mm (US E/4) · Make: 2
Work these rounds in a spiral. Do not join them. Move the marker up to the first stitch of each new round.
Round 1
Quick read: with Gold, 5 sc in MR (5)
- Use Gold and make a magic ring.
- Work 5 sc into the ring.
- Pull the tail to close the ring.
Stitch count: 5 sc
Round 2
Quick read: inc 5 times (10)
- Increase 5 times: work 2 sc in each of the next 5 stitches.
Stitch count: 10 sc Check: 5 repeats x 2 sts = 10
Round 3
Quick read: (sc, inc) 5 times (15)
- Work 1 sc in the next stitch.
- Increase: work 2 sc in the next stitch.
- Repeat steps 1 and 2 four more times (5 times in all).
Stitch count: 15 sc Check: 5 repeats x 3 sts = 15 Positions: Increases in every 2nd stitch of the round before, starting with stitch 2 (5 in all).
Round 4
Quick read: (sc 2, inc) 5 times (20)
- Work 1 sc in each of the next 2 stitches.
- Increase: work 2 sc in the next stitch.
- Repeat steps 1 and 2 four more times (5 times in all).
Stitch count: 20 sc Check: 5 repeats x 4 sts = 20 Positions: Increases in every 3rd stitch of the round before, starting with stitch 3 (5 in all). What it looks like now: The circle starts to curve into a small cup with 20 stitches around, after 4 rounds.
Sl st in the next st. Do not fasten off.
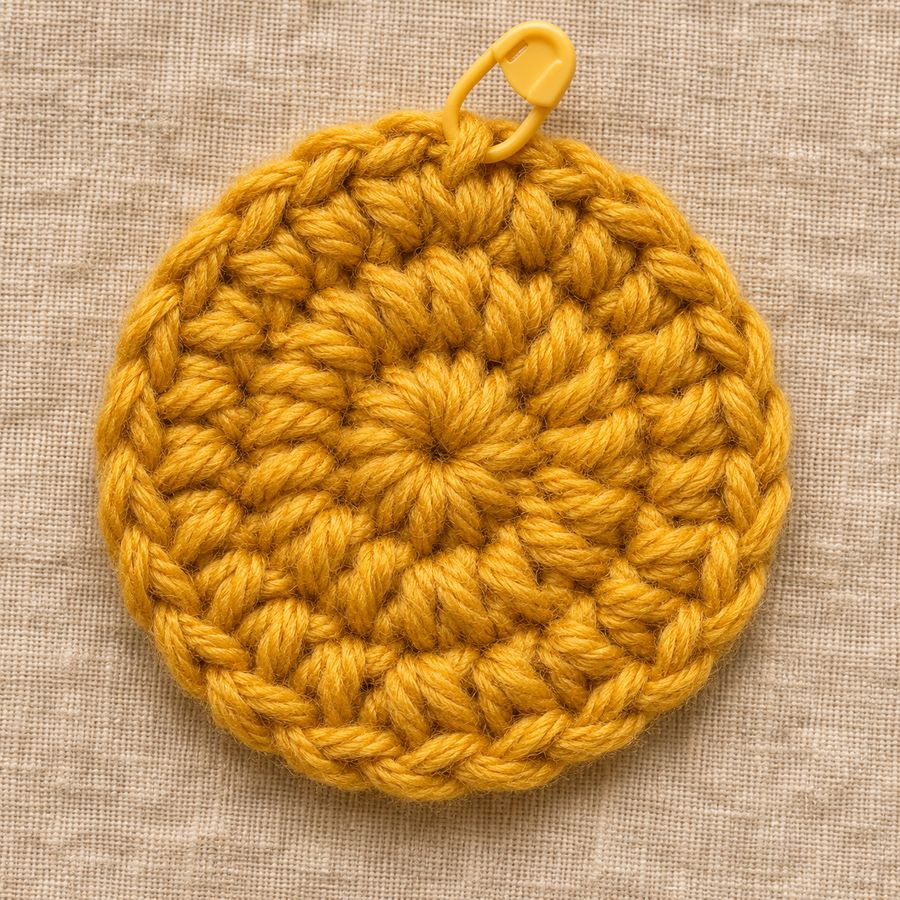 Your star centre has 20 stitches after Round 4, ready for five points.
Count table: Star
| Round | Start count | Change | End count |
|---|---|---|---|
| 1 | MR | +5 | 5 sc |
| 2 | 5 | +5 | 10 sc |
| 3 | 10 | +5 | 15 sc |
| 4 | 15 | +5 | 20 sc |
Points (make 5 on each star)
Colour: Gold · Hook: 3.5 mm (US E/4) · Make: 10
Where the parts go: Work the 5 Points on stitches 1, 5, 9, 13 and 17 of Round 4 (Star).
Row 1
Quick read: sc in each of next 4 sts (4)
- Work 1 sc in each of the next 4 stitches.
Stitch count: 4 sc
Row 2
Quick read: ch 1, turn, sc in each st across (4)
- Ch 1 and turn. This ch 1 does not count as a stitch.
- Work 1 sc in each stitch to the end of the row (4 stitches).
Stitch count: 4 sc
Row 3
Quick read: ch 1, turn, dec 2 times (2)
- Ch 1 and turn. This ch 1 does not count as a stitch.
- Decrease 2 times in a row: each time, work 2 stitches together as 1 sc.
Stitch count: 2 sc Check: 2 repeats x 1 st = 2 Positions: Decreases over stitches 1-2 and 3-4 of the row before.
Row 4
Quick read: ch 1, turn, dec (1)
- Ch 1 and turn. This ch 1 does not count as a stitch.
- Decrease: work the next 2 stitches together as 1 sc.
Stitch count: 1 sc What it looks like now: The flat piece is getting narrower and is now 1 stitch wide, after 2 rows.
Fasten off. Join Gold in the next unworked st of Rnd 4 and repeat Rows 1 to 4 until you have 5 points. On the second star, do not fasten off after the last point.
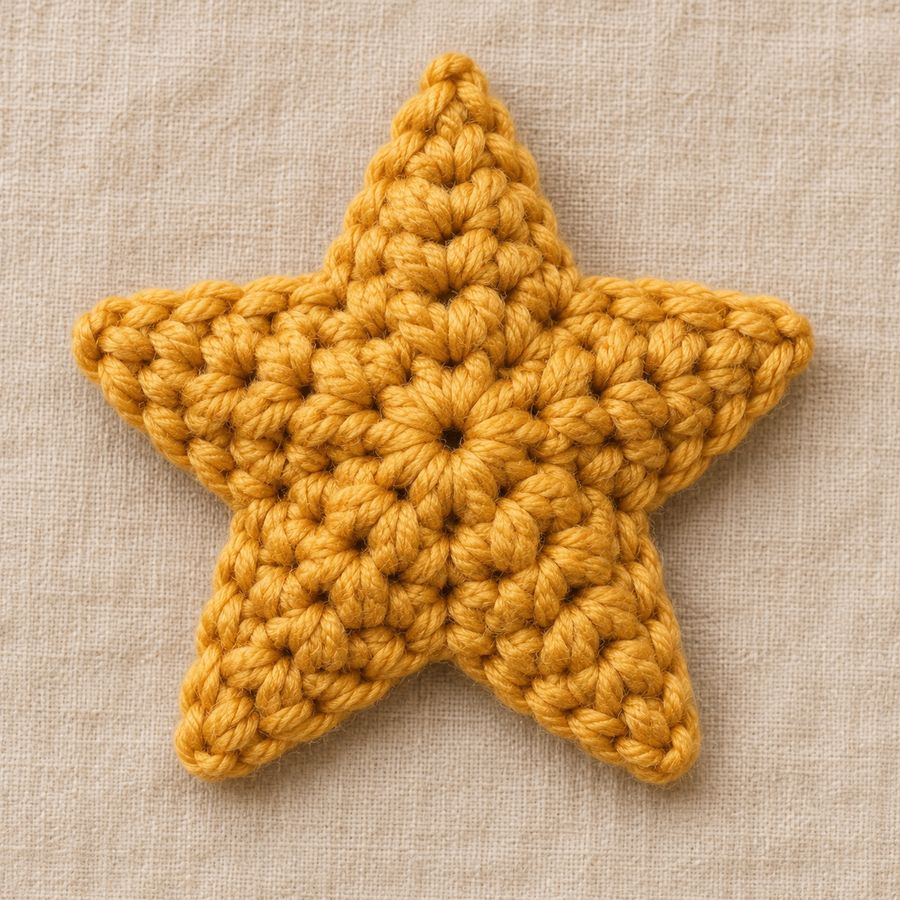 You make two of these layers.
Count table: Points
| Row | Start count | Change | End count |
|---|---|---|---|
| 1 | 4 | 0 | 4 sc |
| 2 | 4 | 0 | 4 sc |
| 3 | 4 | -2 | 2 sc |
| 4 | 2 | -1 | 1 sc |
Joining
Colour: Gold · Hook: 3.5 mm (US E/4) · Make: 1
Hold the two stars together, wrong sides in, with the second star facing you.
Joining round
Quick read: with Gold, working through both layers, (3 sc in the tip st, sc 3 down the side of the point, sc2tog across the valley, sc 3 up the side of the next point) 5 times (50)
- Use Gold and working through both layers.
- Work 3 sc in the tip stitch.
- Work 3 sc down the side of the point.
- Work sc2tog across the valley.
- Work 3 sc up the side of the next point.
- Repeat steps 2 to 5 four more times (5 times in all).
Stitch count: 50 sc Check: 5 repeats x 10 sts = 50
Stuff lightly before you close the last two points. Sl st in the first st, add a hanging loop to one tip and fasten off.
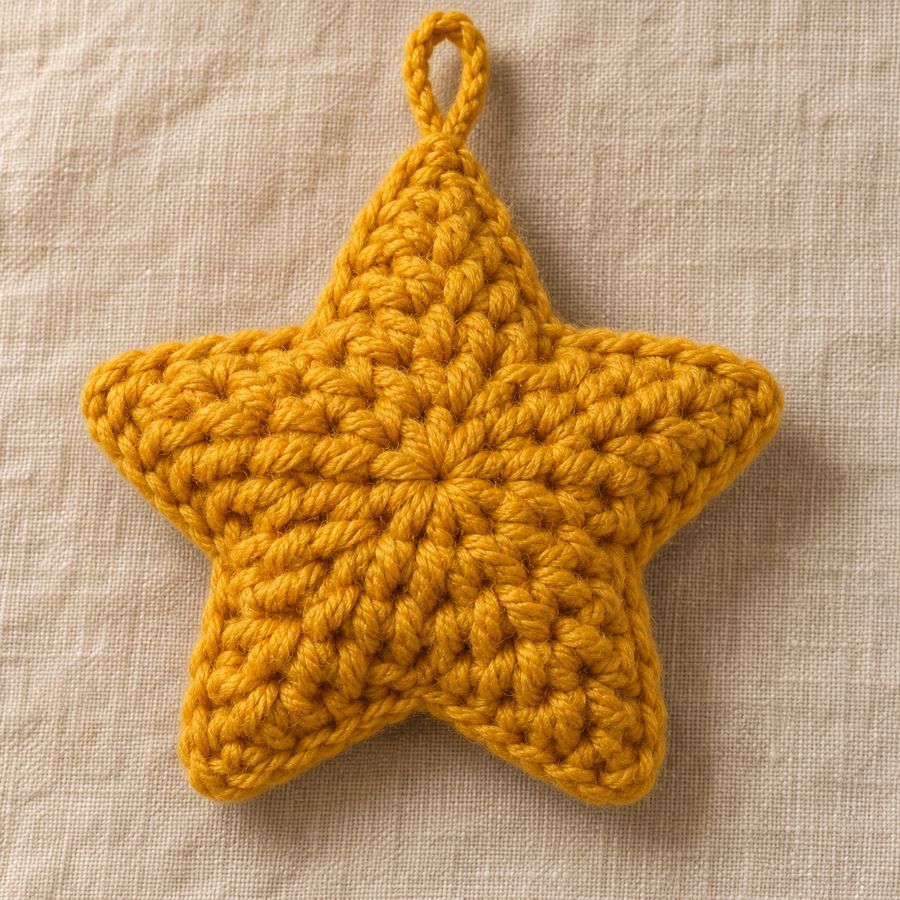 The joining round closes both layers around a little stuffing.
Count table: Joining
| Round | Start count | Change | End count |
|---|---|---|---|
| Joining round | - | - | 50 sc |
- Stuff the star lightly: too much fibrefill pulls the points round.
- Pinch each point into shape before you close the last two points.
Common mistakes and fixes
| Problem | Cause | Fix |
|---|---|---|
| You have 19 stitches after Round 4 instead of 20. | An increase was missed. | Count the increases. There should be 5. Undo back to the missing one and work it again. |
| You have 3 stitches after Row 3 instead of 2. | A decrease was missed. | Count the decreases. There should be 2. Undo back to the missing one and work it again. |
| The piece grows by 1 stitch every row. | The turning ch 1 was worked as a stitch. | Skip the ch 1. You should have 4 stitches at the end of Row 2. |
Troubleshooting for this piece
| Problem | Cause | Fix |
|---|---|---|
| The stuffing shows through the stitches | The stitches are loose, or the piece is stuffed too tightly | Use a smaller hook and work firmly. Stuff in small pieces and stop when the shape is firm. |
| The opening will not close neatly at the end | A decrease was missed, so too many stitches are left | Count the stitches against the last row of the Count table. Fix the round if it does not match. Then thread the tail through the front loops of the last stitches and pull tight. |
| Small holes show at the increases | The first stitch after an increase is loose, or the increase is in the wrong place | Pull the stitch after each increase snug. Check the Positions line for where each increase goes. Use a slightly smaller hook. |
| The points or petals are uneven | The tension changes from one point to the next, or a count is off by one | Check the Positions line and the counts for each point. Keep the same tension on every point. Shape them gently when you finish. |
6. Flat Star
A single layer cream star with a red edge. Light and quick, and it lies flat on a gift box.
Overview
| Detail | Flat Star |
|---|---|
| Finished size | About 7.5 cm / 3 in across |
| Colours | Cream (star), Red (edge), Gold (loop) |
| Yarn used | About 6 m / 7 yd in total |
| Make | 1 |
| Parts made separately | Star x 1, Points x 5 |
| Rounds and rows | 9 |
| Difficulty | Medium |
| What it involves | You change colour, you turn at the end of each row, you add and remove stitches to shape it. |
Star
Colour: Cream · Hook: 3.5 mm (US E/4) · Make: 1
Work these rounds in a spiral. Do not join them. Move the marker up to the first stitch of each new round.
Round 1
Quick read: with Cream, 5 sc in MR (5)
- Use Cream and make a magic ring.
- Work 5 sc into the ring.
- Pull the tail to close the ring.
Stitch count: 5 sc
Round 2
Quick read: inc 5 times (10)
- Increase 5 times: work 2 sc in each of the next 5 stitches.
Stitch count: 10 sc Check: 5 repeats x 2 sts = 10
Round 3
Quick read: (sc, inc) 5 times (15)
- Work 1 sc in the next stitch.
- Increase: work 2 sc in the next stitch.
- Repeat steps 1 and 2 four more times (5 times in all).
Stitch count: 15 sc Check: 5 repeats x 3 sts = 15 Positions: Increases in every 2nd stitch of the round before, starting with stitch 2 (5 in all).
Round 4
Quick read: (sc 2, inc) 5 times (20)
- Work 1 sc in each of the next 2 stitches.
- Increase: work 2 sc in the next stitch.
- Repeat steps 1 and 2 four more times (5 times in all).
Stitch count: 20 sc Check: 5 repeats x 4 sts = 20 Positions: Increases in every 3rd stitch of the round before, starting with stitch 3 (5 in all). What it looks like now: The circle starts to curve into a small cup with 20 stitches around, after 4 rounds.
Sl st in the next st. Do not fasten off.
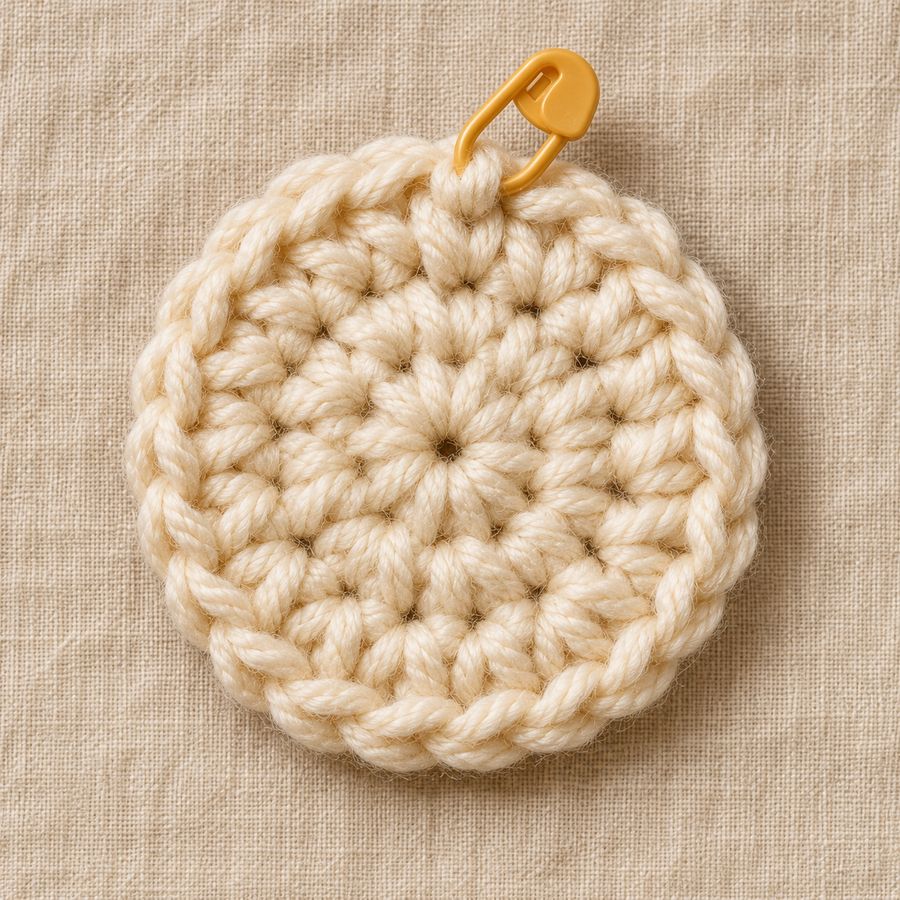 The Flat Star starts with the same 20 stitch centre, worked in Cream.
Count table: Star
| Round | Start count | Change | End count |
|---|---|---|---|
| 1 | MR | +5 | 5 sc |
| 2 | 5 | +5 | 10 sc |
| 3 | 10 | +5 | 15 sc |
| 4 | 15 | +5 | 20 sc |
Points (make 5)
Colour: Cream · Hook: 3.5 mm (US E/4) · Make: 5
Where the parts go: Work the 5 Points on stitches 1, 5, 9, 13 and 17 of Round 4 (Star).
Row 1
Quick read: sc in each of next 4 sts (4)
- Work 1 sc in each of the next 4 stitches.
Stitch count: 4 sc
Row 2
Quick read: ch 1, turn, sc in each st across (4)
- Ch 1 and turn. This ch 1 does not count as a stitch.
- Work 1 sc in each stitch to the end of the row (4 stitches).
Stitch count: 4 sc
Row 3
Quick read: ch 1, turn, dec 2 times (2)
- Ch 1 and turn. This ch 1 does not count as a stitch.
- Decrease 2 times in a row: each time, work 2 stitches together as 1 sc.
Stitch count: 2 sc Check: 2 repeats x 1 st = 2 Positions: Decreases over stitches 1-2 and 3-4 of the row before.
Row 4
Quick read: ch 1, turn, dec (1)
- Ch 1 and turn. This ch 1 does not count as a stitch.
- Decrease: work the next 2 stitches together as 1 sc.
Stitch count: 1 sc What it looks like now: The flat piece is getting narrower and is now 1 stitch wide, after 2 rows.
Fasten off. Join Cream in the next unworked st of Rnd 4 and repeat Rows 1 to 4 until you have 5 points.
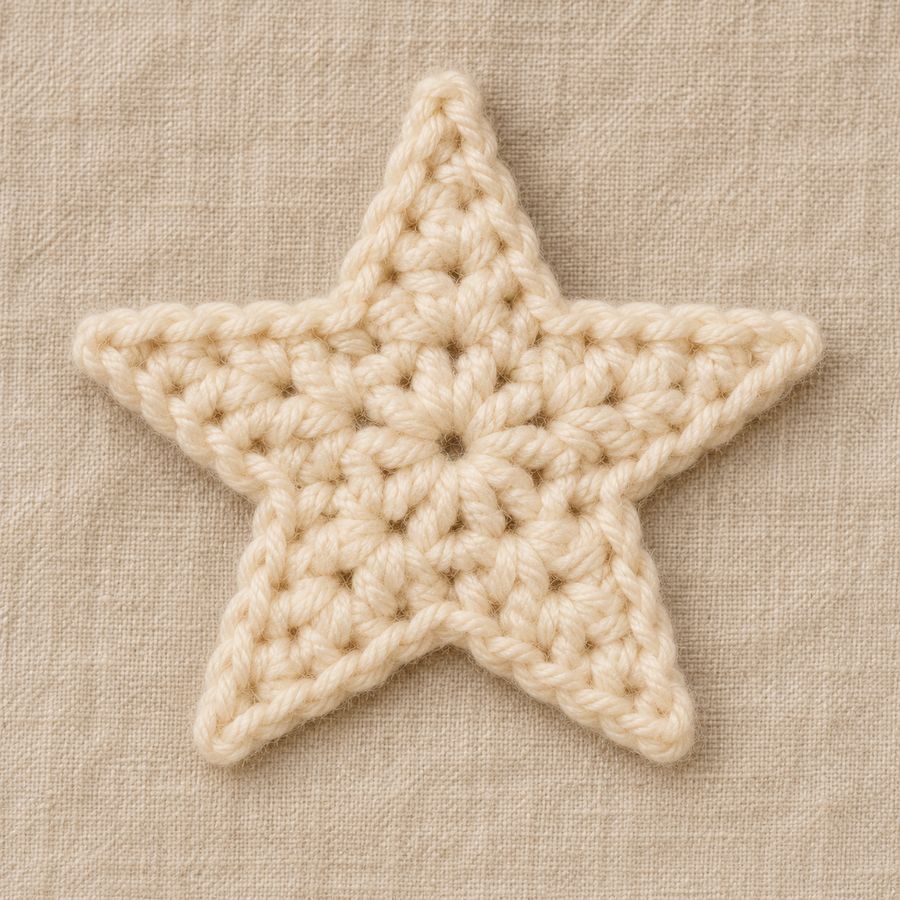 Each point narrows to one stitch.
Count table: Points
| Row | Start count | Change | End count |
|---|---|---|---|
| 1 | 4 | 0 | 4 sc |
| 2 | 4 | 0 | 4 sc |
| 3 | 4 | -2 | 2 sc |
| 4 | 2 | -1 | 1 sc |
Edge
Colour: Red · Hook: 3.5 mm (US E/4) · Make: 1
Edge round
Quick read: with Red, join in the tip of any point, (3 sc in the tip st, sc 3 down the side of the point, sc2tog across the valley, sc 3 up the side of the next point) 5 times (50)
- Use Red and join in the tip of any point.
- Work 3 sc in the tip stitch.
- Work 3 sc down the side of the point.
- Work sc2tog across the valley.
- Work 3 sc up the side of the next point.
- Repeat steps 2 to 5 four more times (5 times in all).
Stitch count: 50 sc Check: 5 repeats x 10 sts = 50
Sl st in the first st and fasten off. Block flat and add a Gold hanging loop to one tip.
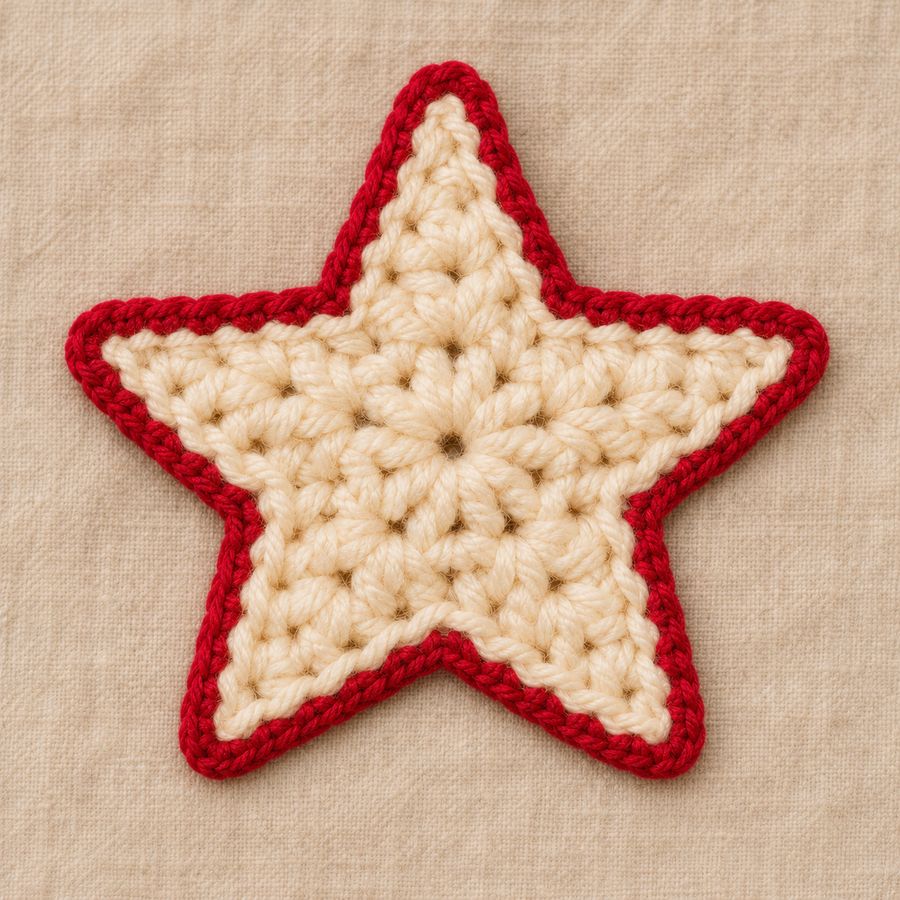 Three sc in every tip keeps your points sharp under the red edge.
Count table: Edge
| Round | Start count | Change | End count |
|---|---|---|---|
| Edge round | - | - | 50 sc |
Blocking
Block the flat ornaments (Flat Star, Flat Tree, Snowflake, Scandi Heart): pin them out flat on a towel, mist with water and leave to dry.
- Block the star flat with a pin in every point and it will stay crisp.
- Keep the 3 sc at each tip in the single tip st so the points stay sharp.
Common mistakes and fixes
| Problem | Cause | Fix |
|---|---|---|
| You have 19 stitches after Round 4 instead of 20. | An increase was missed. | Count the increases. There should be 5. Undo back to the missing one and work it again. |
| You have 3 stitches after Row 3 instead of 2. | A decrease was missed. | Count the decreases. There should be 2. Undo back to the missing one and work it again. |
| The piece grows by 1 stitch every row. | The turning ch 1 was worked as a stitch. | Skip the ch 1. You should have 4 stitches at the end of Row 2. |
| A small step shows where the colour changes. | The new colour was started on a new stitch. | Finish the last stitch of the old colour with the new colour. Keep the steps at the back. |
Troubleshooting for this piece
| Problem | Cause | Fix |
|---|---|---|
| The flat part curls up like a bowl | Too few stitches in a round, or tension that is very tight | Check each round against the Count table. Undo to the last round that matches. Go up half a hook size. |
| Small holes show at the increases | The first stitch after an increase is loose, or the increase is in the wrong place | Pull the stitch after each increase snug. Check the Positions line for where each increase goes. Use a slightly smaller hook. |
| The points or petals are uneven | The tension changes from one point to the next, or a count is off by one | Check the Positions line and the counts for each point. Keep the same tension on every point. Shape them gently when you finish. |
| The flat part ripples like a ruffle | Too many stitches in a round, or tension that is very loose | Recount every round. Undo to the last correct round. Go down half a hook size. |
7. Christmas Bell
A gold bell with a cream band, a flared red rim and a gold clapper inside.
Overview
| Detail | Christmas Bell |
|---|---|
| Finished size | About 6 cm / 2.4 in across the rim, 6.5 cm / 2.5 in tall |
| Colours | Gold (bell and clapper), Cream (band), Red (rim) |
| Yarn used | About 12 m / 13 yd in total |
| Make | 1 |
| Parts made separately | Bell x 1, Clapper x 1 |
| Rounds and rows | 17 |
| Difficulty | Medium |
| What it involves | You change colour, you add and remove stitches to shape it. |
Bell
Colours: Gold, Cream, Red · Hook: 3.5 mm (US E/4) · Make: 1
Work these rounds in a spiral. Do not join them. Move the marker up to the first stitch of each new round.
Round 1
Quick read: with Gold, 6 sc in MR (6)
- Use Gold and make a magic ring.
- Work 6 sc into the ring.
- Pull the tail to close the ring.
Stitch count: 6 sc
Round 2
Quick read: inc 6 times (12)
- Increase 6 times: work 2 sc in each of the next 6 stitches.
Stitch count: 12 sc Check: 6 repeats x 2 sts = 12
Round 3
Quick read: (sc, inc) 6 times (18)
- Work 1 sc in the next stitch.
- Increase: work 2 sc in the next stitch.
- Repeat steps 1 and 2 five more times (6 times in all).
Stitch count: 18 sc Check: 6 repeats x 3 sts = 18 Positions: Increases in every 2nd stitch of the round before, starting with stitch 2 (6 in all). What it looks like now: A flat circle with 18 stitches around, made in 3 rounds.
Rounds 4 to 7
Quick read: sc in each st around (18)
- Work 1 sc in each stitch around (18 stitches).
- Work this round 4 times in all: Rounds 4, 5, 6 and 7.
Stitch count: 18 sc (at the end of each round) What it looks like now: The sides go straight up like a tube with 18 stitches around, after 4 rounds without shaping.
Round 8
Quick read: (sc 2, inc) 6 times (24)
- Work 1 sc in each of the next 2 stitches.
- Increase: work 2 sc in the next stitch.
- Repeat steps 1 and 2 five more times (6 times in all).
Stitch count: 24 sc Check: 6 repeats x 4 sts = 24 Positions: Increases in every 3rd stitch of the round before, starting with stitch 3 (6 in all).
Round 9
Quick read: sc in each st around (24)
- Work 1 sc in each stitch around (24 stitches).
Stitch count: 24 sc
Round 10
Quick read: with Cream, (sc 3, inc) 6 times (30)
- Change to Cream and work 1 sc in each of the next 3 stitches.
- Increase: work 2 sc in the next stitch.
- Repeat steps 1 and 2 five more times (6 times in all), staying in the new colour.
Stitch count: 30 sc Check: 6 repeats x 5 sts = 30 Positions: Increases in every 4th stitch of the round before, starting with stitch 4 (6 in all).
Round 11
Quick read: sc in each st around (30)
- Work 1 sc in each stitch around (30 stitches).
Stitch count: 30 sc
Round 12
Quick read: with Red, (sc 4, inc) 6 times (36)
- Change to Red and work 1 sc in each of the next 4 stitches.
- Increase: work 2 sc in the next stitch.
- Repeat steps 1 and 2 five more times (6 times in all), staying in the new colour.
Stitch count: 36 sc Check: 6 repeats x 6 sts = 36 Positions: Increases in every 5th stitch of the round before, starting with stitch 5 (6 in all).
Round 13
Quick read: sc in each st around (36)
- Work 1 sc in each stitch around (36 stitches).
Stitch count: 36 sc
Sl st in the next st and fasten off. The bell is not stuffed.
Count table: Bell
| Round | Start count | Change | End count |
|---|---|---|---|
| 1 | MR | +6 | 6 sc |
| 2 | 6 | +6 | 12 sc |
| 3 | 12 | +6 | 18 sc |
| 4 | 18 | 0 | 18 sc |
| 5 | 18 | 0 | 18 sc |
| 6 | 18 | 0 | 18 sc |
| 7 | 18 | 0 | 18 sc |
| 8 | 18 | +6 | 24 sc |
| 9 | 24 | 0 | 24 sc |
| 10 | 24 | +6 | 30 sc |
| 11 | 30 | 0 | 30 sc |
| 12 | 30 | +6 | 36 sc |
| 13 | 36 | 0 | 36 sc |
Clapper
Colour: Gold · Hook: 3.5 mm (US E/4) · Make: 1
Work these rounds in a spiral. Do not join them. Move the marker up to the first stitch of each new round.
Round 1
Quick read: with Gold, 6 sc in MR (6)
- Use Gold and make a magic ring.
- Work 6 sc into the ring.
- Pull the tail to close the ring.
Stitch count: 6 sc
Round 2
Quick read: inc 6 times (12)
- Increase 6 times: work 2 sc in each of the next 6 stitches.
Stitch count: 12 sc Check: 6 repeats x 2 sts = 12 What it looks like now: A flat circle with 12 stitches around, made in 2 rounds.
Round 3
Quick read: sc in each st around (12)
- Work 1 sc in each stitch around (12 stitches).
Stitch count: 12 sc
Stuff the clapper firmly.
Round 4
Quick read: dec 6 times (6)
- Decrease 6 times in a row: each time, work 2 stitches together as 1 sc.
Stitch count: 6 sc Check: 6 repeats x 1 st = 6 Positions: Decreases over stitches 1-2 of the round before, then every 2 stitches (6 in all).
Fasten off, leaving a 15 cm / 6 in tail, and close the opening.
Count table: Clapper
| Round | Start count | Change | End count |
|---|---|---|---|
| 1 | MR | +6 | 6 sc |
| 2 | 6 | +6 | 12 sc |
| 3 | 12 | 0 | 12 sc |
| 4 | 12 | -6 | 6 sc |
Assembly
-
Thread the clapper tail through the top of the bell from the inside, so the clapper hangs just below the rim.
-
Use the same tail to make a Gold hanging loop on top of the bell and secure it.
-
Starch the bell lightly (see Finishing and Display) if you want the rim to keep its flare.
Blocking
For crisp arms on the Snowflake and a firm rim on the Bell, brush on fabric stiffener or spray starch, shape and leave to dry completely.
- Do not stuff the bell. A little starch keeps the flared rim open.
- Hang the clapper so it shows just below the red rim.
Common mistakes and fixes
| Problem | Cause | Fix |
|---|---|---|
| You have 35 stitches after Round 12 instead of 36. | An increase was missed. | Count the increases. There should be 6. Undo back to the missing one and work it again. |
| You have 7 stitches after Clapper Round 4 instead of 6. | A decrease was missed. | Count the decreases. There should be 6. Undo back to the missing one and work it again. |
| A small step shows where the colour changes. | The new colour was started on a new stitch. | Finish the last stitch of the old colour with the new colour. Keep the steps at the back. |
| The count is off after several plain rounds. | The marker moved or fell out. | Put the marker in the first stitch of every round and count before you move it. |
Troubleshooting for this piece
| Problem | Cause | Fix |
|---|---|---|
| The stuffing shows through the stitches | The stitches are loose, or the piece is stuffed too tightly | Use a smaller hook and work firmly. Stuff in small pieces and stop when the shape is firm. |
| The opening will not close neatly at the end | A decrease was missed, so too many stitches are left | Count the stitches against the last row of the Count table. Fix the round if it does not match. Then thread the tail through the front loops of the last stitches and pull tight. |
| Small holes show at the increases | The first stitch after an increase is loose, or the increase is in the wrong place | Pull the stitch after each increase snug. Check the Positions line for where each increase goes. Use a slightly smaller hook. |
| The finished piece is bigger or smaller than the size given | Your tension is different from the gauge, or the yarn is thicker or thinner | Make a gauge swatch and compare it with the Gauge section. Change the hook size to match, or use the yarn named in Materials. |
8. Mini Cone Tree
A small standing cone tree with a red garland, gold baubles and a brown trunk.
You wind the chain garland on after the cone is stuffed and closed.
Overview
| Detail | Mini Cone Tree |
|---|---|
| Finished size | About 4.5 cm / 1.75 in across the base, 7 cm / 2.75 in tall with trunk |
| Colours | Green (tree), Red (garland), Gold (baubles and loop), Brown (trunk) |
| Yarn used | About 11 m / 12 yd in total |
| Make | 1 |
| Parts made separately | Tree x 1, Trunk x 1 |
| Rounds and rows | 21 |
| Difficulty | Medium |
| What it involves | You change colour, several parts are sewn together, you add and remove stitches to shape it. |
Tree
Colour: Green · Hook: 3.5 mm (US E/4) · Make: 1
Work these rounds in a spiral. Do not join them. Move the marker up to the first stitch of each new round.
Round 1
Quick read: with Green, 6 sc in MR (6)
- Use Green and make a magic ring.
- Work 6 sc into the ring.
- Pull the tail to close the ring.
Stitch count: 6 sc
Round 2
Quick read: sc in each st around (6)
- Work 1 sc in each stitch around (6 stitches).
Stitch count: 6 sc
Round 3
Quick read: (sc, inc) 3 times (9)
- Work 1 sc in the next stitch.
- Increase: work 2 sc in the next stitch.
- Repeat steps 1 and 2 two more times (3 times in all).
Stitch count: 9 sc Check: 3 repeats x 3 sts = 9 Positions: Increases in every 2nd stitch of the round before, starting with stitch 2 (3 in all).
Round 4
Quick read: sc in each st around (9)
- Work 1 sc in each stitch around (9 stitches).
Stitch count: 9 sc
Round 5
Quick read: (sc 2, inc) 3 times (12)
- Work 1 sc in each of the next 2 stitches.
- Increase: work 2 sc in the next stitch.
- Repeat steps 1 and 2 two more times (3 times in all).
Stitch count: 12 sc Check: 3 repeats x 4 sts = 12 Positions: Increases in every 3rd stitch of the round before, starting with stitch 3 (3 in all).
Round 6
Quick read: sc in each st around (12)
- Work 1 sc in each stitch around (12 stitches).
Stitch count: 12 sc
Round 7
Quick read: (sc 3, inc) 3 times (15)
- Work 1 sc in each of the next 3 stitches.
- Increase: work 2 sc in the next stitch.
- Repeat steps 1 and 2 two more times (3 times in all).
Stitch count: 15 sc Check: 3 repeats x 5 sts = 15 Positions: Increases in every 4th stitch of the round before, starting with stitch 4 (3 in all).
Round 8
Quick read: sc in each st around (15)
- Work 1 sc in each stitch around (15 stitches).
Stitch count: 15 sc
Round 9
Quick read: (sc 4, inc) 3 times (18)
- Work 1 sc in each of the next 4 stitches.
- Increase: work 2 sc in the next stitch.
- Repeat steps 1 and 2 two more times (3 times in all).
Stitch count: 18 sc Check: 3 repeats x 6 sts = 18 Positions: Increases in every 5th stitch of the round before, starting with stitch 5 (3 in all).
Round 10
Quick read: sc in each st around (18)
- Work 1 sc in each stitch around (18 stitches).
Stitch count: 18 sc
Round 11
Quick read: (sc 5, inc) 3 times (21)
- Work 1 sc in each of the next 5 stitches.
- Increase: work 2 sc in the next stitch.
- Repeat steps 1 and 2 two more times (3 times in all).
Stitch count: 21 sc Check: 3 repeats x 7 sts = 21 Positions: Increases in every 6th stitch of the round before, starting with stitch 6 (3 in all).
Round 12
Quick read: sc in each st around (21)
- Work 1 sc in each stitch around (21 stitches).
Stitch count: 21 sc
Round 13
Quick read: (sc 6, inc) 3 times (24)
- Work 1 sc in each of the next 6 stitches.
- Increase: work 2 sc in the next stitch.
- Repeat steps 1 and 2 two more times (3 times in all).
Stitch count: 24 sc Check: 3 repeats x 8 sts = 24 Positions: Increases in every 7th stitch of the round before, starting with stitch 7 (3 in all).
Round 14
Quick read: sc in each st around (24)
- Work 1 sc in each stitch around (24 stitches).
Stitch count: 24 sc
Round 15
Quick read: sc in BLO in each st around (24)
- Work 1 sc in each stitch around (24 stitches).
- Work into the back loop only.
Stitch count: 24 sc What it looks like now: The sides go straight up like a tube with 24 stitches around, after 2 rounds without shaping.
Round 16
Quick read: (sc 2, dec) 6 times (18)
- Work 1 sc in each of the next 2 stitches.
- Decrease: work the next 2 stitches together as 1 sc.
- Repeat steps 1 and 2 five more times (6 times in all).
Stitch count: 18 sc Check: 6 repeats x 3 sts = 18 Positions: Decreases over stitches 3-4 of the round before, then every 4 stitches (6 in all).
Round 17
Quick read: (sc, dec) 6 times (12)
- Work 1 sc in the next stitch.
- Decrease: work the next 2 stitches together as 1 sc.
- Repeat steps 1 and 2 five more times (6 times in all).
Stitch count: 12 sc Check: 6 repeats x 2 sts = 12 Positions: Decreases over stitches 2-3 of the round before, then every 3 stitches (6 in all).
Stuff the tree firmly, right up into the tip.
Round 18
Quick read: dec 6 times (6)
- Decrease 6 times in a row: each time, work 2 stitches together as 1 sc.
Stitch count: 6 sc Check: 6 repeats x 1 st = 6 Positions: Decreases over stitches 1-2 of the round before, then every 2 stitches (6 in all). What it looks like now: The piece is closing in and has 6 stitches left around the opening, after 3 rounds of decreasing.
Fasten off and close the opening. Rnd 15 makes a neat flat base edge.
Count table: Tree
| Round | Start count | Change | End count |
|---|---|---|---|
| 1 | MR | +6 | 6 sc |
| 2 | 6 | 0 | 6 sc |
| 3 | 6 | +3 | 9 sc |
| 4 | 9 | 0 | 9 sc |
| 5 | 9 | +3 | 12 sc |
| 6 | 12 | 0 | 12 sc |
| 7 | 12 | +3 | 15 sc |
| 8 | 15 | 0 | 15 sc |
| 9 | 15 | +3 | 18 sc |
| 10 | 18 | 0 | 18 sc |
| 11 | 18 | +3 | 21 sc |
| 12 | 21 | 0 | 21 sc |
| 13 | 21 | +3 | 24 sc |
| 14 | 24 | 0 | 24 sc |
| 15 | 24 | 0 | 24 sc |
| 16 | 24 | -6 | 18 sc |
| 17 | 18 | -6 | 12 sc |
| 18 | 12 | -6 | 6 sc |
Trunk
Colour: Brown · Hook: 3.5 mm (US E/4) · Make: 1
Work these rounds in a spiral. Do not join them. Move the marker up to the first stitch of each new round.
Round 1
Quick read: with Brown, 6 sc in MR (6)
- Use Brown and make a magic ring.
- Work 6 sc into the ring.
- Pull the tail to close the ring.
Stitch count: 6 sc
Rounds 2 to 3
Quick read: sc in each st around (6)
- Work 1 sc in each stitch around (6 stitches).
- Work this round 2 times in all: Rounds 2 and 3.
Stitch count: 6 sc (at the end of each round) What it looks like now: The sides go straight up like a tube with 6 stitches around, after 2 rounds without shaping.
Sl st in the next st and fasten off, leaving a tail. Stuff lightly.
Count table: Trunk
| Round | Start count | Change | End count |
|---|---|---|---|
| 1 | MR | +6 | 6 sc |
| 2 | 6 | 0 | 6 sc |
| 3 | 6 | 0 | 6 sc |
Assembly
-
Sew the trunk to the centre of the base.
-
With Red, ch 70 for the garland. Wind it round the tree in a spiral from the tip to the base and tack it in place every 2 cm / 0.75 in.
-
With Gold, make 8 French knots spaced around the tree for baubles.
-
Add a Gold hanging loop at the tip.
- Fill the tip of the cone first, a pinch at a time, with the back of the hook.
- Rnd 15 in the back loop makes a crisp edge so the tree stands on its base.
Common mistakes and fixes
| Problem | Cause | Fix |
|---|---|---|
| You have 23 stitches after Round 13 instead of 24. | An increase was missed. | Count the increases. There should be 3. Undo back to the missing one and work it again. |
| You have 19 stitches after Round 16 instead of 18. | A decrease was missed. | Count the decreases. There should be 6. Undo back to the missing one and work it again. |
| No ridge shows at Round 15. | The round was worked through both loops. | Undo the round and work it into the back loop only. |
| A small step shows where the colour changes. | The new colour was started on a new stitch. | Finish the last stitch of the old colour with the new colour. Keep the steps at the back. |
| The count is off after several plain rounds. | The marker moved or fell out. | Put the marker in the first stitch of every round and count before you move it. |
Troubleshooting for this piece
| Problem | Cause | Fix |
|---|---|---|
| The stuffing shows through the stitches | The stitches are loose, or the piece is stuffed too tightly | Use a smaller hook and work firmly. Stuff in small pieces and stop when the shape is firm. |
| The opening will not close neatly at the end | A decrease was missed, so too many stitches are left | Count the stitches against the last row of the Count table. Fix the round if it does not match. Then thread the tail through the front loops of the last stitches and pull tight. |
| Small holes show at the increases | The first stitch after an increase is loose, or the increase is in the wrong place | Pull the stitch after each increase snug. Check the Positions line for where each increase goes. Use a slightly smaller hook. |
| The finished piece is bigger or smaller than the size given | Your tension is different from the gauge, or the yarn is thicker or thinner | Make a gauge swatch and compare it with the Gauge section. Change the hook size to match, or use the yarn named in Materials. |
9. Flat Tree
A flat three tier tree in green with a cream edge, red baubles and a short brown trunk.
Overview
| Detail | Flat Tree |
|---|---|
| Finished size | About 8.5 cm / 3.25 in wide, 8.5 cm / 3.25 in tall with trunk |
| Colours | Green (tree), Cream (edge), Red (baubles), Brown (trunk), Gold (loop) |
| Yarn used | About 8 m / 9 yd in total |
| Make | 1 |
| Parts made separately | Tree x 1 |
| Rounds and rows | 19 |
| Difficulty | Medium |
| What it involves | You change colour, you turn at the end of each row, you add and remove stitches to shape it. |
Tree
Colour: Green · Hook: 3.5 mm (US E/4) · Make: 1
The tree is worked from the bottom up in three tiers. Each tier narrows by 2 sts a row, then the next tier steps out again with a double increase at each edge.
Foundation chain
Quick read: with Green, ch 16 (16)
- Use Green and make a slip knot, then ch 16.
Stitch count: 16 ch
Row 1
Quick read: sc in 2nd ch from hook, sc in each ch across (15)
- Work 1 sc in the 2nd chain from the hook.
- Work 1 sc in each chain to the end (14 chains).
Stitch count: 15 sc Check: 1 + 14 = 15
Row 2
Quick read: ch 1, turn, dec, sc 11, dec (13)
- Ch 1 and turn. This ch 1 does not count as a stitch.
- Decrease: work the next 2 stitches together as 1 sc.
- Work 1 sc in each of the next 11 stitches.
- Decrease: work the next 2 stitches together as 1 sc.
Stitch count: 13 sc Check: 1 + 11 + 1 = 13 Positions: Decreases over stitches 1-2 and 14-15 of the row before.
Row 3
Quick read: ch 1, turn, dec, sc 9, dec (11)
- Ch 1 and turn. This ch 1 does not count as a stitch.
- Decrease: work the next 2 stitches together as 1 sc.
- Work 1 sc in each of the next 9 stitches.
- Decrease: work the next 2 stitches together as 1 sc.
Stitch count: 11 sc Check: 1 + 9 + 1 = 11 Positions: Decreases over stitches 1-2 and 12-13 of the row before.
Row 4
Quick read: ch 1, turn, dec, sc 7, dec (9)
- Ch 1 and turn. This ch 1 does not count as a stitch.
- Decrease: work the next 2 stitches together as 1 sc.
- Work 1 sc in each of the next 7 stitches.
- Decrease: work the next 2 stitches together as 1 sc.
Stitch count: 9 sc Check: 1 + 7 + 1 = 9 Positions: Decreases over stitches 1-2 and 10-11 of the row before. What it looks like now: The flat piece is getting narrower and is now 9 stitches wide, after 4 rows.
Row 5
Quick read: ch 1, turn, inc, inc, sc 5, inc, inc (13)
- Ch 1 and turn. This ch 1 does not count as a stitch.
- Increase: work 2 sc in the next stitch.
- Increase: work 2 sc in the next stitch.
- Work 1 sc in each of the next 5 stitches.
- Increase: work 2 sc in the next stitch.
- Increase: work 2 sc in the next stitch.
Stitch count: 13 sc Check: 2 + 2 + 5 + 2 + 2 = 13 Positions: Increases in stitches 1, 2, 8 and 9 of the row before.
Row 6
Quick read: ch 1, turn, dec, sc 9, dec (11)
- Ch 1 and turn. This ch 1 does not count as a stitch.
- Decrease: work the next 2 stitches together as 1 sc.
- Work 1 sc in each of the next 9 stitches.
- Decrease: work the next 2 stitches together as 1 sc.
Stitch count: 11 sc Check: 1 + 9 + 1 = 11 Positions: Decreases over stitches 1-2 and 12-13 of the row before.
Row 7
Quick read: ch 1, turn, dec, sc 7, dec (9)
- Ch 1 and turn. This ch 1 does not count as a stitch.
- Decrease: work the next 2 stitches together as 1 sc.
- Work 1 sc in each of the next 7 stitches.
- Decrease: work the next 2 stitches together as 1 sc.
Stitch count: 9 sc Check: 1 + 7 + 1 = 9 Positions: Decreases over stitches 1-2 and 10-11 of the row before.
Row 8
Quick read: ch 1, turn, dec, sc 5, dec (7)
- Ch 1 and turn. This ch 1 does not count as a stitch.
- Decrease: work the next 2 stitches together as 1 sc.
- Work 1 sc in each of the next 5 stitches.
- Decrease: work the next 2 stitches together as 1 sc.
Stitch count: 7 sc Check: 1 + 5 + 1 = 7 Positions: Decreases over stitches 1-2 and 8-9 of the row before. What it looks like now: The flat piece is getting narrower and is now 7 stitches wide, after 3 rows.
Row 9
Quick read: ch 1, turn, inc, inc, sc 3, inc, inc (11)
- Ch 1 and turn. This ch 1 does not count as a stitch.
- Increase: work 2 sc in the next stitch.
- Increase: work 2 sc in the next stitch.
- Work 1 sc in each of the next 3 stitches.
- Increase: work 2 sc in the next stitch.
- Increase: work 2 sc in the next stitch.
Stitch count: 11 sc Check: 2 + 2 + 3 + 2 + 2 = 11 Positions: Increases in stitches 1, 2, 6 and 7 of the row before.
Row 10
Quick read: ch 1, turn, dec, sc 7, dec (9)
- Ch 1 and turn. This ch 1 does not count as a stitch.
- Decrease: work the next 2 stitches together as 1 sc.
- Work 1 sc in each of the next 7 stitches.
- Decrease: work the next 2 stitches together as 1 sc.
Stitch count: 9 sc Check: 1 + 7 + 1 = 9 Positions: Decreases over stitches 1-2 and 10-11 of the row before.
Row 11
Quick read: ch 1, turn, dec, sc 5, dec (7)
- Ch 1 and turn. This ch 1 does not count as a stitch.
- Decrease: work the next 2 stitches together as 1 sc.
- Work 1 sc in each of the next 5 stitches.
- Decrease: work the next 2 stitches together as 1 sc.
Stitch count: 7 sc Check: 1 + 5 + 1 = 7 Positions: Decreases over stitches 1-2 and 8-9 of the row before.
Row 12
Quick read: ch 1, turn, dec, sc 3, dec (5)
- Ch 1 and turn. This ch 1 does not count as a stitch.
- Decrease: work the next 2 stitches together as 1 sc.
- Work 1 sc in each of the next 3 stitches.
- Decrease: work the next 2 stitches together as 1 sc.
Stitch count: 5 sc Check: 1 + 3 + 1 = 5 Positions: Decreases over stitches 1-2 and 6-7 of the row before.
Row 13
Quick read: ch 1, turn, dec, sc, dec (3)
- Ch 1 and turn. This ch 1 does not count as a stitch.
- Decrease: work the next 2 stitches together as 1 sc.
- Work 1 sc in the next stitch.
- Decrease: work the next 2 stitches together as 1 sc.
Stitch count: 3 sc Check: 1 + 1 + 1 = 3 Positions: Decreases over stitches 1-2 and 4-5 of the row before.
Row 14
Quick read: ch 1, turn, sc3tog (1)
- Ch 1 and turn. This ch 1 does not count as a stitch.
- Work sc3tog over the next 3 stitches (3 stitches become 1).
Stitch count: 1 sc What it looks like now: The flat piece is getting narrower and is now 1 stitch wide, after 5 rows.
Fasten off.
Count table: Tree
| Row | Start count | Change | End count |
|---|---|---|---|
| Foundation chain | - | - | 16 ch |
| 1 | 16 | -1 | 15 sc |
| 2 | 15 | -2 | 13 sc |
| 3 | 13 | -2 | 11 sc |
| 4 | 11 | -2 | 9 sc |
| 5 | 9 | +4 | 13 sc |
| 6 | 13 | -2 | 11 sc |
| 7 | 11 | -2 | 9 sc |
| 8 | 9 | -2 | 7 sc |
| 9 | 7 | +4 | 11 sc |
| 10 | 11 | -2 | 9 sc |
| 11 | 9 | -2 | 7 sc |
| 12 | 7 | -2 | 5 sc |
| 13 | 5 | -2 | 3 sc |
| 14 | 3 | -2 | 1 sc |
Edge
Colour: Cream · Hook: 3.5 mm (US E/4) · Make: 1
Edge round
Quick read: with Cream, join in the first st of Row 1, 3 sc in the corner st, sc 13 along the bottom, 3 sc in the corner st, sc 16 up the side, 3 sc in the tip st, sc 16 down the other side (54)
- Use Cream and join in the first stitch of Row 1.
- Work 3 sc in the corner stitch.
- Work 13 sc along the bottom.
- Work 3 sc in the corner stitch.
- Work 16 sc up the side.
- Work 3 sc in the tip stitch.
- Work 16 sc down the other side.
Stitch count: 54 sc Check: 3 + 13 + 3 + 16 + 3 + 16 = 54
Up each side, work 1 sc in each of the 14 row ends and 1 extra sc at the outer corner of each of the 2 tier steps (Rows 5 and 9), so 16 sc per side. Sl st in the first st and fasten off.
Count table: Edge
| Round | Start count | Change | End count |
|---|---|---|---|
| Edge round | - | - | 54 sc |
Trunk
Colour: Brown · Hook: 3.5 mm (US E/4) · Make: 1
The 9th, 10th and 11th sts of the Edge Rnd are the 3 middle sts of the bottom edge.
Row 1
Quick read: with Brown, join in the 9th st of the Edge Rnd, sc in each of next 3 sts (3)
- Use Brown and join in the 9th stitch of the Edge Rnd.
- Work 1 sc in each of the next 3 stitches.
Stitch count: 3 sc
Rows 2 to 3
Quick read: ch 1, turn, sc in each st across (3)
- Ch 1 and turn. This ch 1 does not count as a stitch.
- Work 1 sc in each stitch to the end of the row (3 stitches).
- Work this row 2 times in all: Rows 2 and 3.
Stitch count: 3 sc (at the end of each row) What it looks like now: A flat piece 3 stitches wide, after 2 rows.
Fasten off and weave in the ends.
Count table: Trunk
| Row | Start count | Change | End count |
|---|---|---|---|
| 1 | - | - | 3 sc |
| 2 | 3 | 0 | 3 sc |
| 3 | 3 | 0 | 3 sc |
Finishing
-
With Red, make 6 French knots across the tree for baubles.
-
Add a Gold hanging loop at the tip.
Blocking
Block the flat ornaments (Flat Star, Flat Tree, Snowflake, Scandi Heart): pin them out flat on a towel, mist with water and leave to dry.
- Each tier narrows by 2 sts a row; the double increase at each edge on Rows 5 and 9 makes the step out for the next tier.
- Keep the 3 sc at each corner of the edge so the corners stay sharp.
Common mistakes and fixes
| Problem | Cause | Fix |
|---|---|---|
| You have 12 stitches after Row 5 instead of 13. | An increase was missed. | Count the increases. There should be 4. Undo back to the missing one and work it again. |
| You have 14 stitches after Row 2 instead of 13. | A decrease was missed. | Count the decreases. There should be 2. Undo back to the missing one and work it again. |
| The piece grows by 1 stitch every row. | The turning ch 1 was worked as a stitch. | Skip the ch 1. You should have 13 stitches at the end of Row 2. |
| Row 1 has 16 stitches instead of 15. | The first stitch went into the 1st chain from the hook. | Start in the 2nd chain from the hook. |
| A small step shows where the colour changes. | The new colour was started on a new stitch. | Finish the last stitch of the old colour with the new colour. Keep the steps at the back. |
Troubleshooting for this piece
| Problem | Cause | Fix |
|---|---|---|
| The sides are wavy, or one end is wider | The stitch count changed by one on some rows, often at the turning chain | Count the stitches at the end of every row and compare with the Count table. Undo to the last correct row. Use a marker in the first stitch. |
| The finished piece is bigger or smaller than the size given | Your tension is different from the gauge, or the yarn is thicker or thinner | Make a gauge swatch and compare it with the Gauge section. Change the hook size to match, or use the yarn named in Materials. |
10. Snowflake
A lacy cream snowflake with six slender arms, each with two pairs of little branches.
Overview
| Detail | Snowflake |
|---|---|
| Finished size | About 8.5 cm / 3.25 in across, arm tip to arm tip |
| Colours | Cream (snowflake), Gold (loop) |
| Yarn used | About 5 m / 5 yd in total |
| Make | 1 |
| Parts made separately | Snowflake x 1 |
| Rounds and rows | 3 |
| Difficulty | Medium |
| What it involves | It has special parts such as points or picots, you add and remove stitches to shape it. |
Snowflake
Colour: Cream · Hook: 3.5 mm (US E/4) · Make: 1
Work these rounds in a spiral. Do not join them. Move the marker up to the first stitch of each new round.
Each arm is a chain worked back on itself with slip stitches, with two pairs of picot branches. An arm is not counted in the stitch count.
Arm
- Ch 8.
- Work 1 sl st in the 2nd chain from the hook.
- Work 1 sl st in the next chain.
- Ch 4.
- Work 1 sl st in the 4th chain from the hook.
- Repeat steps 4 and 5 one more time (2 times in all).
- Work 1 sl st in each of the next 2 chains.
- Ch 4.
- Work 1 sl st in the 4th chain from the hook.
- Repeat steps 8 and 9 one more time (2 times in all).
- Work 1 sl st in each of the last 3 chains.
You are back at the centre.
Round 1
Quick read: with Cream, 6 sc in MR (6)
- Use Cream and make a magic ring.
- Work 6 sc into the ring.
- Pull the tail to close the ring.
Stitch count: 6 sc
Round 2
Quick read: inc 6 times (12)
- Increase 6 times: work 2 sc in each of the next 6 stitches.
Stitch count: 12 sc Check: 6 repeats x 2 sts = 12 What it looks like now: A flat circle with 12 stitches around, made in 2 rounds.
Round 3
Quick read: (sc, arm, sc) 6 times (12)
- Work 1 sc in the next stitch.
- Make 1 arm (see above).
- Work 1 sc in the next stitch.
- Repeat steps 1 to 3 five more times (6 times in all).
Stitch count: 12 sc Check: 6 repeats x 2 sts = 12 Positions: Arm after stitches 1, 3, 5, 7, 9 and 11 of this round.
Sl st in the first st and fasten off.
Count table: Snowflake
| Round | Start count | Change | End count |
|---|---|---|---|
| 1 | MR | +6 | 6 sc |
| 2 | 6 | +6 | 12 sc |
| 3 | 12 | 0 | 12 sc |
Finishing
Weave in all ends, pin the snowflake out flat with a pin at every arm tip and branch, and starch it so the arms stay straight. Add a Gold hanging loop to one arm tip.
Blocking
Block the flat ornaments (Flat Star, Flat Tree, Snowflake, Scandi Heart): pin them out flat on a towel, mist with water and leave to dry.
For crisp arms on the Snowflake and a firm rim on the Bell, brush on fabric stiffener or spray starch, shape and leave to dry completely.
- Keep the arm chains loose so the slip stitches back along them are easy to work.
- Count 6 arms before you fasten off: one in every (sc, arm, sc) repeat.
- Starch and pin each arm and branch straight while it dries.
Common mistakes and fixes
| Problem | Cause | Fix |
|---|---|---|
| You have 11 stitches after Round 2 instead of 12. | An increase was missed. | Count the increases. There should be 6. Undo back to the missing one and work it again. |
| The count is too high after Round 3. | The arm parts were counted as stitches. | Do not count them. You should have 12 stitches. |
| Your piece is bigger or smaller than about 8.5 cm / 3.25 in across, arm tip to arm tip. | Your tension is different from the gauge. | Check your gauge. Use a smaller hook if it is too big and a bigger hook if it is too small. |
Troubleshooting for this piece
| Problem | Cause | Fix |
|---|---|---|
| The flat part curls up like a bowl | Too few stitches in a round, or tension that is very tight | Check each round against the Count table. Undo to the last round that matches. Go up half a hook size. |
| Small holes show at the increases | The first stitch after an increase is loose, or the increase is in the wrong place | Pull the stitch after each increase snug. Check the Positions line for where each increase goes. Use a slightly smaller hook. |
| The points or petals are uneven | The tension changes from one point to the next, or a count is off by one | Check the Positions line and the counts for each point. Keep the same tension on every point. Shape them gently when you finish. |
| The flat part ripples like a ruffle | Too many stitches in a round, or tension that is very loose | Recount every round. Undo to the last correct round. Go down half a hook size. |
11. Puffy Heart
A plump red heart with little cream cross stitch stars.
Two bumps become one plump heart, then you stitch the stars on top.
Overview
| Detail | Puffy Heart |
|---|---|
| Finished size | About 6.5 cm / 2.5 in wide, 6 cm / 2.4 in tall |
| Colours | Red (heart), Cream (stars), Gold (loop) |
| Yarn used | About 10 m / 11 yd in total |
| Make | 1 |
| Parts made separately | Bumps x 2 |
| Rounds and rows | 11 |
| Difficulty | Easy |
| What it involves | It uses only basic stitches, you add and remove stitches to shape it. |
Bumps (make 2)
Colour: Red · Hook: 3.5 mm (US E/4) · Make: 2
Work these rounds in a spiral. Do not join them. Move the marker up to the first stitch of each new round.
Round 1
Quick read: with Red, 6 sc in MR (6)
- Use Red and make a magic ring.
- Work 6 sc into the ring.
- Pull the tail to close the ring.
Stitch count: 6 sc
Round 2
Quick read: inc 6 times (12)
- Increase 6 times: work 2 sc in each of the next 6 stitches.
Stitch count: 12 sc Check: 6 repeats x 2 sts = 12
Round 3
Quick read: (sc, inc) 6 times (18)
- Work 1 sc in the next stitch.
- Increase: work 2 sc in the next stitch.
- Repeat steps 1 and 2 five more times (6 times in all).
Stitch count: 18 sc Check: 6 repeats x 3 sts = 18 Positions: Increases in every 2nd stitch of the round before, starting with stitch 2 (6 in all). What it looks like now: A flat circle with 18 stitches around, made in 3 rounds.
Round 4
Quick read: sc in each st around (18)
- Work 1 sc in each stitch around (18 stitches).
Stitch count: 18 sc
Fasten off the first bump. Keep the second bump on the hook.
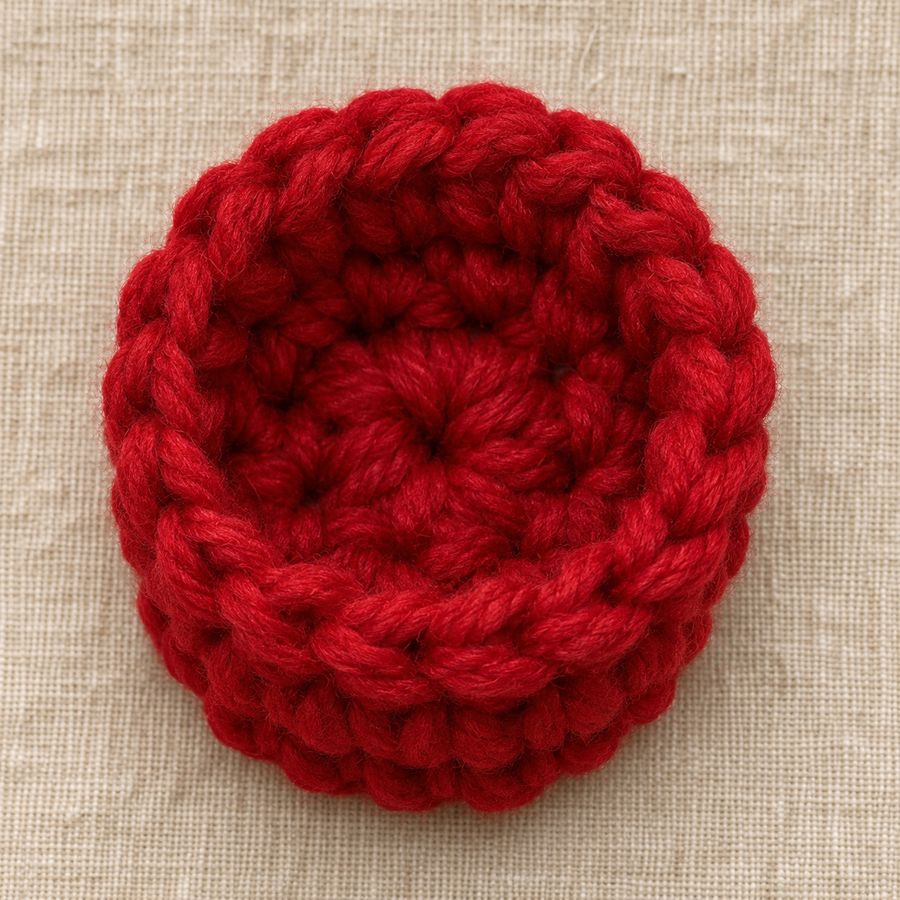 Make two of these bumps before you start the body.
Count table: Bumps
| Round | Start count | Change | End count |
|---|---|---|---|
| 1 | MR | +6 | 6 sc |
| 2 | 6 | +6 | 12 sc |
| 3 | 12 | +6 | 18 sc |
| 4 | 18 | 0 | 18 sc |
Body
Colour: Red · Hook: 3.5 mm (US E/4) · Make: 1
Work these rounds in a spiral. Do not join them. Move the marker up to the first stitch of each new round.
Round 5
Quick read: sc in each of next 15 sts of the second bump, sc in each of next 15 sts of the first bump (30)
- Work 1 sc in each of the next 15 stitches of the second bump.
- Work 1 sc in each of the next 15 stitches of the first bump.
Stitch count: 30 sc Check: 15 + 15 = 30
Round 6
Quick read: sc in each st around (30)
- Work 1 sc in each stitch around (30 stitches).
Stitch count: 30 sc
Round 7
Quick read: (sc 3, dec) 6 times (24)
- Work 1 sc in each of the next 3 stitches.
- Decrease: work the next 2 stitches together as 1 sc.
- Repeat steps 1 and 2 five more times (6 times in all).
Stitch count: 24 sc Check: 6 repeats x 4 sts = 24 Positions: Decreases over stitches 4-5 of the round before, then every 5 stitches (6 in all).
Round 8
Quick read: sc in each st around (24)
- Work 1 sc in each stitch around (24 stitches).
Stitch count: 24 sc
Round 9
Quick read: (sc 2, dec) 6 times (18)
- Work 1 sc in each of the next 2 stitches.
- Decrease: work the next 2 stitches together as 1 sc.
- Repeat steps 1 and 2 five more times (6 times in all).
Stitch count: 18 sc Check: 6 repeats x 3 sts = 18 Positions: Decreases over stitches 3-4 of the round before, then every 4 stitches (6 in all).
Round 10
Quick read: (sc, dec) 6 times (12)
- Work 1 sc in the next stitch.
- Decrease: work the next 2 stitches together as 1 sc.
- Repeat steps 1 and 2 five more times (6 times in all).
Stitch count: 12 sc Check: 6 repeats x 2 sts = 12 Positions: Decreases over stitches 2-3 of the round before, then every 3 stitches (6 in all).
Sew closed the 3 unworked sts of each bump where the bumps meet. Stuff the heart firmly.
Round 11
Quick read: dec 6 times (6)
- Decrease 6 times in a row: each time, work 2 stitches together as 1 sc.
Stitch count: 6 sc Check: 6 repeats x 1 st = 6 Positions: Decreases over stitches 1-2 of the round before, then every 2 stitches (6 in all). What it looks like now: The piece is closing in and has 6 stitches left around the opening, after 3 rounds of decreasing.
Fasten off and close the opening.
Count table: Body
| Round | Start count | Change | End count |
|---|---|---|---|
| 5 | 30 | 0 | 30 sc |
| 6 | 30 | 0 | 30 sc |
| 7 | 30 | -6 | 24 sc |
| 8 | 24 | 0 | 24 sc |
| 9 | 24 | -6 | 18 sc |
| 10 | 18 | -6 | 12 sc |
| 11 | 12 | -6 | 6 sc |
Finishing
-
With Cream, embroider 10 small cross stitch stars over the front.
-
Add a Gold hanging loop in the dip between the bumps.
- Leave the two 3 st gaps between the bumps open until the body is done, then sew them closed.
- Stuff the bumps well so the heart keeps its shape.
Common mistakes and fixes
| Problem | Cause | Fix |
|---|---|---|
| You have 17 stitches after Round 3 instead of 18. | An increase was missed. | Count the increases. There should be 6. Undo back to the missing one and work it again. |
| You have 25 stitches after Round 7 instead of 24. | A decrease was missed. | Count the decreases. There should be 6. Undo back to the missing one and work it again. |
| Your piece is bigger or smaller than about 6.5 cm / 2.5 in wide, 6 cm / 2.4 in tall. | Your tension is different from the gauge. | Check your gauge. Use a smaller hook if it is too big and a bigger hook if it is too small. |
Troubleshooting for this piece
| Problem | Cause | Fix |
|---|---|---|
| The stuffing shows through the stitches | The stitches are loose, or the piece is stuffed too tightly | Use a smaller hook and work firmly. Stuff in small pieces and stop when the shape is firm. |
| The opening will not close neatly at the end | A decrease was missed, so too many stitches are left | Count the stitches against the last row of the Count table. Fix the round if it does not match. Then thread the tail through the front loops of the last stitches and pull tight. |
| Small holes show at the increases | The first stitch after an increase is loose, or the increase is in the wrong place | Pull the stitch after each increase snug. Check the Positions line for where each increase goes. Use a slightly smaller hook. |
| The finished piece is bigger or smaller than the size given | Your tension is different from the gauge, or the yarn is thicker or thinner | Make a gauge swatch and compare it with the Gauge section. Change the hook size to match, or use the yarn named in Materials. |
12. Scandi Heart
A flat cream heart worked in rows, edged in red, with a running stitch border and a little flower.
Overview
| Detail | Scandi Heart |
|---|---|
| Finished size | About 7 cm / 2.75 in wide, 6.5 cm / 2.5 in tall |
| Colours | Cream (heart), Red (edge, stitching and flower), Green (leaves), Gold (loop) |
| Yarn used | About 8 m / 9 yd in total |
| Make | 1 |
| Parts made separately | Heart x 1, Flower x 1, Leaves x 4 |
| Rounds and rows | 21 |
| Difficulty | Medium |
| What it involves | You change colour, several parts are sewn together, you turn at the end of each row, you add and remove stitches to shape it. |
Heart
Colour: Cream · Hook: 3.5 mm (US E/4) · Make: 1
Foundation chain
Quick read: with Cream, ch 2 (2)
- Use Cream and make a slip knot, then ch 2.
Stitch count: 2 ch
Row 1
Quick read: 3 sc in 2nd ch from hook (3)
- Work 3 sc in the 2nd chain from the hook.
Stitch count: 3 sc
Row 2
Quick read: ch 1, turn, inc, sc, inc (5)
- Ch 1 and turn. This ch 1 does not count as a stitch.
- Increase: work 2 sc in the next stitch.
- Work 1 sc in the next stitch.
- Increase: work 2 sc in the next stitch.
Stitch count: 5 sc Check: 2 + 1 + 2 = 5 Positions: Increases in stitches 1 and 3 of the row before.
Row 3
Quick read: ch 1, turn, inc, sc 3, inc (7)
- Ch 1 and turn. This ch 1 does not count as a stitch.
- Increase: work 2 sc in the next stitch.
- Work 1 sc in each of the next 3 stitches.
- Increase: work 2 sc in the next stitch.
Stitch count: 7 sc Check: 2 + 3 + 2 = 7 Positions: Increases in stitches 1 and 5 of the row before.
Row 4
Quick read: ch 1, turn, inc, sc 5, inc (9)
- Ch 1 and turn. This ch 1 does not count as a stitch.
- Increase: work 2 sc in the next stitch.
- Work 1 sc in each of the next 5 stitches.
- Increase: work 2 sc in the next stitch.
Stitch count: 9 sc Check: 2 + 5 + 2 = 9 Positions: Increases in stitches 1 and 7 of the row before.
Row 5
Quick read: ch 1, turn, inc, sc 7, inc (11)
- Ch 1 and turn. This ch 1 does not count as a stitch.
- Increase: work 2 sc in the next stitch.
- Work 1 sc in each of the next 7 stitches.
- Increase: work 2 sc in the next stitch.
Stitch count: 11 sc Check: 2 + 7 + 2 = 11 Positions: Increases in stitches 1 and 9 of the row before.
Row 6
Quick read: ch 1, turn, inc, sc 9, inc (13)
- Ch 1 and turn. This ch 1 does not count as a stitch.
- Increase: work 2 sc in the next stitch.
- Work 1 sc in each of the next 9 stitches.
- Increase: work 2 sc in the next stitch.
Stitch count: 13 sc Check: 2 + 9 + 2 = 13 Positions: Increases in stitches 1 and 11 of the row before. What it looks like now: The flat piece is getting wider and is now 13 stitches wide, after 6 rows.
Rows 7 to 9
Quick read: ch 1, turn, sc in each st across (13)
- Ch 1 and turn. This ch 1 does not count as a stitch.
- Work 1 sc in each stitch to the end of the row (13 stitches).
- Work this row 3 times in all: Rows 7, 8 and 9.
Stitch count: 13 sc (at the end of each row) What it looks like now: A flat piece 13 stitches wide, after 3 rows.
Count table: Heart
| Row | Start count | Change | End count |
|---|---|---|---|
| Foundation chain | - | - | 2 ch |
| 1 | 2 | +1 | 3 sc |
| 2 | 3 | +2 | 5 sc |
| 3 | 5 | +2 | 7 sc |
| 4 | 7 | +2 | 9 sc |
| 5 | 9 | +2 | 11 sc |
| 6 | 11 | +2 | 13 sc |
| 7 | 13 | 0 | 13 sc |
| 8 | 13 | 0 | 13 sc |
| 9 | 13 | 0 | 13 sc |
Right Bump
Colour: Cream · Hook: 3.5 mm (US E/4) · Make: 1
Row 10
Quick read: ch 1, turn, sc in each of next 6 sts (6)
- Ch 1 and turn. This ch 1 does not count as a stitch.
- Work 1 sc in each of the next 6 stitches.
Stitch count: 6 sc
Row 11
Quick read: ch 1, turn, dec, sc 2, dec (4)
- Ch 1 and turn. This ch 1 does not count as a stitch.
- Decrease: work the next 2 stitches together as 1 sc.
- Work 1 sc in each of the next 2 stitches.
- Decrease: work the next 2 stitches together as 1 sc.
Stitch count: 4 sc Check: 1 + 2 + 1 = 4 Positions: Decreases over stitches 1-2 and 5-6 of the row before.
Row 12
Quick read: ch 1, turn, dec 2 times (2)
- Ch 1 and turn. This ch 1 does not count as a stitch.
- Decrease 2 times in a row: each time, work 2 stitches together as 1 sc.
Stitch count: 2 sc Check: 2 repeats x 1 st = 2 Positions: Decreases over stitches 1-2 and 3-4 of the row before. What it looks like now: The flat piece is getting narrower and is now 2 stitches wide, after 3 rows.
Fasten off.
Count table: Right Bump
| Row | Start count | Change | End count |
|---|---|---|---|
| 10 | 6 | 0 | 6 sc |
| 11 | 6 | -2 | 4 sc |
| 12 | 4 | -2 | 2 sc |
Left Bump
Colour: Cream · Hook: 3.5 mm (US E/4) · Make: 1
Row 10
Quick read: skip the centre st of Row 9, join Cream in the next st, sc in each of next 6 sts (6)
- Skip the centre stitch of Row 9.
- Join Cream in the next stitch.
- Work 1 sc in each of the next 6 stitches.
Stitch count: 6 sc
Row 11
Quick read: ch 1, turn, dec, sc 2, dec (4)
- Ch 1 and turn. This ch 1 does not count as a stitch.
- Decrease: work the next 2 stitches together as 1 sc.
- Work 1 sc in each of the next 2 stitches.
- Decrease: work the next 2 stitches together as 1 sc.
Stitch count: 4 sc Check: 1 + 2 + 1 = 4 Positions: Decreases over stitches 1-2 and 5-6 of the row before.
Row 12
Quick read: ch 1, turn, dec 2 times (2)
- Ch 1 and turn. This ch 1 does not count as a stitch.
- Decrease 2 times in a row: each time, work 2 stitches together as 1 sc.
Stitch count: 2 sc Check: 2 repeats x 1 st = 2 Positions: Decreases over stitches 1-2 and 3-4 of the row before. What it looks like now: The flat piece is getting narrower and is now 2 stitches wide, after 3 rows.
Fasten off.
Count table: Left Bump
| Row | Start count | Change | End count |
|---|---|---|---|
| 10 | - | - | 6 sc |
| 11 | 6 | -2 | 4 sc |
| 12 | 4 | -2 | 2 sc |
Edge
Colour: Red · Hook: 3.5 mm (US E/4) · Make: 1
Edge round
Quick read: with Red, join at the bottom point, 3 sc in the point, sc 11 up the side, sc 7 around the bump, sl st in the centre dip, sc 7 around the next bump, sc 11 down the other side (40)
- Use Red and join at the bottom point.
- Work 3 sc in the point.
- Work 11 sc up the side.
- Work 7 sc around the bump.
- Work 1 sl stitch in the centre dip.
- Work 7 sc around the next bump.
- Work 11 sc down the other side.
Stitch count: 40 sts Check: 3 + 11 + 7 + 1 + 7 + 11 = 40
Sl st in the first st and fasten off.
Count table: Edge
| Round | Start count | Change | End count |
|---|---|---|---|
| Edge round | - | - | 40 sts |
Flower
Colour: Red · Hook: 3.5 mm (US E/4) · Make: 1
Work these rounds in a spiral. Do not join them. Move the marker up to the first stitch of each new round.
Round 1
Quick read: with Red, 5 sc in MR (5)
- Use Red and make a magic ring.
- Work 5 sc into the ring.
- Pull the tail to close the ring.
Stitch count: 5 sc
Round 2
Quick read: ((hdc, dc, hdc) in next st) 5 times (15)
- Work 1 hdc, 1 dc and 1 hdc, all in the next stitch. Repeat this step four more times (5 times in all).
Stitch count: 15 sts Check: 5 repeats x 3 sts = 15 What it looks like now: The piece is growing wider. It has 15 stitches around after 2 rounds.
Sl st in the first st and fasten off.
Count table: Flower
| Round | Start count | Change | End count |
|---|---|---|---|
| 1 | MR | +5 | 5 sc |
| 2 | 5 | +10 | 15 sts |
Leaves (make 4)
Colour: Green · Hook: 3.5 mm (US E/4) · Make: 4
Foundation chain
Quick read: with Green, ch 6 (6)
- Use Green and make a slip knot, then ch 6.
Stitch count: 6 ch
Row 1
Quick read: sl st in 2nd ch from hook, sc, hdc, sc, sl st (5)
- Work 1 sl st in the 2nd chain from the hook.
- Work 1 sc in the next chain.
- Work 1 hdc in the next chain.
- Work 1 sc in the next chain.
- Work 1 sl st in the next chain.
Stitch count: 5 sts Check: 1 + 1 + 1 + 1 + 1 = 5
Fasten off.
Count table: Leaves
| Row | Start count | Change | End count |
|---|---|---|---|
| Foundation chain | - | - | 6 ch |
| 1 | 6 | -1 | 5 sts |
Finishing
-
With Red, work a running stitch about 4 mm / 0.15 in inside the edge.
-
Sew the 4 leaves in a cross at the centre of the heart and the flower on top of them.
-
Add a Gold hanging loop in the centre dip.
Blocking
Block the flat ornaments (Flat Star, Flat Tree, Snowflake, Scandi Heart): pin them out flat on a towel, mist with water and leave to dry.
- Mark the centre st of Row 9 before you start the bumps.
- Work the running stitch with an even spacing of about 4 mm / 0.15 in.
Common mistakes and fixes
| Problem | Cause | Fix |
|---|---|---|
| You have 12 stitches after Row 6 instead of 13. | An increase was missed. | Count the increases. There should be 2. Undo back to the missing one and work it again. |
| You have 5 stitches after Row 11 instead of 4. | A decrease was missed. | Count the decreases. There should be 2. Undo back to the missing one and work it again. |
| The piece grows by 1 stitch every row. | The turning ch 1 was worked as a stitch. | Skip the ch 1. You should have 5 stitches at the end of Row 2. |
| Leaves Row 1 has 6 stitches instead of 5. | The first stitch went into the 1st chain from the hook. | Start in the 2nd chain from the hook. |
| A small step shows where the colour changes. | The new colour was started on a new stitch. | Finish the last stitch of the old colour with the new colour. Keep the steps at the back. |
Troubleshooting for this piece
| Problem | Cause | Fix |
|---|---|---|
| The sides are wavy, or one end is wider | The stitch count changed by one on some rows, often at the turning chain | Count the stitches at the end of every row and compare with the Count table. Undo to the last correct row. Use a marker in the first stitch. |
| The points or petals are uneven | The tension changes from one point to the next, or a count is off by one | Check the Positions line and the counts for each point. Keep the same tension on every point. Shape them gently when you finish. |
| The finished piece is bigger or smaller than the size given | Your tension is different from the gauge, or the yarn is thicker or thinner | Make a gauge swatch and compare it with the Gauge section. Change the hook size to match, or use the yarn named in Materials. |
13. Spiral Icicle
A twisting cream, red and gold icicle that shapes itself: the stitches get taller along the chain, so it curls into a spiral that is wide at the top and fine at the tip.
The taller stitches curl this icicle on their own; you only twist it gently to even out the spiral.
Overview
| Detail | Spiral Icicle |
|---|---|
| Finished size | About 2 cm / 0.75 in across, 9 cm / 3.5 in long |
| Colours | Cream (icicle), Red and Gold (spiral stripes and loop) |
| Yarn used | About 8 m / 9 yd in total |
| Make | 1 |
| Parts made separately | Icicle x 1 |
| Rounds and rows | 4 |
| Difficulty | Medium |
| What it involves | You change colour, you turn at the end of each row. |
Icicle
Colours: Cream, Red, Gold · Hook: 3.5 mm (US E/4) · Make: 1
Foundation chain
Quick read: with Cream, ch 25 (25)
- Use Cream and make a slip knot, then ch 25.
Stitch count: 25 ch
Row 1
Quick read: 3 sc in 2nd ch from hook, 3 sc in each of next 7 ch, 3 hdc in each of next 8 ch, 3 dc in each of next 8 ch (72)
- Work 3 sc in the 2nd chain from the hook.
- Work 3 sc in each of the next 7 chains.
- Work 3 hdc in each of the next 8 chains.
- Work 3 dc in each of the next 8 chains.
Stitch count: 72 sts Check: 3 + (7 x 3) + (8 x 3) + (8 x 3) = 72 Positions: 24 increases in all, as the steps above show (see Count table).
Row 2
Quick read: with Red, ch 1, turn, sc in each st across (72)
- Change to Red and ch 1 and turn. This ch 1 does not count as a stitch.
- Work 1 sc in each stitch to the end of the row (72 stitches).
Stitch count: 72 sc
Row 3
Quick read: with Gold, ch 1, turn, sl st in each st across (72)
- Change to Gold and ch 1 and turn. This ch 1 does not count as a stitch.
- Work 1 sl st in each stitch to the end of the row (72 stitches).
Stitch count: 72 sl st What it looks like now: A flat piece 72 stitches wide, after 3 rows.
Fasten off. Rows 2 and 3 are worked along the outer edge of the spiral, so the red and gold stripes wind round it. Twist the piece gently with your fingers so it sits evenly.
Count table: Icicle
| Row | Start count | Change | End count |
|---|---|---|---|
| Foundation chain | - | - | 25 ch |
| 1 | 25 | +47 | 72 sts |
| 2 | 72 | 0 | 72 sc |
| 3 | 72 | 0 | 72 sl st |
Finishing
Add a Gold hanging loop to the wide (double crochet) end.
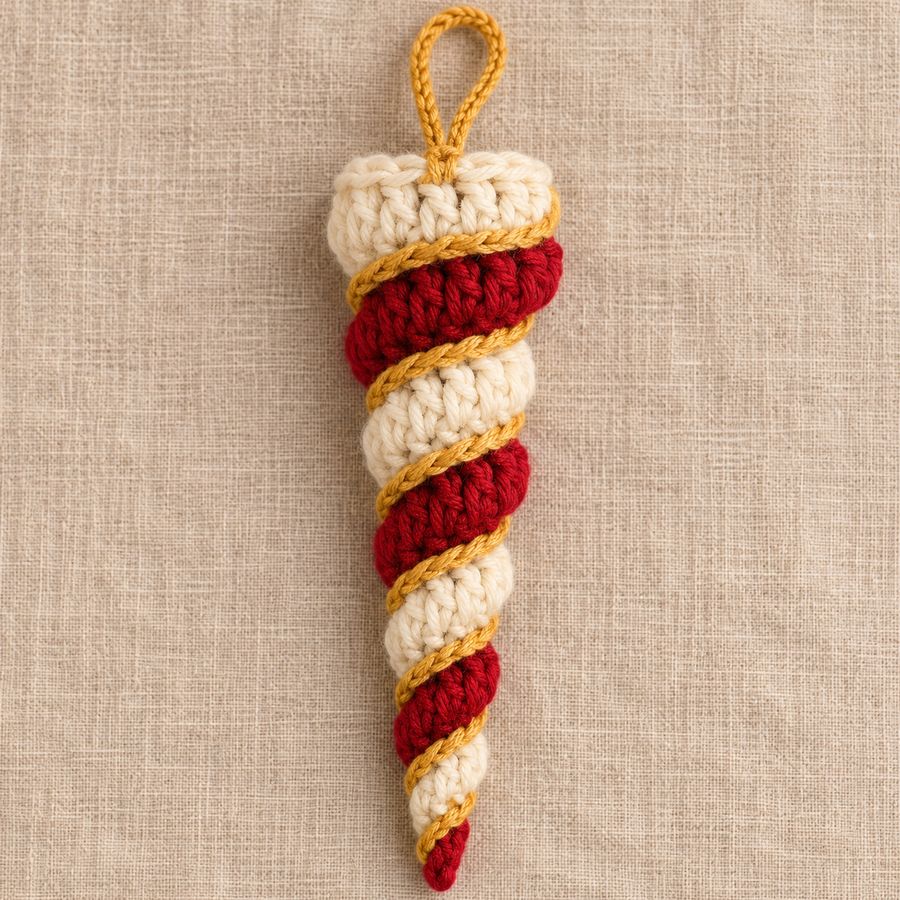 You sew the loop to the wide end.
- Work Row 1 loosely: 3 stitches go into every chain.
- The spiral forms on its own. Twist it gently to even it out.
Common mistakes and fixes
| Problem | Cause | Fix |
|---|---|---|
| You have 71 stitches after Row 1 instead of 72. | An increase was missed. | Count the increases. There should be 24. Undo back to the missing one and work it again. |
| The piece grows by 1 stitch every row. | The turning ch 1 was worked as a stitch. | Skip the ch 1. You should have 72 stitches at the end of Row 2. |
| A small step shows where the colour changes. | The new colour was started on a new stitch. | Finish the last stitch of the old colour with the new colour. Keep the steps at the back. |
Troubleshooting for this piece
| Problem | Cause | Fix |
|---|---|---|
| The sides are wavy, or one end is wider | The stitch count changed by one on some rows, often at the turning chain | Count the stitches at the end of every row and compare with the Count table. Undo to the last correct row. Use a marker in the first stitch. |
| The finished piece is bigger or smaller than the size given | Your tension is different from the gauge, or the yarn is thicker or thinner | Make a gauge swatch and compare it with the Gauge section. Change the hook size to match, or use the yarn named in Materials. |
14. Mini Wreath
A stuffed green tube joined into a ring, with a gold bow and red berries.
Overview
| Detail | Mini Wreath |
|---|---|
| Finished size | About 6 cm / 2.4 in across |
| Colours | Green (wreath), Gold (bow and loop), Red (berries) |
| Yarn used | About 12 m / 13 yd in total |
| Make | 1 |
| Parts made separately | Ring x 1, Bow x 1, Berries x 5 |
| Rounds and rows | 35 |
| Difficulty | Medium |
| What it involves | You change colour, several parts are sewn together. |
Ring
Colour: Green · Hook: 3.5 mm (US E/4) · Make: 1
Work these rounds in a spiral. Do not join them. Move the marker up to the first stitch of each new round.
Round 1
Quick read: with Green, 8 sc in MR (8)
- Use Green and make a magic ring.
- Work 8 sc into the ring.
- Pull the tail to close the ring.
Stitch count: 8 sc
Rounds 2 to 32
Quick read: sc in each st around (8)
- Work 1 sc in each stitch around (8 stitches).
- Work this round 31 times in all: Rounds 2, 3, 4, 5, 6, 7, 8, 9, 10, 11, 12, 13, 14, 15, 16, 17, 18, 19, 20, 21, 22, 23, 24, 25, 26, 27, 28, 29, 30, 31 and 32.
Stitch count: 8 sc (at the end of each round) What it looks like now: The sides go straight up like a tube with 8 stitches around, after 31 rounds without shaping.
Stuff lightly as you go, every 8 rounds or so. Fasten off, leaving a 30 cm / 12 in tail. Bring the two ends together and sew them neatly to form a ring.
Count table: Ring
| Round | Start count | Change | End count |
|---|---|---|---|
| 1 | MR | +8 | 8 sc |
| 2 | 8 | 0 | 8 sc |
| 3 | 8 | 0 | 8 sc |
| 4 | 8 | 0 | 8 sc |
| 5 | 8 | 0 | 8 sc |
| 6 | 8 | 0 | 8 sc |
| 7 | 8 | 0 | 8 sc |
| 8 | 8 | 0 | 8 sc |
| 9 | 8 | 0 | 8 sc |
| 10 | 8 | 0 | 8 sc |
| 11 | 8 | 0 | 8 sc |
| 12 | 8 | 0 | 8 sc |
| 13 | 8 | 0 | 8 sc |
| 14 | 8 | 0 | 8 sc |
| 15 | 8 | 0 | 8 sc |
| 16 | 8 | 0 | 8 sc |
| 17 | 8 | 0 | 8 sc |
| 18 | 8 | 0 | 8 sc |
| 19 | 8 | 0 | 8 sc |
| 20 | 8 | 0 | 8 sc |
| 21 | 8 | 0 | 8 sc |
| 22 | 8 | 0 | 8 sc |
| 23 | 8 | 0 | 8 sc |
| 24 | 8 | 0 | 8 sc |
| 25 | 8 | 0 | 8 sc |
| 26 | 8 | 0 | 8 sc |
| 27 | 8 | 0 | 8 sc |
| 28 | 8 | 0 | 8 sc |
| 29 | 8 | 0 | 8 sc |
| 30 | 8 | 0 | 8 sc |
| 31 | 8 | 0 | 8 sc |
| 32 | 8 | 0 | 8 sc |
Bow
Colour: Gold · Hook: 3.5 mm (US E/4) · Make: 1
Foundation chain
Quick read: with Gold, ch 31 (31)
- Use Gold and make a slip knot, then ch 31.
Stitch count: 31 ch
Row 1
Quick read: sc in 2nd ch from hook, sc in each ch across (30)
- Work 1 sc in the 2nd chain from the hook.
- Work 1 sc in each chain to the end (29 chains).
Stitch count: 30 sc Check: 1 + 29 = 30
Fasten off. Tie the strip into a small bow.
Count table: Bow
| Row | Start count | Change | End count |
|---|---|---|---|
| Foundation chain | - | - | 31 ch |
| 1 | 31 | -1 | 30 sc |
Berries (make 5)
Colour: Red · Hook: 3.5 mm (US E/4) · Make: 5
Round 1
Quick read: with Red, 5 sc in MR (5)
- Use Red and make a magic ring.
- Work 5 sc into the ring.
- Pull the tail to close the ring.
Stitch count: 5 sc
Pull the ring tight so the berry curls into a little ball. Fasten off.
Count table: Berries
| Round | Start count | Change | End count |
|---|---|---|---|
| 1 | MR | +5 | 5 sc |
Assembly
-
Sew the bow to the top of the wreath.
-
Sew the berries in a scatter around the ring.
-
Add a Gold hanging loop behind the bow.
- Stuff the tube lightly so it bends round into a ring easily.
- Sew the ends with small stitches all the way around the tube for an invisible join.
Common mistakes and fixes
| Problem | Cause | Fix |
|---|---|---|
| Row 1 has 31 stitches instead of 30. | The first stitch went into the 1st chain from the hook. | Start in the 2nd chain from the hook. |
| A small step shows where the colour changes. | The new colour was started on a new stitch. | Finish the last stitch of the old colour with the new colour. Keep the steps at the back. |
| The count is off after several plain rounds. | The marker moved or fell out. | Put the marker in the first stitch of every round and count before you move it. |
Troubleshooting for this piece
| Problem | Cause | Fix |
|---|---|---|
| The stuffing shows through the stitches | The stitches are loose, or the piece is stuffed too tightly | Use a smaller hook and work firmly. Stuff in small pieces and stop when the shape is firm. |
| Small holes show at the increases | The first stitch after an increase is loose, or the increase is in the wrong place | Pull the stitch after each increase snug. Check the Positions line for where each increase goes. Use a slightly smaller hook. |
| The finished piece is bigger or smaller than the size given | Your tension is different from the gauge, or the yarn is thicker or thinner | Make a gauge swatch and compare it with the Gauge section. Change the hook size to match, or use the yarn named in Materials. |
15. Mini Stocking
A tiny 3D stocking with a cream toe, heel and cuff. The heel is added at the end, which keeps the shaping simple.
Overview
| Detail | Mini Stocking |
|---|---|
| Finished size | About 6.5 cm / 2.5 in tall, 5 cm / 2 in from heel to toe |
| Colours | Red (foot and leg), Cream (toe, heel and cuff), Gold (loop) |
| Yarn used | About 13 m / 14 yd in total |
| Make | 1 |
| Parts made separately | Stocking x 1 |
| Rounds and rows | 21 |
| Difficulty | Medium |
| What it involves | You change colour, you add and remove stitches to shape it. |
Stocking
Colours: Cream, Red · Hook: 3.5 mm (US E/4) · Make: 1
Work these rounds in a spiral. Do not join them. Move the marker up to the first stitch of each new round.
Round 1
Quick read: with Cream, 6 sc in MR (6)
- Use Cream and make a magic ring.
- Work 6 sc into the ring.
- Pull the tail to close the ring.
Stitch count: 6 sc
Round 2
Quick read: inc 6 times (12)
- Increase 6 times: work 2 sc in each of the next 6 stitches.
Stitch count: 12 sc Check: 6 repeats x 2 sts = 12
Round 3
Quick read: (sc, inc) 6 times (18)
- Work 1 sc in the next stitch.
- Increase: work 2 sc in the next stitch.
- Repeat steps 1 and 2 five more times (6 times in all).
Stitch count: 18 sc Check: 6 repeats x 3 sts = 18 Positions: Increases in every 2nd stitch of the round before, starting with stitch 2 (6 in all). What it looks like now: A flat circle with 18 stitches around, made in 3 rounds.
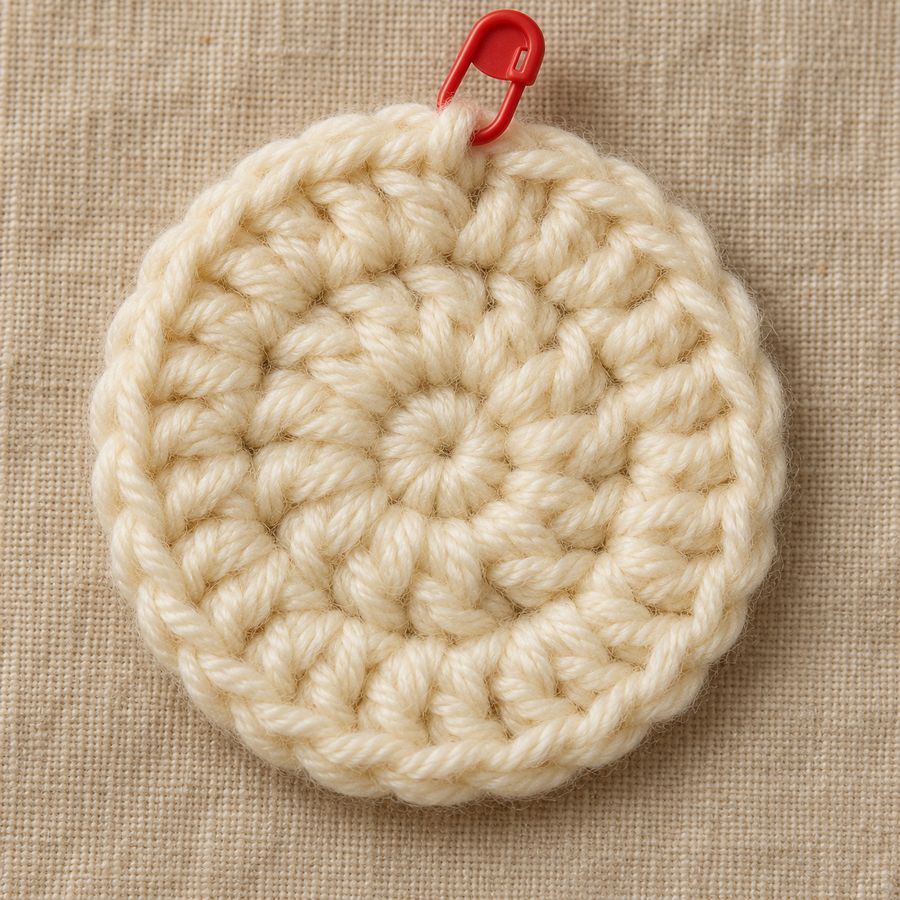 After Round 3 your toe is a flat Cream circle of 18 stitches.
Round 4
Quick read: sc in each st around (18)
- Work 1 sc in each stitch around (18 stitches).
Stitch count: 18 sc
Rounds 5 to 8
Quick read: with Red, sc in each st around (18)
- Change to Red and work 1 sc in each stitch around (18 stitches).
- Work this round 4 times in all: Rounds 5, 6, 7 and 8.
Stitch count: 18 sc (at the end of each round)
Round 9
Quick read: sc 9, ch 9, skip 9 (18)
- Work 1 sc in each of the next 9 stitches.
- Ch 9. They count as 9 stitches.
- Skip the next 9 stitches.
Stitch count: 18 sts
Rounds 10 to 15
Quick read: sc in each st around (18)
- Work 1 sc in each stitch around (18 stitches).
- Work this round 6 times in all: Rounds 10, 11, 12, 13, 14 and 15.
Stitch count: 18 sc (at the end of each round)
Rounds 16 to 18
Quick read: with Cream, sc in each st around (18)
- Change to Cream and work 1 sc in each stitch around (18 stitches).
- Work this round 3 times in all: Rounds 16, 17 and 18.
Stitch count: 18 sc (at the end of each round) What it looks like now: The sides go straight up like a tube with 18 stitches around, after 15 rounds without shaping.
Sl st in the next st and fasten off. The ch 9 in Rnd 9 leaves an opening for the heel.
Count table: Stocking
| Round | Start count | Change | End count |
|---|---|---|---|
| 1 | MR | +6 | 6 sc |
| 2 | 6 | +6 | 12 sc |
| 3 | 12 | +6 | 18 sc |
| 4 | 18 | 0 | 18 sc |
| 5 | 18 | 0 | 18 sc |
| 6 | 18 | 0 | 18 sc |
| 7 | 18 | 0 | 18 sc |
| 8 | 18 | 0 | 18 sc |
| 9 | 18 | 0 | 18 sts |
| 10 | 18 | 0 | 18 sc |
| 11 | 18 | 0 | 18 sc |
| 12 | 18 | 0 | 18 sc |
| 13 | 18 | 0 | 18 sc |
| 14 | 18 | 0 | 18 sc |
| 15 | 18 | 0 | 18 sc |
| 16 | 18 | 0 | 18 sc |
| 17 | 18 | 0 | 18 sc |
| 18 | 18 | 0 | 18 sc |
Heel
Colour: Cream · Hook: 3.5 mm (US E/4) · Make: 1
Work these rounds in a spiral. Do not join them. Move the marker up to the first stitch of each new round.
Round 1
Quick read: with Cream, join at one corner of the heel opening, sc in each of next 9 skipped sts, sc in each of next 9 ch (18)
- Use Cream and join at one corner of the heel opening.
- Work 1 sc in each of the next 9 skipped stitches.
- Work 1 sc in each of the next 9 chains.
Stitch count: 18 sc Check: 9 + 9 = 18
Round 2
Quick read: (sc, dec) 6 times (12)
- Work 1 sc in the next stitch.
- Decrease: work the next 2 stitches together as 1 sc.
- Repeat steps 1 and 2 five more times (6 times in all).
Stitch count: 12 sc Check: 6 repeats x 2 sts = 12 Positions: Decreases over stitches 2-3 of the round before, then every 3 stitches (6 in all).
Stuff the toe, foot and heel lightly.
Round 3
Quick read: dec 6 times (6)
- Decrease 6 times in a row: each time, work 2 stitches together as 1 sc.
Stitch count: 6 sc Check: 6 repeats x 1 st = 6 Positions: Decreases over stitches 1-2 of the round before, then every 2 stitches (6 in all). What it looks like now: The piece is closing in and has 6 stitches left around the opening, after 2 rounds of decreasing.
Fasten off and close the opening.
Count table: Heel
| Round | Start count | Change | End count |
|---|---|---|---|
| 1 | - | - | 18 sc |
| 2 | 18 | -6 | 12 sc |
| 3 | 12 | -6 | 6 sc |
Finishing
-
Close any small gaps at the corners of the heel with the tail.
-
Press the stocking flat with the heel to the back so the foot points forwards.
-
Fold the cuff down if you like a deeper cuff, and add a Gold hanging loop at the back of the cuff.
- Count the 9 sts before the heel chain carefully: the opening must be exactly half the round.
- Pick up one extra st at each corner of the heel if you see a gap, then decrease it on the next round.
Common mistakes and fixes
| Problem | Cause | Fix |
|---|---|---|
| You have 17 stitches after Round 3 instead of 18. | An increase was missed. | Count the increases. There should be 6. Undo back to the missing one and work it again. |
| You have 13 stitches after Heel Round 2 instead of 12. | A decrease was missed. | Count the decreases. There should be 6. Undo back to the missing one and work it again. |
| A small step shows where the colour changes. | The new colour was started on a new stitch. | Finish the last stitch of the old colour with the new colour. Keep the steps at the back. |
| The count is off after several plain rounds. | The marker moved or fell out. | Put the marker in the first stitch of every round and count before you move it. |
Troubleshooting for this piece
| Problem | Cause | Fix |
|---|---|---|
| The stuffing shows through the stitches | The stitches are loose, or the piece is stuffed too tightly | Use a smaller hook and work firmly. Stuff in small pieces and stop when the shape is firm. |
| The opening will not close neatly at the end | A decrease was missed, so too many stitches are left | Count the stitches against the last row of the Count table. Fix the round if it does not match. Then thread the tail through the front loops of the last stitches and pull tight. |
| Small holes show at the increases | The first stitch after an increase is loose, or the increase is in the wrong place | Pull the stitch after each increase snug. Check the Positions line for where each increase goes. Use a slightly smaller hook. |
| The points or petals are uneven | The tension changes from one point to the next, or a count is off by one | Check the Positions line and the counts for each point. Keep the same tension on every point. Shape them gently when you finish. |
16. Mini Mitten
A green mitten with a cream cuff and an embroidered snowflake.
Overview
| Detail | Mini Mitten |
|---|---|
| Finished size | About 4.5 cm / 1.75 in wide, 6.5 cm / 2.5 in tall |
| Colours | Green (mitten and thumb), Cream (cuff and snowflake), Gold (loop) |
| Yarn used | About 10 m / 11 yd in total |
| Make | 1 |
| Parts made separately | Hand x 1, Thumb x 1 |
| Rounds and rows | 19 |
| Difficulty | Medium |
| What it involves | You change colour, several parts are sewn together, you add and remove stitches to shape it. |
Hand
Colours: Green, Cream · Hook: 3.5 mm (US E/4) · Make: 1
Work these rounds in a spiral. Do not join them. Move the marker up to the first stitch of each new round.
Round 1
Quick read: with Green, 6 sc in MR (6)
- Use Green and make a magic ring.
- Work 6 sc into the ring.
- Pull the tail to close the ring.
Stitch count: 6 sc
Round 2
Quick read: inc 6 times (12)
- Increase 6 times: work 2 sc in each of the next 6 stitches.
Stitch count: 12 sc Check: 6 repeats x 2 sts = 12
Round 3
Quick read: (sc, inc) 6 times (18)
- Work 1 sc in the next stitch.
- Increase: work 2 sc in the next stitch.
- Repeat steps 1 and 2 five more times (6 times in all).
Stitch count: 18 sc Check: 6 repeats x 3 sts = 18 Positions: Increases in every 2nd stitch of the round before, starting with stitch 2 (6 in all). What it looks like now: A flat circle with 18 stitches around, made in 3 rounds.
Rounds 4 to 11
Quick read: sc in each st around (18)
- Work 1 sc in each stitch around (18 stitches).
- Work this round 8 times in all: Rounds 4, 5, 6, 7, 8, 9, 10 and 11.
Stitch count: 18 sc (at the end of each round) What it looks like now: The sides go straight up like a tube with 18 stitches around, after 8 rounds without shaping.
Round 12
Quick read: (sc 4, dec) 3 times (15)
- Work 1 sc in each of the next 4 stitches.
- Decrease: work the next 2 stitches together as 1 sc.
- Repeat steps 1 and 2 two more times (3 times in all).
Stitch count: 15 sc Check: 3 repeats x 5 sts = 15 Positions: Decreases over stitches 5-6 of the round before, then every 6 stitches (3 in all).
Rounds 13 to 15
Quick read: with Cream, sc in BLO in each st around (15)
- Change to Cream and work 1 sc in each stitch around (15 stitches).
- Work into the back loop only.
- Work this round 3 times in all: Rounds 13, 14 and 15.
Stitch count: 15 sc (at the end of each round) What it looks like now: The sides go straight up like a tube with 15 stitches around, after 3 rounds without shaping.
Sl st in the next st and fasten off. Do not stuff: the mitten is pressed flat.
Count table: Hand
| Round | Start count | Change | End count |
|---|---|---|---|
| 1 | MR | +6 | 6 sc |
| 2 | 6 | +6 | 12 sc |
| 3 | 12 | +6 | 18 sc |
| 4 | 18 | 0 | 18 sc |
| 5 | 18 | 0 | 18 sc |
| 6 | 18 | 0 | 18 sc |
| 7 | 18 | 0 | 18 sc |
| 8 | 18 | 0 | 18 sc |
| 9 | 18 | 0 | 18 sc |
| 10 | 18 | 0 | 18 sc |
| 11 | 18 | 0 | 18 sc |
| 12 | 18 | -3 | 15 sc |
| 13 | 15 | 0 | 15 sc |
| 14 | 15 | 0 | 15 sc |
| 15 | 15 | 0 | 15 sc |
Thumb
Colour: Green · Hook: 3.5 mm (US E/4) · Make: 1
Work these rounds in a spiral. Do not join them. Move the marker up to the first stitch of each new round.
Round 1
Quick read: with Green, 6 sc in MR (6)
- Use Green and make a magic ring.
- Work 6 sc into the ring.
- Pull the tail to close the ring.
Stitch count: 6 sc
Rounds 2 to 4
Quick read: sc in each st around (6)
- Work 1 sc in each stitch around (6 stitches).
- Work this round 3 times in all: Rounds 2, 3 and 4.
Stitch count: 6 sc (at the end of each round) What it looks like now: The sides go straight up like a tube with 6 stitches around, after 3 rounds without shaping.
Fasten off, leaving a tail.
Count table: Thumb
| Round | Start count | Change | End count |
|---|---|---|---|
| 1 | MR | +6 | 6 sc |
| 2 | 6 | 0 | 6 sc |
| 3 | 6 | 0 | 6 sc |
| 4 | 6 | 0 | 6 sc |
Assembly
-
Flatten the hand. Sew the thumb to one side between Rnds 6 and 9, angled slightly outwards.
-
With Cream, embroider a small snowflake on the front with 4 crossing straight stitches.
-
Add a Gold hanging loop at the cuff.
- The back loop cuff gives a ribbed look; keep it loose.
- Pin the thumb in place before sewing to get the angle right.
Common mistakes and fixes
| Problem | Cause | Fix |
|---|---|---|
| You have 17 stitches after Round 3 instead of 18. | An increase was missed. | Count the increases. There should be 6. Undo back to the missing one and work it again. |
| You have 16 stitches after Round 12 instead of 15. | A decrease was missed. | Count the decreases. There should be 3. Undo back to the missing one and work it again. |
| No ridge shows at Rounds 13 to 15. | The round was worked through both loops. | Undo the round and work it into the back loop only. |
| A small step shows where the colour changes. | The new colour was started on a new stitch. | Finish the last stitch of the old colour with the new colour. Keep the steps at the back. |
| The count is off after several plain rounds. | The marker moved or fell out. | Put the marker in the first stitch of every round and count before you move it. |
Troubleshooting for this piece
| Problem | Cause | Fix |
|---|---|---|
| The stuffing shows through the stitches | The stitches are loose, or the piece is stuffed too tightly | Use a smaller hook and work firmly. Stuff in small pieces and stop when the shape is firm. |
| The opening will not close neatly at the end | A decrease was missed, so too many stitches are left | Count the stitches against the last row of the Count table. Fix the round if it does not match. Then thread the tail through the front loops of the last stitches and pull tight. |
| Small holes show at the increases | The first stitch after an increase is loose, or the increase is in the wrong place | Pull the stitch after each increase snug. Check the Positions line for where each increase goes. Use a slightly smaller hook. |
| The finished piece is bigger or smaller than the size given | Your tension is different from the gauge, or the yarn is thicker or thinner | Make a gauge swatch and compare it with the Gauge section. Change the hook size to match, or use the yarn named in Materials. |
17. Gift Box
A little cream present tied with a red ribbon and bow.
Six small squares make the box, and two chains make the ribbon.
Overview
| Detail | Gift Box |
|---|---|
| Finished size | About 4.5 cm / 1.75 in on each side |
| Colours | Cream (box), Red (ribbon and bow), Gold (loop) |
| Yarn used | About 20 m / 22 yd in total |
| Make | 1 |
| Parts made separately | Square x 6, Bow x 1 |
| Rounds and rows | 12 |
| Difficulty | Medium |
| What it involves | You change colour, several parts are sewn together, you turn at the end of each row. |
Square (make 6)
Colour: Cream · Hook: 3.5 mm (US E/4) · Make: 6
Foundation chain
Quick read: with Cream, ch 10 (10)
- Use Cream and make a slip knot, then ch 10.
Stitch count: 10 ch
Row 1
Quick read: sc in 2nd ch from hook, sc in each ch across (9)
- Work 1 sc in the 2nd chain from the hook.
- Work 1 sc in each chain to the end (8 chains).
Stitch count: 9 sc Check: 1 + 8 = 9
Rows 2 to 9
Quick read: ch 1, turn, sc in each st across (9)
- Ch 1 and turn. This ch 1 does not count as a stitch.
- Work 1 sc in each stitch to the end of the row (9 stitches).
- Work this row 8 times in all: Rows 2, 3, 4, 5, 6, 7, 8 and 9.
Stitch count: 9 sc (at the end of each row) What it looks like now: A flat piece 9 stitches wide, after 9 rows.
Fasten off, leaving a tail on 2 of the squares for sewing.
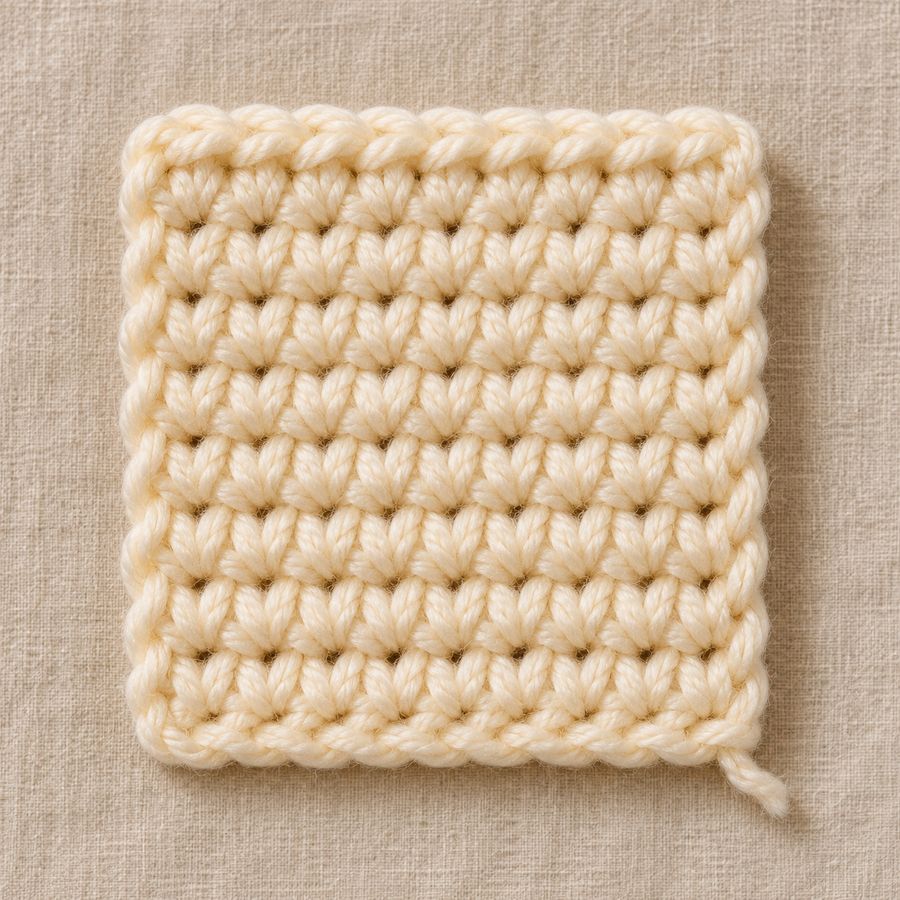 Each square is 9 stitches by 9 rows, and you need six.
Count table: Square
| Row | Start count | Change | End count |
|---|---|---|---|
| Foundation chain | - | - | 10 ch |
| 1 | 10 | -1 | 9 sc |
| 2 | 9 | 0 | 9 sc |
| 3 | 9 | 0 | 9 sc |
| 4 | 9 | 0 | 9 sc |
| 5 | 9 | 0 | 9 sc |
| 6 | 9 | 0 | 9 sc |
| 7 | 9 | 0 | 9 sc |
| 8 | 9 | 0 | 9 sc |
| 9 | 9 | 0 | 9 sc |
Bow
Colour: Red · Hook: 3.5 mm (US E/4) · Make: 1
Foundation chain
Quick read: with Red, ch 21 (21)
- Use Red and make a slip knot, then ch 21.
Stitch count: 21 ch
Row 1
Quick read: sc in 2nd ch from hook, sc in each ch across (20)
- Work 1 sc in the 2nd chain from the hook.
- Work 1 sc in each chain to the end (19 chains).
Stitch count: 20 sc Check: 1 + 19 = 20
Fasten off.
Count table: Bow
| Row | Start count | Change | End count |
|---|---|---|---|
| Foundation chain | - | - | 21 ch |
| 1 | 21 | -1 | 20 sc |
Assembly
-
Sew 5 squares into an open box (a base and 4 sides). Stuff lightly and sew on the last square as the lid.
-
With Red, ch 40 twice. Sew one chain all the way round the box over the lid, then the second one at right angles to it, for the ribbon.
-
Fold both ends of the bow strip to the centre, wrap the centre a few times with Red and sew the bow where the ribbons cross.
-
Add a Gold hanging loop under the bow.
- Sew the squares with a whip stitch through the outer loops for neat seams.
- Stuff lightly so the box keeps its flat sides.
Common mistakes and fixes
| Problem | Cause | Fix |
|---|---|---|
| The piece grows by 1 stitch every row. | The turning ch 1 was worked as a stitch. | Skip the ch 1. You should have 9 stitches at the end of Row 9. |
| Row 1 has 10 stitches instead of 9. | The first stitch went into the 1st chain from the hook. | Start in the 2nd chain from the hook. |
| A small step shows where the colour changes. | The new colour was started on a new stitch. | Finish the last stitch of the old colour with the new colour. Keep the steps at the back. |
Troubleshooting for this piece
| Problem | Cause | Fix |
|---|---|---|
| The stuffing shows through the stitches | The stitches are loose, or the piece is stuffed too tightly | Use a smaller hook and work firmly. Stuff in small pieces and stop when the shape is firm. |
| The sides are wavy, or one end is wider | The stitch count changed by one on some rows, often at the turning chain | Count the stitches at the end of every row and compare with the Count table. Undo to the last correct row. Use a marker in the first stitch. |
| The finished piece is bigger or smaller than the size given | Your tension is different from the gauge, or the yarn is thicker or thinner | Make a gauge swatch and compare it with the Gauge section. Change the hook size to match, or use the yarn named in Materials. |
18. Pompom Hat
A red hat with a folded cream brim and a fluffy pompom.
You fold the cream brim up over itself before the base goes in.
Overview
| Detail | Pompom Hat |
|---|---|
| Finished size | About 5 cm / 2 in across, 6.5 cm / 2.5 in tall with pompom |
| Colours | Red (hat and base), Cream (brim and pompom), Gold (loop) |
| Yarn used | About 15 m / 16 yd in total |
| Make | 1 |
| Parts made separately | Hat x 1, Base x 1 |
| Rounds and rows | 20 |
| Difficulty | Medium |
| What it involves | You change colour, several parts are sewn together, you add and remove stitches to shape it. |
Hat
Colours: Red, Cream · Hook: 3.5 mm (US E/4) · Make: 1
Work these rounds in a spiral. Do not join them. Move the marker up to the first stitch of each new round.
Round 1
Quick read: with Red, 6 sc in MR (6)
- Use Red and make a magic ring.
- Work 6 sc into the ring.
- Pull the tail to close the ring.
Stitch count: 6 sc
Round 2
Quick read: inc 6 times (12)
- Increase 6 times: work 2 sc in each of the next 6 stitches.
Stitch count: 12 sc Check: 6 repeats x 2 sts = 12
Round 3
Quick read: (sc, inc) 6 times (18)
- Work 1 sc in the next stitch.
- Increase: work 2 sc in the next stitch.
- Repeat steps 1 and 2 five more times (6 times in all).
Stitch count: 18 sc Check: 6 repeats x 3 sts = 18 Positions: Increases in every 2nd stitch of the round before, starting with stitch 2 (6 in all).
Round 4
Quick read: (sc 2, inc) 6 times (24)
- Work 1 sc in each of the next 2 stitches.
- Increase: work 2 sc in the next stitch.
- Repeat steps 1 and 2 five more times (6 times in all).
Stitch count: 24 sc Check: 6 repeats x 4 sts = 24 Positions: Increases in every 3rd stitch of the round before, starting with stitch 3 (6 in all). What it looks like now: A flat circle with 24 stitches around, made in 4 rounds.
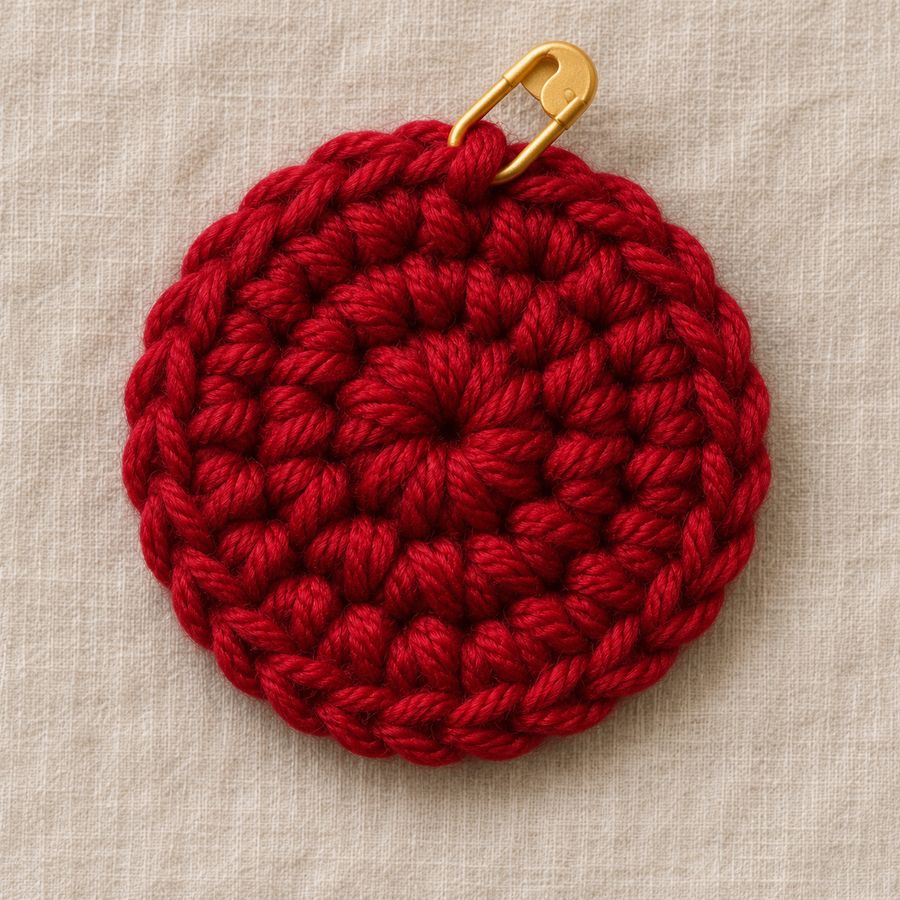 Your hat starts as a flat circle of 24 stitches.
Rounds 5 to 10
Quick read: sc in each st around (24)
- Work 1 sc in each stitch around (24 stitches).
- Work this round 6 times in all: Rounds 5, 6, 7, 8, 9 and 10.
Stitch count: 24 sc (at the end of each round)
Rounds 11 to 16
Quick read: with Cream, sc in BLO in each st around (24)
- Change to Cream and work 1 sc in each stitch around (24 stitches).
- Work into the back loop only.
- Work this round 6 times in all: Rounds 11, 12, 13, 14, 15 and 16.
Stitch count: 24 sc (at the end of each round) What it looks like now: The sides go straight up like a tube with 24 stitches around, after 12 rounds without shaping.
Sl st in the next st and fasten off. Fold Rnds 14 to 16 up over Rnds 11 to 13 to make the brim.
Count table: Hat
| Round | Start count | Change | End count |
|---|---|---|---|
| 1 | MR | +6 | 6 sc |
| 2 | 6 | +6 | 12 sc |
| 3 | 12 | +6 | 18 sc |
| 4 | 18 | +6 | 24 sc |
| 5 | 24 | 0 | 24 sc |
| 6 | 24 | 0 | 24 sc |
| 7 | 24 | 0 | 24 sc |
| 8 | 24 | 0 | 24 sc |
| 9 | 24 | 0 | 24 sc |
| 10 | 24 | 0 | 24 sc |
| 11 | 24 | 0 | 24 sc |
| 12 | 24 | 0 | 24 sc |
| 13 | 24 | 0 | 24 sc |
| 14 | 24 | 0 | 24 sc |
| 15 | 24 | 0 | 24 sc |
| 16 | 24 | 0 | 24 sc |
Base
Colour: Red · Hook: 3.5 mm (US E/4) · Make: 1
Work these rounds in a spiral. Do not join them. Move the marker up to the first stitch of each new round.
Round 1
Quick read: with Red, 6 sc in MR (6)
- Use Red and make a magic ring.
- Work 6 sc into the ring.
- Pull the tail to close the ring.
Stitch count: 6 sc
Round 2
Quick read: inc 6 times (12)
- Increase 6 times: work 2 sc in each of the next 6 stitches.
Stitch count: 12 sc Check: 6 repeats x 2 sts = 12
Round 3
Quick read: (sc, inc) 6 times (18)
- Work 1 sc in the next stitch.
- Increase: work 2 sc in the next stitch.
- Repeat steps 1 and 2 five more times (6 times in all).
Stitch count: 18 sc Check: 6 repeats x 3 sts = 18 Positions: Increases in every 2nd stitch of the round before, starting with stitch 2 (6 in all).
Round 4
Quick read: (sc 2, inc) 6 times (24)
- Work 1 sc in each of the next 2 stitches.
- Increase: work 2 sc in the next stitch.
- Repeat steps 1 and 2 five more times (6 times in all).
Stitch count: 24 sc Check: 6 repeats x 4 sts = 24 Positions: Increases in every 3rd stitch of the round before, starting with stitch 3 (6 in all). What it looks like now: A flat circle with 24 stitches around, made in 4 rounds.
Sl st in the next st and fasten off, leaving a long tail.
Count table: Base
| Round | Start count | Change | End count |
|---|---|---|---|
| 1 | MR | +6 | 6 sc |
| 2 | 6 | +6 | 12 sc |
| 3 | 12 | +6 | 18 sc |
| 4 | 18 | +6 | 24 sc |
Assembly
-
Stuff the hat lightly. Sew the Base inside the hat to Rnd 13, at the fold line, with the long tail, so the folded brim hides the seam.
-
Make a Cream pompom about 2.5 cm / 1 in across by wrapping yarn 40 times around two fingers, tying the middle tightly, cutting the loops and trimming. Sew it to the top.
-
Add a Gold hanging loop beside the pompom.
- Wrap the pompom yarn firmly and trim it round with sharp scissors.
- Fold the brim before sewing in the base so the brim hides the seam.
Common mistakes and fixes
| Problem | Cause | Fix |
|---|---|---|
| You have 23 stitches after Round 4 instead of 24. | An increase was missed. | Count the increases. There should be 6. Undo back to the missing one and work it again. |
| No ridge shows at Rounds 11 to 16. | The round was worked through both loops. | Undo the round and work it into the back loop only. |
| A small step shows where the colour changes. | The new colour was started on a new stitch. | Finish the last stitch of the old colour with the new colour. Keep the steps at the back. |
| The count is off after several plain rounds. | The marker moved or fell out. | Put the marker in the first stitch of every round and count before you move it. |
Troubleshooting for this piece
| Problem | Cause | Fix |
|---|---|---|
| The stuffing shows through the stitches | The stitches are loose, or the piece is stuffed too tightly | Use a smaller hook and work firmly. Stuff in small pieces and stop when the shape is firm. |
| Small holes show at the increases | The first stitch after an increase is loose, or the increase is in the wrong place | Pull the stitch after each increase snug. Check the Positions line for where each increase goes. Use a slightly smaller hook. |
| The finished piece is bigger or smaller than the size given | Your tension is different from the gauge, or the yarn is thicker or thinner | Make a gauge swatch and compare it with the Gauge section. Change the hook size to match, or use the yarn named in Materials. |
19. Crescent Moon
A puffy gold crescent with little cream stars. The graded stitches along a chain curve it into a moon shape on their own.
Overview
| Detail | Crescent Moon |
|---|---|
| Finished size | About 7 cm / 2.75 in tall |
| Colours | Gold (moon), Cream (stars and loop) |
| Yarn used | About 7 m / 8 yd in total |
| Make | 1 |
| Parts made separately | Moon x 2 |
| Rounds and rows | 4 |
| Difficulty | Easy |
| What it involves | It uses only basic stitches, you turn at the end of each row. |
Moon (make 2)
Colour: Gold · Hook: 3.5 mm (US E/4) · Make: 2
Foundation chain
Quick read: with Gold, ch 19 (19)
- Use Gold and make a slip knot, then ch 19.
Stitch count: 19 ch
Row 1
Quick read: sl st in 2nd ch from hook, sc 2, hdc 2, dc 2, (2 dc in next ch) 4 times, dc 2, hdc 2, sc 2, sl st (22)
- Work 1 sl st in the 2nd chain from the hook.
- Work 1 sc in each of the next 2 chains.
- Work 1 hdc in each of the next 2 chains.
- Work 1 dc in each of the next 2 chains.
- Work 2 dc in the next chain. Repeat this step three more times (4 times in all).
- Work 1 dc in each of the next 2 chains.
- Work 1 hdc in each of the next 2 chains.
- Work 1 sc in each of the next 2 chains.
- Work 1 sl st in the next chain.
Stitch count: 22 sts Check: 1 + 2 + 2 + 2 + (4 x 2) + 2 + 2 + 2 + 1 = 22 Positions: Increases in stitches 9, 10, 11 and 12 of the row before.
Row 2
Quick read: ch 1, turn, sl st, sc 3, hdc 3, (2 hdc in next st, hdc) 4 times, hdc 3, sc 3, sl st (26)
- Ch 1 and turn. This ch 1 does not count as a stitch.
- Work 1 sl st in the next stitch.
- Work 1 sc in each of the next 3 stitches.
- Work 1 hdc in each of the next 3 stitches.
- Work 2 hdc in the next stitch.
- Work 1 hdc in the next stitch.
- Repeat steps 5 and 6 three more times (4 times in all).
- Work 1 hdc in each of the next 3 stitches.
- Work 1 sc in each of the next 3 stitches.
- Work 1 sl st in the next stitch.
Stitch count: 26 sts Check: 1 + 3 + 3 + (4 x 3) + 3 + 3 + 1 = 26 Positions: Increases in every 2nd stitch of the row before, starting with stitch 8 (4 in all). What it looks like now: The flat piece is getting wider and is now 26 stitches wide, after 2 rows.
Fasten off the first piece. Keep the second piece on the hook.
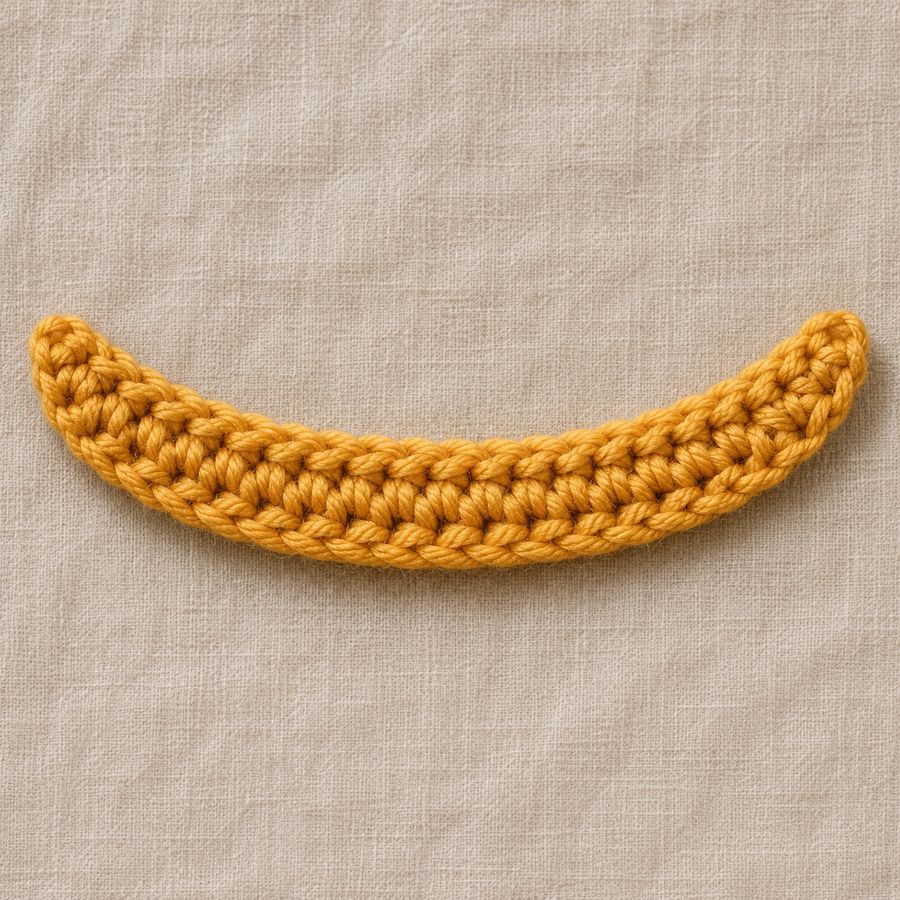 This is one half of your moon after Row 2.
Count table: Moon
| Row | Start count | Change | End count |
|---|---|---|---|
| Foundation chain | - | - | 19 ch |
| 1 | 19 | +3 | 22 sts |
| 2 | 22 | +4 | 26 sts |
Joining
Colour: Gold · Hook: 3.5 mm (US E/4) · Make: 1
Hold the two pieces together with wrong sides in.
Joining round
Quick read: with Gold, working through both layers, sc 26 along the outer curve, 2 sc in the tip, sc 18 along the inner curve, 2 sc in the other tip (48)
- Use Gold and working through both layers.
- Work 26 sc along the outer curve.
- Work 2 sc in the tip.
- Work 18 sc along the inner curve.
- Work 2 sc in the other tip.
Stitch count: 48 sc Check: 26 + 2 + 18 + 2 = 48
Stuff lightly before you close the inner curve. Sl st in the first st and fasten off.
Count table: Joining
| Round | Start count | Change | End count |
|---|---|---|---|
| Joining round | - | - | 48 sc |
Finishing
-
With Cream, embroider 3 small stars on the front with 3 crossing straight stitches each.
-
Add a Cream or Gold hanging loop at the upper tip.
- The graded stitches curve the moon on their own; do not pull Row 1 tight.
- Stuff the moon lightly so it stays a crescent shape.
Common mistakes and fixes
| Problem | Cause | Fix |
|---|---|---|
| You have 25 stitches after Row 2 instead of 26. | An increase was missed. | Count the increases. There should be 4. Undo back to the missing one and work it again. |
| The piece grows by 1 stitch every row. | The turning ch 1 was worked as a stitch. | Skip the ch 1. You should have 26 stitches at the end of Row 2. |
| Your piece is bigger or smaller than about 7 cm / 2.75 in tall. | Your tension is different from the gauge. | Check your gauge. Use a smaller hook if it is too big and a bigger hook if it is too small. |
Troubleshooting for this piece
| Problem | Cause | Fix |
|---|---|---|
| The stuffing shows through the stitches | The stitches are loose, or the piece is stuffed too tightly | Use a smaller hook and work firmly. Stuff in small pieces and stop when the shape is firm. |
| The sides are wavy, or one end is wider | The stitch count changed by one on some rows, often at the turning chain | Count the stitches at the end of every row and compare with the Count table. Undo to the last correct row. Use a marker in the first stitch. |
| The finished piece is bigger or smaller than the size given | Your tension is different from the gauge, or the yarn is thicker or thinner | Make a gauge swatch and compare it with the Gauge section. Change the hook size to match, or use the yarn named in Materials. |
20. Mini Sweater
A tiny holiday sweater in green with a red and cream checked band across the chest.
Overview
| Detail | Mini Sweater |
|---|---|
| Finished size | About 12 cm / 4.75 in across the sleeves, 6 cm / 2.4 in tall |
| Colours | Green (body and sleeves), Cream (ribbing and band), Red (band), Gold (loop) |
| Yarn used | About 16 m / 18 yd in total |
| Make | 1 |
| Parts made separately | Body x 2, Sleeves x 2 |
| Rounds and rows | 22 |
| Difficulty | Medium |
| What it involves | You change colour, several parts are sewn together, you turn at the end of each row. |
Body (make 2)
Colours: Cream, Green, Red · Hook: 3.5 mm (US E/4) · Make: 2
Foundation chain
Quick read: with Cream, ch 13 (13)
- Use Cream and make a slip knot, then ch 13.
Stitch count: 13 ch
Row 1
Quick read: sc in 2nd ch from hook, sc in each ch across (12)
- Work 1 sc in the 2nd chain from the hook.
- Work 1 sc in each chain to the end (11 chains).
Stitch count: 12 sc Check: 1 + 11 = 12
Row 2
Quick read: ch 1, turn, sc in each st across (12)
- Ch 1 and turn. This ch 1 does not count as a stitch.
- Work 1 sc in each stitch to the end of the row (12 stitches).
Stitch count: 12 sc
Rows 3 to 4
Quick read: with Green, ch 1, turn, sc in each st across (12)
- Change to Green and ch 1 and turn. This ch 1 does not count as a stitch.
- Work 1 sc in each stitch to the end of the row (12 stitches).
- Work this row 2 times in all: Rows 3 and 4.
Stitch count: 12 sc (at the end of each row)
Row 5
Quick read: with Red, ch 1, turn, sc in each st across (12)
- Change to Red and ch 1 and turn. This ch 1 does not count as a stitch.
- Work 1 sc in each stitch to the end of the row (12 stitches).
Stitch count: 12 sc
Row 6
Quick read: with Cream, ch 1, turn, sc in each st across, working 1 st in Cream and 1 st in Red all along the row (12)
- Change to Cream and ch 1 and turn. This ch 1 does not count as a stitch.
- Work 1 sc in each stitch to the end of the row (12 stitches).
- Working 1 stitch in Cream and 1 stitch in Red all along the row.
Stitch count: 12 sc
Row 7
Quick read: with Red, ch 1, turn, sc in each st across (12)
- Change to Red and ch 1 and turn. This ch 1 does not count as a stitch.
- Work 1 sc in each stitch to the end of the row (12 stitches).
Stitch count: 12 sc
Rows 8 to 12
Quick read: with Green, ch 1, turn, sc in each st across (12)
- Change to Green and ch 1 and turn. This ch 1 does not count as a stitch.
- Work 1 sc in each stitch to the end of the row (12 stitches).
- Work this row 5 times in all: Rows 8, 9, 10, 11 and 12.
Stitch count: 12 sc (at the end of each row)
Row 13
Quick read: with Cream, ch 1, turn, sc in each st across (12)
- Change to Cream and ch 1 and turn. This ch 1 does not count as a stitch.
- Work 1 sc in each stitch to the end of the row (12 stitches).
Stitch count: 12 sc What it looks like now: A flat piece 12 stitches wide, after 13 rows.
Fasten off.
Count table: Body
| Row | Start count | Change | End count |
|---|---|---|---|
| Foundation chain | - | - | 13 ch |
| 1 | 13 | -1 | 12 sc |
| 2 | 12 | 0 | 12 sc |
| 3 | 12 | 0 | 12 sc |
| 4 | 12 | 0 | 12 sc |
| 5 | 12 | 0 | 12 sc |
| 6 | 12 | 0 | 12 sc |
| 7 | 12 | 0 | 12 sc |
| 8 | 12 | 0 | 12 sc |
| 9 | 12 | 0 | 12 sc |
| 10 | 12 | 0 | 12 sc |
| 11 | 12 | 0 | 12 sc |
| 12 | 12 | 0 | 12 sc |
| 13 | 12 | 0 | 12 sc |
Sleeves (make 2)
Colours: Cream, Green · Hook: 3.5 mm (US E/4) · Make: 2
Foundation chain
Quick read: with Cream, ch 8 (8)
- Use Cream and make a slip knot, then ch 8.
Stitch count: 8 ch
Row 1
Quick read: sc in 2nd ch from hook, sc in each ch across (7)
- Work 1 sc in the 2nd chain from the hook.
- Work 1 sc in each chain to the end (6 chains).
Stitch count: 7 sc Check: 1 + 6 = 7
Row 2
Quick read: ch 1, turn, sc in each st across (7)
- Ch 1 and turn. This ch 1 does not count as a stitch.
- Work 1 sc in each stitch to the end of the row (7 stitches).
Stitch count: 7 sc
Rows 3 to 7
Quick read: with Green, ch 1, turn, sc in each st across (7)
- Change to Green and ch 1 and turn. This ch 1 does not count as a stitch.
- Work 1 sc in each stitch to the end of the row (7 stitches).
- Work this row 5 times in all: Rows 3, 4, 5, 6 and 7.
Stitch count: 7 sc (at the end of each row) What it looks like now: A flat piece 7 stitches wide, after 7 rows.
Fasten off, leaving a tail.
Count table: Sleeves
| Row | Start count | Change | End count |
|---|---|---|---|
| Foundation chain | - | - | 8 ch |
| 1 | 8 | -1 | 7 sc |
| 2 | 7 | 0 | 7 sc |
| 3 | 7 | 0 | 7 sc |
| 4 | 7 | 0 | 7 sc |
| 5 | 7 | 0 | 7 sc |
| 6 | 7 | 0 | 7 sc |
| 7 | 7 | 0 | 7 sc |
Assembly
-
Place the two body pieces together. Sew across the top for 4 sts from each side, leaving the centre 4 sts open for the neck.
-
Sew the side seams from the bottom up to Row 9, leaving the top 4 rows open for the sleeves.
-
Fold each sleeve in half with the Cream cuff at the bottom, sew the long edge (the row ends) to make a tube, then sew the top of the sleeve into the armhole.
-
Add a Gold hanging loop at the back of the neck.
- Carry the Green up the side for the stripe rows instead of cutting it.
- On the checked Row 6, carry the Red inside the stitches as in the Tapestry Colour Change.
- Sew the sleeves with the cuffs at the bottom so they hang down.
Common mistakes and fixes
| Problem | Cause | Fix |
|---|---|---|
| The piece grows by 1 stitch every row. | The turning ch 1 was worked as a stitch. | Skip the ch 1. You should have 12 stitches at the end of Row 2. |
| Row 1 has 13 stitches instead of 12. | The first stitch went into the 1st chain from the hook. | Start in the 2nd chain from the hook. |
| A small step shows where the colour changes. | The new colour was started on a new stitch. | Finish the last stitch of the old colour with the new colour. Keep the steps at the back. |
Troubleshooting for this piece
| Problem | Cause | Fix |
|---|---|---|
| The sides are wavy, or one end is wider | The stitch count changed by one on some rows, often at the turning chain | Count the stitches at the end of every row and compare with the Count table. Undo to the last correct row. Use a marker in the first stitch. |
| The fabric puckers where the colour changes | The yarn carried at the back is pulled too tight | Let the carried yarn lie loose. Check the back of the work every few rows. Spread the stitches on the hook before you carry on. |
| The finished piece is bigger or smaller than the size given | Your tension is different from the gauge, or the yarn is thicker or thinner | Make a gauge swatch and compare it with the Gauge section. Change the hook size to match, or use the yarn named in Materials. |
Finishing and Display
-
Weave in every end on the inside or along the back of flat pieces, taking each tail in two directions so it cannot work loose.
-
Block the flat ornaments (Flat Star, Flat Tree, Snowflake, Scandi Heart): pin them out flat on a towel, mist with water and leave to dry.
-
For crisp arms on the Snowflake and a firm rim on the Bell, brush on fabric stiffener or spray starch, shape and leave to dry completely.
-
Hang the set on the tree, string it into a garland on twine, tie single ornaments onto gift wrap as toppers, or fill a bowl with the stuffed pieces.
Set inventory
| No. | Piece | Parts | Make | Rounds and rows |
|---|---|---|---|---|
| 1 | Classic Bauble | Ball x 1, Cap x 1 (2) | 1 | 18 |
| 2 | Striped Bauble | Ball x 1, Cap x 1 (2) | 1 | 18 |
| 3 | Teardrop Bauble | Body x 1, Cap x 1 (2) | 1 | 20 |
| 4 | Flower Medallion | Front x 1, Back x 1 (2) | 1 | 12 |
| 5 | Puffy Star | Star x 2, Points x 10 (12) | 1 | 9 |
| 6 | Flat Star | Star x 1, Points x 5 (6) | 1 | 9 |
| 7 | Christmas Bell | Bell x 1, Clapper x 1 (2) | 1 | 17 |
| 8 | Mini Cone Tree | Tree x 1, Trunk x 1 (2) | 1 | 21 |
| 9 | Flat Tree | Tree x 1 (1) | 1 | 19 |
| 10 | Snowflake | Snowflake x 1 (1) | 1 | 3 |
| 11 | Puffy Heart | Bumps x 2 (2) | 1 | 11 |
| 12 | Scandi Heart | Heart x 1, Flower x 1, Leaves x 4 (6) | 1 | 21 |
| 13 | Spiral Icicle | Icicle x 1 (1) | 1 | 4 |
| 14 | Mini Wreath | Ring x 1, Bow x 1, Berries x 5 (7) | 1 | 35 |
| 15 | Mini Stocking | Stocking x 1 (1) | 1 | 21 |
| 16 | Mini Mitten | Hand x 1, Thumb x 1 (2) | 1 | 19 |
| 17 | Gift Box | Square x 6, Bow x 1 (7) | 1 | 12 |
| 18 | Pompom Hat | Hat x 1, Base x 1 (2) | 1 | 20 |
| 19 | Crescent Moon | Moon x 2 (2) | 1 | 4 |
| 20 | Mini Sweater | Body x 2, Sleeves x 2 (4) | 1 | 22 |
| Total | 20 | 66 parts in all | 20 | 315 |
Final count checklist
| Done | Piece | Part | Last round or row | Stitch count |
|---|---|---|---|---|
| ☐ | 1. Classic Bauble | Ball | Round 14 | 6 sc |
| ☐ | 1. Classic Bauble | Cap | Round 4 | 12 sc |
| ☐ | 2. Striped Bauble | Ball | Round 14 | 6 sc |
| ☐ | 2. Striped Bauble | Cap | Round 4 | 12 sc |
| ☐ | 3. Teardrop Bauble | Body | Round 16 | 6 sc |
| ☐ | 3. Teardrop Bauble | Cap | Round 4 | 12 sc |
| ☐ | 4. Flower Medallion | Front | Round 5 | 36 sc |
| ☐ | 4. Flower Medallion | Back | Round 6 | 36 sc |
| ☐ | 4. Flower Medallion | Joining | Joining round | 42 sc |
| ☐ | 5. Puffy Star | Star | Round 4 | 20 sc |
| ☐ | 5. Puffy Star | Points | Row 4 | 1 sc |
| ☐ | 5. Puffy Star | Joining | Joining round | 50 sc |
| ☐ | 6. Flat Star | Star | Round 4 | 20 sc |
| ☐ | 6. Flat Star | Points | Row 4 | 1 sc |
| ☐ | 6. Flat Star | Edge | Edge round | 50 sc |
| ☐ | 7. Christmas Bell | Bell | Round 13 | 36 sc |
| ☐ | 7. Christmas Bell | Clapper | Round 4 | 6 sc |
| ☐ | 8. Mini Cone Tree | Tree | Round 18 | 6 sc |
| ☐ | 8. Mini Cone Tree | Trunk | Round 3 | 6 sc |
| ☐ | 9. Flat Tree | Tree | Row 14 | 1 sc |
| ☐ | 9. Flat Tree | Edge | Edge round | 54 sc |
| ☐ | 9. Flat Tree | Trunk | Row 3 | 3 sc |
| ☐ | 10. Snowflake | Snowflake | Round 3 | 12 sc |
| ☐ | 11. Puffy Heart | Bumps | Round 4 | 18 sc |
| ☐ | 11. Puffy Heart | Body | Round 11 | 6 sc |
| ☐ | 12. Scandi Heart | Heart | Row 9 | 13 sc |
| ☐ | 12. Scandi Heart | Right Bump | Row 12 | 2 sc |
| ☐ | 12. Scandi Heart | Left Bump | Row 12 | 2 sc |
| ☐ | 12. Scandi Heart | Edge | Edge round | 40 sts |
| ☐ | 12. Scandi Heart | Flower | Round 2 | 15 sts |
| ☐ | 12. Scandi Heart | Leaves | Row 1 | 5 sts |
| ☐ | 13. Spiral Icicle | Icicle | Row 3 | 72 sl st |
| ☐ | 14. Mini Wreath | Ring | Round 32 | 8 sc |
| ☐ | 14. Mini Wreath | Bow | Row 1 | 30 sc |
| ☐ | 14. Mini Wreath | Berries | Round 1 | 5 sc |
| ☐ | 15. Mini Stocking | Stocking | Round 18 | 18 sc |
| ☐ | 15. Mini Stocking | Heel | Round 3 | 6 sc |
| ☐ | 16. Mini Mitten | Hand | Round 15 | 15 sc |
| ☐ | 16. Mini Mitten | Thumb | Round 4 | 6 sc |
| ☐ | 17. Gift Box | Square | Row 9 | 9 sc |
| ☐ | 17. Gift Box | Bow | Row 1 | 20 sc |
| ☐ | 18. Pompom Hat | Hat | Round 16 | 24 sc |
| ☐ | 18. Pompom Hat | Base | Round 4 | 24 sc |
| ☐ | 19. Crescent Moon | Moon | Row 2 | 26 sts |
| ☐ | 19. Crescent Moon | Joining | Joining round | 48 sc |
| ☐ | 20. Mini Sweater | Body | Row 13 | 12 sc |
| ☐ | 20. Mini Sweater | Sleeves | Row 7 | 7 sc |
Total: 47 counts to check
Care and washing
- Spot clean with cool water and a little mild soap, press out the water in a towel and dry flat.
- Do not machine wash stuffed ornaments.
- Store the set flat in a box with tissue paper between the pieces.
Crochet Christmas ornament ideas beyond these 20: wreaths, hats, trees and snowflakes
These 20 ornaments are small, between 4.5 and 12 cm (1.75 and 4.75 in), so they suit a tree, a garland or a gift. You may want a shape bigger, or another version of it. Each of those has its own page.
The Mini Wreath here is a stuffed tube. For door wreaths and other mini wreath ornaments, read Crochet Wreath Patterns: Mini Wreath Ornaments and Door Wreaths. If the Pompom Hat makes you want one to wear, the free set Free Christmas Beanie Crochet Patterns: 8 Hats from Baby to Adult sizes Christmas beanies from baby to adult, and Crochet Hat Patterns: Beanies, Balaclavas and Hats by Head Size covers hats by head size.
Your trees and snowflake have bigger relatives. Cone trees, flat trees and tree squares sit in Crochet Christmas Tree Patterns: Mini Trees and Tree Squares, lace snowflakes in Crochet Snowflake Patterns: Lace Snowflakes and Snowflake Decor, and full size stockings in Crochet Christmas Stocking Pattern: 4 Designs with a Name Panel. Every free set on the site, ornaments included, is listed under Free Crochet Patterns with Step by Step Photos.
Frequently asked questions
Can I use a different yarn?
Yes. Pick a yarn in the same weight category as the Materials section and make a gauge swatch first. A thicker yarn makes bigger pieces and a thinner yarn makes smaller ones. Buy extra if you go thicker, and use the same yarn for the whole set so the pieces match.
Can I use a different hook?
Yes, if your swatch matches the Gauge section. Many crocheters work tighter or looser than the hook size shown, so trust your swatch, not the hook size. For stuffed pieces, a firm fabric matters most, so go down a size if the stuffing shows.
I am left-handed. Can I follow this pattern?
Yes. Many left-handed crocheters follow the written steps as they are and get a mirror image. For round pieces this makes no difference. You can also mirror the directions: wherever the guide says right, hold or work on the left.
This guide uses US terms. What are the UK names?
The stitch names differ between US and UK patterns. US single crochet (sc) is UK double crochet (dc). US half double crochet (hdc) is UK half treble (htr). US double crochet (dc) is UK treble (tr). US treble (tr) is UK double treble (dtr). The Abbreviations table in this guide lists each one.
How do I wash the finished piece?
Follow the care label of your yarn first. The Care and washing section of this guide gives the steps. In general, wash gently, reshape while damp and dry flat.
Can I make it bigger or smaller?
Yes. Use a thicker or thinner yarn with a matching hook, and keep the stitch counts the same. Every piece then grows or shrinks by the same amount as your swatch. If you add or remove rounds yourself, the Count tables and the final checklist no longer apply to those rounds.
My stitch count does not match the guide. What do I do?
Stop and count. Compare your stitches with the Stitch count line and the Count table for that round. Undo to the last round that matches. Use a stitch marker in the first stitch of each round, and count again at the end of every round.
Questions makers ask
Are these crochet Christmas ornament patterns free?
Yes. All 20 crochet Christmas ornament patterns are free to read on this page, from the Classic Bauble to the Mini Sweater. Every round and row ends with its stitch count, every part ends with a count table, and the final checklist holds 47 counts, so you can check each ornament as you go.
What yarn and hook do these crochet ornaments need?
These crochet ornaments use weight 4 (medium, worsted) acrylic or cotton blend yarn on a 3.5 mm (E-4) hook. That hook is several sizes smaller than the 5.5 to 6.5 mm the Craft Yarn Council Standard Yarn Weight System gives for weight 4, so the fabric stays firm and the stuffing does not show through.
How long does a crochet Christmas ornament take?
A small flat crochet Christmas ornament takes about 20 minutes and a stuffed one 40 to 60 minutes, by the pattern's own notes. The whole set of 20 is roughly 12 to 15 hours of crochet. The stuffed pieces take longer because you also stuff, close and sew on a cap or a loop.
How much yarn do the 20 ornaments take?
All 20 ornaments take about 227 m (248 yd) of weight 4 yarn: Red 65 m (71 yd), Cream 65 m (71 yd), Green 50 m (55 yd), Gold 45 m (49 yd) and Brown 2 m (2 yd). One ornament uses 5 to 20 m (5 to 22 yd), so one ball of each colour covers the set.
Which crochet Christmas ornaments are easiest to start with?
The pattern labels three ornaments Easy: the Puffy Star, the Puffy Heart and the Crescent Moon, because they use only basic stitches. The other seventeen carry its Medium label. Its own tip is to start with the Classic Bauble, because the Striped and Teardrop Baubles repeat the same rhythm of increases.