These free Christmas mug cozy crochet patterns are 10 flat bands worked in rows, each about 21 cm (8.25 in) long and 7.5 to 8 cm (3 to 3.25 in) tall, closed beside the handle with two button straps so they fit an 11 to 12 oz mug about 25 to 27 cm (10 to 10.5 in) around. All ten use weight 4 (medium, worsted) yarn on a 4 mm (US G-6) hook.
You get stripes, a ripple, a rib, moss stitch, bobbles, a tree, a Nordic diamond band, a mistletoe sprig, a wrapped gift and a cabin check. Most cozies take you about 1 to 2 hours; the Nordic Diamond Band and the Cabin Check take about 2 to 3. Every row ends with its stitch count, so you can check your work before you go on. The skill labels run from Beginner to Easy. You need no shaping for most of them.
The 10 free Christmas mug cozy patterns in this set
The set has 10 mug cozies, and each card jumps to that cozy’s full pattern further down this page. Each card gives you the size, the skill label, the hook, the build, the parts, the colours and the yarn. Every band starts from a chain of 37 or 38 (11 for the sideways rib). Then you close it with the same two button straps, so one fit carries through the whole set. Your first cozy shows you how all ten will sit.
Hearthside Stripe
- Size
- 21 x 7.5 cm (8.25 x 3 in)
- Build
- Single crochet stripes: 3 Red, 2 Cream, 4 Green, 2 Cream, 3 Red rows
- Parts
- Band, 2 button straps
- Colours
- Red, Cream, Green
- Yarn
- Weight 4 (medium, worsted), 27 m / 30 yd
- Hook
- 4 mm (US G-6)
- Difficulty
- Beginner
Peppermint Ripple
- Size
- 22 x 8 cm (8.5 x 3.25 in)
- Build
- Single crochet ripple: 6 waves of 6 stitches, straight top and bottom
- Parts
- Band, 2 button straps
- Colours
- Red, Cream
- Yarn
- Weight 4 (medium, worsted), 32 m / 35 yd
- Hook
- 4 mm (US G-6)
- Difficulty
- Easy
Fireside Rib
- Size
- 21 x 8 cm (8.25 x 3.25 in)
- Build
- Back loop single crochet worked sideways, 2 Red edge rows top and bottom
- Parts
- Band, 2 button straps
- Colours
- Cream, Red
- Yarn
- Weight 4 (medium, worsted), 28 m / 31 yd
- Hook
- 4 mm (US G-6)
- Difficulty
- Beginner
Evergreen Moss
- Size
- 21 x 7.5 cm (8.25 x 3 in)
- Build
- Moss (linen) stitch between 2 Gold rows
- Parts
- Band, 2 button straps
- Colours
- Green, Gold
- Yarn
- Weight 4 (medium, worsted), 22 m / 25 yd
- Hook
- 4 mm (US G-6)
- Difficulty
- Easy
Snowberry Bobble
- Size
- 21 x 8 cm (8.25 x 3.25 in)
- Build
- 3 rows of 8 Red bobbles on Cream single crochet
- Parts
- Band, 2 button straps
- Colours
- Cream, Red
- Yarn
- Weight 4 (medium, worsted), 37 m / 41 yd
- Hook
- 4 mm (US G-6)
- Difficulty
- Easy
Little Christmas Tree
- Size
- 21 x 8 cm (8.25 x 3.25 in)
- Build
- Single crochet band with a sewn 3 tier tree, trunk and picot star
- Parts
- Band, tree, trunk, star, 2 button straps
- Colours
- Cream, Green, Gold
- Yarn
- Weight 4 (medium, worsted), 32 m / 35 yd
- Hook
- 4 mm (US G-6)
- Difficulty
- Beginner
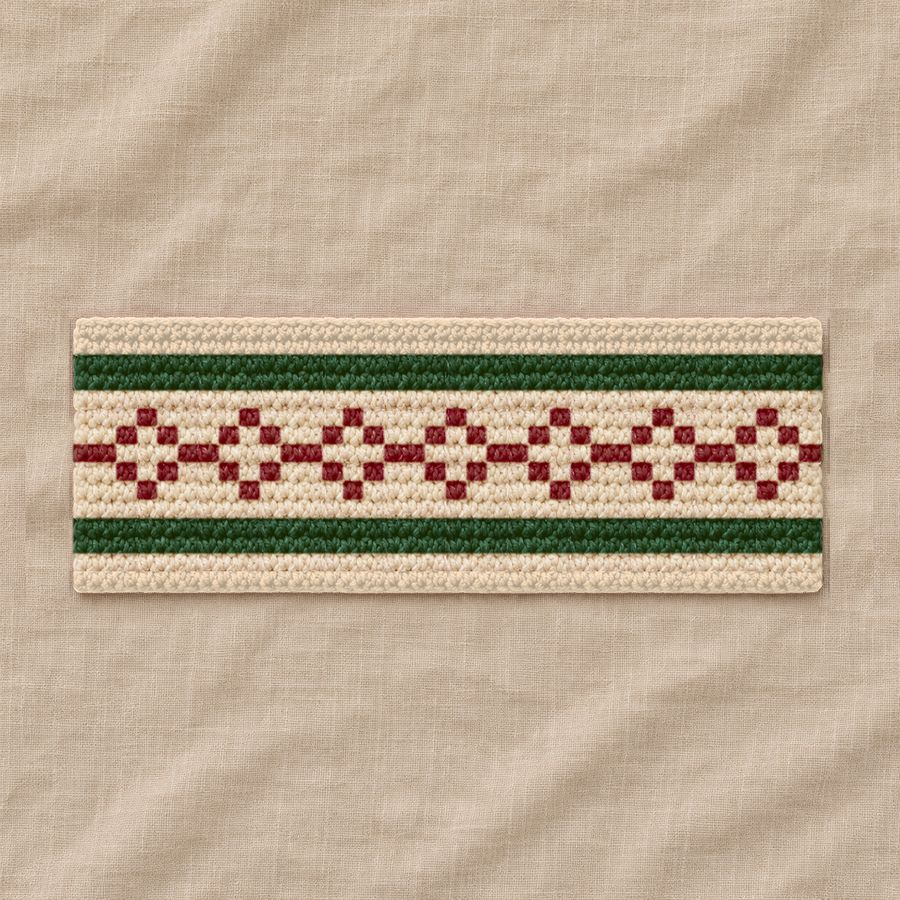
Nordic Diamond Band
- Size
- 21 x 8 cm (8.25 x 3.25 in)
- Build
- Tapestry crochet: 7 outline diamonds between 2 Green stripes
- Parts
- Band, 2 button straps
- Colours
- Cream, Green, Red
- Yarn
- Weight 4 (medium, worsted), 29 m / 32 yd
- Hook
- 4 mm (US G-6)
- Difficulty
- Easy (tapestry crochet)
Mistletoe Sprig
- Size
- 21 x 7.75 cm (8.25 x 3 in)
- Build
- Half double crochet band with 5 leaves, a bud leaf, 3 berries and a chain bow
- Parts
- Band, 5 leaves, bud leaf, 3 berries, bow, 2 button straps
- Colours
- Red, Green, Cream
- Yarn
- Weight 4 (medium, worsted), 31 m / 34 yd
- Hook
- 4 mm (US G-6)
- Difficulty
- Easy
Wrapped Gift
- Size
- 21 x 8 cm (8.25 x 3.25 in)
- Build
- Single crochet band with sewn ribbons, bow and 2 notched tails
- Parts
- Band, 2 ribbons, bow loops, bow centre, 2 bow tails, 2 button straps
- Colours
- Green, Red
- Yarn
- Weight 4 (medium, worsted), 44 m / 49 yd
- Hook
- 4 mm (US G-6)
- Difficulty
- Beginner
Cabin Check
- Size
- 21 x 8 cm (8.25 x 3.25 in)
- Build
- Tapestry crochet checks: blocks of 3 stitches and 3 rows, 4 blocks tall
- Parts
- Band, 2 button straps
- Colours
- Red, Cream
- Yarn
- Weight 4 (medium, worsted), 31 m / 34 yd
- Hook
- 4 mm (US G-6)
- Difficulty
- Easy (tapestry crochet)
Each mug cozy has its own look on the same band:
- Hearthside Stripe: wide single crochet stripes in red, cream and green.
- Peppermint Ripple: red and cream waves between two straight edges.
- Fireside Rib: a cream back loop rib that looks knitted.
- Evergreen Moss: a firm green moss stitch between two gold rows.
- Snowberry Bobble: three rows of red bobbles on cream.
- Little Christmas Tree: a sewn three tier tree with a gold star.
- Nordic Diamond Band: seven red diamonds in tapestry crochet.
- Mistletoe Sprig: green leaves, cream berries and a thin red bow.
- Wrapped Gift: a red ribbon and bow on a green band.
- Cabin Check: a red and cream checkerboard.
Pattern Overview
Ten different holiday cozies with one shared fit. Each is a flat band worked in rows, with two button straps that pass through the handle. Make one for every mug in the cupboard, or a whole set of gifts.
The 10 Designs
| No. | Design | No. | Design |
|---|---|---|---|
| 1 | Hearthside Stripe | 6 | Little Christmas Tree |
| 2 | Peppermint Ripple | 7 | Nordic Diamond Band |
| 3 | Fireside Rib | 8 | Mistletoe Sprig |
| 4 | Evergreen Moss | 9 | Wrapped Gift |
| 5 | Snowberry Bobble | 10 | Cabin Check |
- Start with Design 1. Its band is the base for every other cozy, so the rest will feel familiar.
- Make your first band, try it on your own mug, and adjust the chain before you make the rest.
- Gift idea: a cozy on a plain mug with a bag of cocoa or tea makes a lovely small present.
Which mug cozy to make first
Make the Hearthside Stripe first. Its band is the base for every other cozy, so the rest feel familiar. It is only single crochet in five stripes. You change colour four times. That is all. Try your first band on your own mug and adjust the chain before you make the rest, because mugs vary. Next, the Fireside Rib, the Little Christmas Tree and the Wrapped Gift are also labelled Beginner. The Nordic Diamond Band and the Cabin Check change colour inside the row, so you carry a second yarn. Leave those two for later.
How to read this pattern
- Every round or row has its own heading, for example Round 3.
- Quick read is the short pattern line, for crocheters who already know the stitches.
- The numbered steps say the same thing in full, one action per line.
- Stitch count is how many stitches you should have at the end of the round or row.
- Check is a small sum that proves the stitch count.
- Positions tell you exactly which stitches get the increases, decreases or added parts.
- Each part ends with a count table. Tick off each round as you finish it.
Example: 2. Peppermint Ripple, Body
Row 2 Quick read: ch 1, turn, sc2tog, (sc 1, 3 sc in next st, sc 1, sc3tog) 5 times, sc 1, 3 sc in next st, sc 1, sc2tog (37)
- Ch 1 and turn. This ch 1 does not count as a stitch.
- Work sc2tog over the next 2 stitches (2 stitches become 1).
- Work 1 sc in the next stitch.
- Work 3 sc in the next stitch.
- Work 1 sc in the next stitch.
- Work sc3tog over the next 3 stitches (3 stitches become 1).
- Repeat steps 3 to 6 four more times (5 times in all).
- Work 1 sc in the next stitch.
- Work 3 sc in the next stitch.
- Work 1 sc in the next stitch.
- Work sc2tog over the next 2 stitches (2 stitches become 1).
Stitch count: 37 sc Check: 1 + (5 x 6) + 1 + 3 + 1 + 1 = 37 Positions: Decreases over stitches 1-2, 6-8, 12-14, 18-20, 24-26, 30-32 and 36-37 of the row before; increases in every 6th stitch of the row before, starting with stitch 4 (6 in all).
General pattern notes
- This pattern uses US crochet terms. The UK names are in the abbreviations table.
- Every round and row ends with a Stitch count line. Count your stitches there before you go on.
- The Berry rounds are worked in a spiral: do not join them, and put a marker in the first stitch of each round. The Star and the Strap Ring are joined with a sl st, as written.
- In rows, the ch 1 at the start of the row is a turning chain. It never counts as a stitch.
- Count stitches from the first stitch of the row or round, where the marker is.
- Stitch positions such as stitches 3, 6 and 9 are counted from the first stitch of the row or round.
- Work through both loops of each stitch, unless the round says back loop only or front loop only.
- Decorative parts (picot) are not counted in the stitch count.
- To change colour, finish the last stitch of the old colour with the new colour.
- Steps in brackets are repeated the number of times shown. Each repeat is worked the same way.
- Weave in each end as soon as you finish a part, so the ends do not pile up at the end.
- Block flat parts before you sew or join them.
- Flat pieces should lie flat with no cupping or ruffles. If a piece cups, check the stitch count and your gauge.
Abbreviations
| Abbreviation | Meaning | In plain words |
|---|---|---|
| ch | chain | Yarn over and pull through the loop on the hook. |
| st(s) | stitch(es) | One finished stitch. You count these. |
| sl st | slip stitch | Insert the hook, yarn over and pull through the stitch and the loop on the hook. |
| sc | single crochet (UK: double crochet) | Insert the hook, pull up a loop, yarn over and pull through both loops. |
| hdc | half double crochet (UK: half treble) | Yarn over, insert the hook, pull up a loop, yarn over and pull through all 3 loops. |
| dc | double crochet (UK: treble), used in the bobble and in Rows 1 and 15 of Design 2 | Yarn over, insert the hook, pull up a loop, then pull through 2 loops twice. |
| sc2tog | sc 2 sts together (1 st made) | Two stitches worked together into one sc. |
| sc3tog | sc 3 sts together (1 st made) | Three stitches worked together into one sc. |
| BLO | back loop only | Put the hook under the back loop only. |
| MR | magic ring | A loop of yarn you work the first round into, then pull closed. |
| RS / WS | right side / wrong side | |
| bobble | 5 dc together in one st (see Techniques) | |
| picot | ch 2, sl st in the 2nd ch from the hook | A tiny bump made of chains, for decoration. |
| ch 1 space | the space under a ch 1, worked as one stitch |
Materials
Yarn
Worsted / Aran weight 4 acrylic, cotton or wool blend, in 4 colours (amounts below)
| Detail | |
|---|---|
| Yarn category | 4 |
Colours
| Colour | Used for | Amount |
|---|---|---|
| Red | Pieces 1, 2, 3, 5, 7, 8, 9 and 10 | About 125 m / 137 yd for all ten cozies |
| Cream | Pieces 1, 2, 3, 5, 6, 7, 8 and 10 | About 120 m / 131 yd for all ten cozies |
| Green | Pieces 1, 4, 6, 7, 8 and 9 | About 70 m / 77 yd for all ten cozies |
| Gold | Pieces 4 and 6 | About 5 m / 6 yd for all ten cozies |
Hooks
- 4 mm (US G/6): All pieces (1 to 10)
4 mm (US G/6), or the size that gives the gauge below
Supplies
- Buttons: 2 per cozy, about 15 mm / 0.6 in, wooden or plastic (20 for the whole set)
- Yarn needle
- Scissors
- Stitch markers
- Pins
- A measuring tape
- Use the same yarn for the whole set so every cozy fits the same mug.
- Cotton and cotton blends give crisp stitch definition and keep their shape on a warm mug.
- Leftover worsted yarn works well; one 100 g ball of each colour is plenty for all ten.
Gauge
17 sc and 19 rows = 10 cm / 4 in in single crochet, after light blocking.
Hook: 4 mm (US G/6)
Make a gauge swatch
- Ch 18.
- Row 1: work 1 sc in the 2nd chain from the hook and in each chain to the end (17 sc).
- Rows 2 to 19: ch 1, turn, work 1 sc in each stitch to the end (17 sc).
- Fasten off and lay the swatch flat without stretching it.
- Measure it: 17 sc should be 10 cm / 4 in wide and 19 rows should be 10 cm / 4 in tall.
If your swatch is too big
You crochet loosely. Use a smaller hook and make a new swatch.
If your swatch is too small
You crochet tightly. Use a bigger hook and make a new swatch.
Target for your first piece
Your first piece, the Hearthside Stripe, should measure about 21 cm / 8.25 in long and 7.5 cm / 3 in tall, plus two straps; fits a standard 11 to 12 oz mug.
- Make the gauge swatch (17 sts and 19 rows of single crochet) before you start.
- Too many stitches in 10 cm: go up a hook size. Too few: go down a size.
- A firm fabric is best for a cozy; it holds the heat and keeps its shape.
Stitches you will use
The basic stitches in this pattern are explained here, one step at a time; colour changes, tapestry crochet, moss stitch, the bobble, the decreases, the magic ring and the picot are explained in Techniques. Read the ones you do not know before you start. The hook is held in your right hand in these steps. Left-handed crocheters mirror the directions.
Chain (ch)
- Make a slip knot and put it on the hook.
- Yarn over: wrap the yarn over the hook from back to front.
- Pull the yarn through the loop on the hook. That is 1 chain.
- Repeat steps 2 and 3 for each chain.
- Keep the chains loose and even, so it is easy to work into them.
- The loop on the hook is never counted as a chain.
Slip stitch (sl st)
- Put the hook into the stitch the pattern names.
- Yarn over.
- Pull the yarn through the stitch and through the loop on the hook in one move.
- One loop stays on the hook. A slip stitch adds almost no height.
Single crochet (sc)
- Put the hook into the stitch.
- Yarn over and pull up a loop. There are 2 loops on the hook.
- Yarn over again.
- Pull the yarn through both loops. One loop is left. That is 1 sc.
Half double crochet (hdc)
- Yarn over, then put the hook into the stitch.
- Yarn over and pull up a loop. There are 3 loops on the hook.
- Yarn over and pull through all 3 loops. One loop is left. That is 1 hdc.
Double crochet (dc)
- Yarn over, then put the hook into the stitch.
- Yarn over and pull up a loop. There are 3 loops on the hook.
- Yarn over and pull through the first 2 loops. There are 2 loops on the hook.
- Yarn over and pull through the last 2 loops. One loop is left. That is 1 dc.
Back loop only (BLO) and front loop only (FLO)
- Look at the top of a stitch. It is a V made of two loops.
- The loop nearer to you is the front loop. The loop farther away is the back loop.
- For BLO, put the hook under the back loop only. For FLO, put it under the front loop only.
- Finish the stitch as normal.
- The loop you did not use stays on the piece and makes a small ridge.
Bobbles, puffs, popcorns and clusters
- These stitches are small groups of stitches worked in the same place and closed together at the top.
- Bobbles, puffs and clusters: start each stitch as normal, but stop before the last pull-through. Leave the last loop of each stitch on the hook.
- Repeat in the same place until you have the number of stitches the Abbreviations table gives for this pattern.
- Yarn over and pull through all the loops on the hook to close the group.
- Popcorn: work complete stitches in the same place, then pull the first loop through the last stitch to close the group.
- Check the Abbreviations table for how many stitches each group has and which stitch it uses.
Turning at the end of a row
- At the end of the row, chain the number the pattern gives. This is the turning chain.
- Turn your work so the other side faces you.
- Start the next row in the stitch the pattern names.
- A turning chain counts as a stitch only when the pattern says so.
Skipping stitches
- To skip a stitch, do not work into it.
- Go on to the next stitch the pattern names.
- The skipped stitch stays in the row or round below. It simply has no new stitch in it.
- Skipped stitches are already counted in the Start count, so use the Count table to check.
Working in a spiral
- Do not join the rounds and do not turn the work.
- Put a stitch marker in the first stitch of the round.
- When you reach the marked stitch, work it, then move the marker into the stitch you just made.
- The marker shows you where each round starts, so you can count each round.
Fastening off and weaving in ends
- After the last stitch, cut the yarn and leave a tail.
- Pull the cut end all the way through the loop on the hook and pull it tight.
- Thread the tail onto a yarn needle.
- Weave it through the backs of the stitches for a few stitches in one direction, then back the other way.
- Trim the end close to the work. Do not trim the tail if you still need it for sewing.
Before You Start
- US crochet terms throughout. UK terms are in the abbreviations table.
- Every cozy is a flat band worked in rows, then closed around the mug with two button straps that pass through the handle.
- The ch 1 at the start of a row turns the work and does not count as a stitch. Work the first stitch into the first stitch of the row.
- The number in brackets at the end of each row is the stitch count at the end of that row.
- Instructions in brackets are repeated the number of times stated: (sc 3 in Cream, sc 1 in Red) 9 times means work that group nine times in all.
- “With Green” at the start of a row means change to Green for that row (see Colour Changes). “sc 4 in Red” means work those stitches with Red.
- Row 1 is the right side unless a design says otherwise. Mark it with a stitch marker.
- Each cozy takes about 1 to 2 hours; the colourwork of Designs 7 and 10 takes about 2 to 3 hours. The appliques on Designs 6 and 8 add about 30 minutes and the ribbons and bow of Design 9 about 45 minutes.
- Left handed crocheters can follow every row as written. The band comes out as a mirror image, so swap the sides in the Assembly: buttons beside the left short edge, straps on the right short edge, and count the motif position from the left short edge.
- Place a stitch marker in the first and last stitch of every row; it makes counting easy.
- Count your stitches at the end of every row until the rhythm feels natural.
Fit Guide
Measure around the widest part of your mug, below the handle. Each band is about 21 cm / 8.25 in long and the straps close a gap of 3 to 6.5 cm / 1.25 to 2.5 in at the handle, so the pattern as written fits a mug of about 25 to 27 cm / 10 to 10.5 in around (the gap is about 4.5 cm / 1.75 in on a 26 cm / 10.25 in mug). Wear the band at a height where both straps can pass through the handle opening, below the top of the handle.
| Your mug | What to change |
|---|---|
| Standard 11 to 12 oz, 25 to 27 cm around | Follow the pattern as written |
| Large 14 to 16 oz, 28 to 31 cm around | Add steps to the foundation chain (table below) until the band is about 4.5 cm / 1.75 in shorter than your mug, and add 2 rows to the height (the large mug table below says where) |
| Small 8 to 10 oz, 22 to 24 cm around | Make the small band in the table below and keep the height; the table says when the straps need to be longer |
| Design | Change the foundation chain in steps of | Small mug, 22 to 24 cm around |
|---|---|---|
| 1, 6, 8, 9 | any number of sts (keep the tree, sprig or bow at the same distance from the right short edge) | 5 sts fewer (31 sts); for Design 9 make the Long Ribbon 5 sts shorter too (ch 32, 31 sts); straps as written |
| 2 Peppermint Ripple | 6 sts (one wave) | ch 32 (31 sts, 5 waves); straps as written |
| 3 Fireside Rib | 4 rows (the rib is worked sideways; add or remove rows, and 4 sts on each edge row) | 36 rows, edge rows 36 sc; straps as written |
| 4 Evergreen Moss | 2 sts | ch 31 (30 sts, 14 repeats); straps as written |
| 5 Snowberry Bobble | 4 sts (one bobble) | ch 33 (32 sts, 7 bobbles a row); straps as written |
| 7 Nordic Diamond Band | 5 sts (one diamond) | ch 32 (31 sts, 6 diamonds; work each bracketed repeat 1 time fewer); straps as written |
| 10 Cabin Check | 6 sts (one red and one cream block) | ch 31 (30 sts, 10 blocks across); straps as written |
| Design | Large mug, 28 to 31 cm around: where the 2 extra rows go |
|---|---|
| 1 Hearthside Stripe | 1 more Red row at each edge (Rows 1 to 4 and 13 to 16 Red) |
| 2 Peppermint Ripple | 1 more Cream row like Row 2 and 1 more Red row like Row 14 (17 rows) |
| 3 Fireside Rib | ch 13 (12 sts) for the foundation instead of ch 11 (band about 7 cm / 2.75 in wide before the edges) |
| 4 Evergreen Moss | 2 more rows like Row 3 (Rows 3 to 15); the Gold row is Row 16 |
| 5 Snowberry Bobble | 2 more plain rows like Row 2 (Rows 2 to 4); the bobble rows are then Rows 5, 9 and 13 (still wrong side rows) and Rows 14 to 17 are plain |
| 6 Little Christmas Tree | Rows 2 to 17; trunk 3 rows (work its Row 2 twice), its lower end on the bottom edge and the tree base on top of Row 3; star centre about 1.9 cm / 0.75 in below the top edge |
| 7 Nordic Diamond Band | 2 more Cream rows like Row 2 (Rows 2 to 4); written Rows 3 to 15 are then Rows 5 to 17 (diamonds on Rows 8 to 12) |
| 8 Mistletoe Sprig | Rows 2 to 12; the centre point is 1 row higher, at the top of Row 6 (the middle of the band); place everything from it as written; lowest leaf tip about 1 cm / 0.4 in above the bottom edge |
| 9 Wrapped Gift | Rows 2 to 17; Long Ribbon: add the sts you added to the band, sew it over Rows 9 to 11; Short Ribbon: ch 16 (15 sts), to reach from edge to edge; tail tips about 1.3 cm / 0.5 in above the bottom edge |
| 10 Cabin Check | 2 more plain Red rows after Row 1 (Rows 1 to 3 Red); written Rows 2 to 15 are then Rows 4 to 17 |
On a large mug, sew the bottom button on the row given and the top button 2 rows higher, so both keep their distance from the edges, and work each bracketed repeat 1 more time for every step added to the foundation chain. A large cozy can use up to about 50 % more yarn.
Longer straps: add 2 sts to the strap foundation chain for every 1.2 cm / 0.5 in that your gap is wider than 6.5 cm / 2.5 in, and work them in every row.
- Wrap the foundation chain around your mug before you work Row 1, starting at the front of the handle. It should leave a gap of about 4.5 cm / 1.75 in behind the handle (3 to 6.5 cm / 1.25 to 2.5 in works).
- Measure your finished band before you sew on the buttons: a chevron or ribbed band can come out a little shorter. If the gap on your mug is wider than 6.5 cm / 2.5 in, make longer straps as above.
Techniques
Foundation Chain and First Row
Chain the number given, then work the first sc into the 2nd ch from the hook (the 3rd ch for hdc). Work into the back bump of each chain for a neat bottom edge that matches the top.
Colour Changes
Work the last stitch before the new colour until 2 loops are left on the hook, then pull the new colour through both loops. For stripes, cut the old colour leaving a 10 cm / 4 in tail, or carry it up the side if it is used again within 2 rows.
Tapestry Crochet (Designs 7 and 10)
Lay the colour you are not using along the top of the row and work your stitches over it, so it is hidden inside them. Change colour on the last yarn over of the stitch before the new colour. Keep the carried strand relaxed so the band does not pucker, and twist the two yarns once at the end of every row.
Back Loop Only (BLO)
Insert the hook under the back loop of the stitch only, the loop furthest from you. Working every row in BLO makes the ridges of Design 3.
Moss Stitch (Design 4)
Moss stitch alternates (ch 1, skip 1, sc). On every row from Row 3 the sc goes into the ch 1 space below and the ch 1 passes over the sc below. Count each ch 1 space as one stitch.
Bobble (Design 5)
(Yarn over, insert the hook in the stitch, yarn over and pull up a loop, yarn over and pull through 2 loops) 5 times in the same stitch, then yarn over and pull through all 6 loops on the hook. Bobbles are worked on wrong side rows, and they pop out on the right side. Between bobbles, carry the Red loosely along the side facing you (the wrong side) instead of working over it, so no red shows through the cream.
Decreases
sc2tog: (insert the hook in the next st, yarn over and pull up a loop) twice, yarn over and pull through all 3 loops. sc3tog is the same over 3 sts, pulling through all 4 loops.
Magic Ring and Picot
Magic ring: wrap the yarn twice round two fingers, pull up a loop, ch 1 (does not count), work the stitches into the ring and pull the tail to close. Picot: ch 2, sl st in the 2nd ch from the hook.
Sewing On Appliques and Buttons
Pin the piece in place first and try the cozy on the mug before you sew. Use the long tail and a yarn needle, sewing small stitches through the outer loops of the applique and only the front half of the band stitches, so nothing shows inside. Sew buttons on with matching yarn or a strong thread, going through the band 3 or 4 times.
- Practise the bobble on a scrap of yarn first; five loops pulled up evenly give a round berry.
- In tapestry crochet, check the back of your work every few rows to make sure the carried yarn is not pulling.
Button Straps
Every cozy closes with the same two straps. Make them in the colour given with each design.
| Detail | |
|---|---|
| Finished size | About 8.2 cm / 3.25 in long and 1.6 cm / 0.6 in wide, plus a round ring about 2.2 cm / 0.9 in across at one end |
| Yarn used | About 6 m / 7 yd for both straps |
Button Strap (make 2)
Foundation: ch 15 (15)
Row 1: sc in 2nd ch from hook, sc in each ch across (14)
Rows 2 to 3: ch 1, turn, sc in each st across (14)
Do not fasten off. The ring is made on this end of the strap.
Strap Ring (make 2)
Do not turn. Sl st in the end of Row 2 (the middle of the short end), ch 6 and sl st in the same row end to make a small chain ring.
Rnd 1: 12 sc in the ring (12)
Join with a sl st in the first sc, fasten off and weave in the ends. The other end of the strap is the plain end; sew it on with a 30 cm / 12 in length of the same yarn (see Assembly). The ring slips over a 15 mm / 0.6 in button and shows as a neat round ring around it. With the plain end overlapping the band by at least 1.5 cm / 0.5 in, the strap closes a gap of up to about 6.5 cm / 2.5 in: on a 26 cm / 10.25 in mug the plain end overlaps the band by about 3.5 cm / 1.5 in, and on a 27 cm / 10.5 in mug by about 2.3 cm / 1 in.
- Make both straps for a cozy at the same time so they match.
- Choose a button first and test it in the first ring; for a bigger button (18 mm / 0.7 in), make the ring with ch 8 and work 14 sc into it.
Each strap row keeps its 14 stitches, and the ring at one end takes 12 sc, so you can count both before you sew.
1. Hearthside Stripe
The easiest cozy in the collection and the best one to start with: single crochet rows in wide bands of red, cream and green. It also teaches the base band that every other cozy is built on.
Overview
| Detail | |
|---|---|
| Finished size | About 21 cm / 8.25 in long and 7.5 cm / 3 in tall, plus two straps; fits a standard 11 to 12 oz mug |
| Colours | Red, Cream, Green |
| Yarn used | About 27 m / 30 yd in total (Red 15 m, Cream 6 m, Green 6 m), straps included |
| Skill level | Beginner |
| Parts made separately | Body x 1, Button Strap x 2 |
| Rounds and rows | 14 |
| What it involves | You change colour. You turn at the end of each row. |
Body
Colours: Red, Cream, Green · Hook: 4 mm (US G/6) · Make: 1
Foundation chain
Quick read: with Red, ch 37 (37)
- Use Red and make a slip knot, then ch 37.
Stitch count: 37 ch
Row 1
Quick read: sc in 2nd ch from hook, sc in each ch across (36)
- Work 1 sc in the 2nd chain from the hook.
- Work 1 sc in each chain to the end (35 chains).
Stitch count: 36 sc Check: 1 + 35 = 36
Rows 2 to 3
Quick read: ch 1, turn, sc in each st across (36)
- Ch 1 and turn. This ch 1 does not count as a stitch.
- Work 1 sc in each stitch to the end of the row (36 stitches).
- Work this row 2 times in all: Rows 2 and 3.
Stitch count: 36 sc (at the end of each row)
Rows 4 to 5
Quick read: with Cream, ch 1, turn, sc in each st across (36)
- Change to Cream and ch 1 and turn. This ch 1 does not count as a stitch.
- Work 1 sc in each stitch to the end of the row (36 stitches).
- Work this row 2 times in all: Rows 4 and 5.
Stitch count: 36 sc (at the end of each row)
Rows 6 to 9
Quick read: with Green, ch 1, turn, sc in each st across (36)
- Change to Green and ch 1 and turn. This ch 1 does not count as a stitch.
- Work 1 sc in each stitch to the end of the row (36 stitches).
- Work this row 4 times in all: Rows 6, 7, 8 and 9.
Stitch count: 36 sc (at the end of each row)
Rows 10 to 11
Quick read: with Cream, ch 1, turn, sc in each st across (36)
- Change to Cream and ch 1 and turn. This ch 1 does not count as a stitch.
- Work 1 sc in each stitch to the end of the row (36 stitches).
- Work this row 2 times in all: Rows 10 and 11.
Stitch count: 36 sc (at the end of each row)
Rows 12 to 14
Quick read: with Red, ch 1, turn, sc in each st across (36)
- Change to Red and ch 1 and turn. This ch 1 does not count as a stitch.
- Work 1 sc in each stitch to the end of the row (36 stitches).
- Work this row 3 times in all: Rows 12, 13 and 14.
Stitch count: 36 sc (at the end of each row) What it looks like now: A flat piece 36 stitches wide, after 14 rows.
Fasten off. Change colour on the last yarn over of the row before each new colour (see Colour Changes).
Count table: Body
| Row | Start count | Change | End count |
|---|---|---|---|
| Foundation chain | 0 | +37 | 37 ch |
| 1 | 37 | -1 | 36 sc |
| 2 | 36 | 0 | 36 sc |
| 3 | 36 | 0 | 36 sc |
| 4 | 36 | 0 | 36 sc |
| 5 | 36 | 0 | 36 sc |
| 6 | 36 | 0 | 36 sc |
| 7 | 36 | 0 | 36 sc |
| 8 | 36 | 0 | 36 sc |
| 9 | 36 | 0 | 36 sc |
| 10 | 36 | 0 | 36 sc |
| 11 | 36 | 0 | 36 sc |
| 12 | 36 | 0 | 36 sc |
| 13 | 36 | 0 | 36 sc |
| 14 | 36 | 0 | 36 sc |
Straps
Make 2 Button Straps in Red (see Button Straps at the start of the designs).
Assembly
-
Weave in all ends on the wrong side.
-
Block the band lightly (see Finishing) so it lies flat and straight.
-
Sew a button on the right side of the band beside the right short edge, 2 stitches in (its centre 1.2 cm / 0.5 in from the edge): one on Row 13, about 0.8 cm / 0.3 in below the top edge, and one on Row 4, about 1.8 cm / 0.75 in above the bottom edge.
-
Wrap the cozy around your mug, right side out, with the handle on your right and the right short edge right against the front of the handle, so the gap is behind the handle and the front of the cozy faces you. Slip each strap ring over its button, pass the strap through the handle and pin its plain end to the wrong side of the left short edge at the same height as its button, so the band sits snug; the plain end overlaps the band by at least 1.5 cm / 0.5 in. Take the cozy off and sew the plain ends in place.
Blocking
Block the band lightly (see Finishing) so it lies flat and straight.
- Cut each colour when its stripe is finished and leave a 10 cm / 4 in tail. No colour comes back within 2 rows in this design, so nothing is carried (see Colour Changes).
- Keep your tension even when you change colour so the stripes stay straight.
Common mistakes and fixes
| Problem | Cause | Fix |
|---|---|---|
| The piece grows by 1 stitch every row. | The turning ch 1 was worked as a stitch. | Skip the ch 1. You should have 36 stitches at the end of Row 3. |
| Row 1 has 37 stitches instead of 36. | The first stitch went into the 1st chain from the hook. | Start in the 2nd chain from the hook. |
| A small step shows where the colour changes. | The new colour was started on a new stitch. | Finish the last stitch of the old colour with the new colour. Keep the steps at the back. |
Troubleshooting for this piece
| Problem | Cause | Fix |
|---|---|---|
| The sides are wavy, or one end is wider | The stitch count changed by one on some rows, often at the turning chain | Count the stitches at the end of every row and compare with the Count table. Undo to the last correct row. Use a marker in the first stitch. |
| The finished piece is bigger or smaller than the size given | Your tension is different from the gauge, or the yarn is thicker or thinner | Make a gauge swatch and compare it with the Gauge section. Change the hook size to match, or use the yarn named in Materials. |
2. Peppermint Ripple
Wide stripes of red and cream that zigzag in six crisp waves around the mug, between straight top and bottom edges. Each wave is one repeat of 6 stitches: 3 sc in one stitch at the peak and a three stitch decrease in the valley.
Overview
| Detail | |
|---|---|
| Finished size | About 22 cm / 8.5 in long and 8 cm / 3.25 in tall, plus two straps; fits a standard 11 to 12 oz mug |
| Colours | Red, Cream |
| Yarn used | About 32 m / 35 yd in total (Red 21 m, Cream 11 m), straps included |
| Skill level | Easy |
| Parts made separately | Body x 1, Button Strap x 2 |
| Rounds and rows | 15 |
| What it involves | You change colour. You turn at the end of each row. You add and take away stitches in Rows 2 to 14 to make the waves; Rows 1 and 15 use taller stitches to keep the edges straight. |
Body
Colours: Cream, Red · Hook: 4 mm (US G/6) · Make: 1
Foundation chain
Quick read: with Cream, ch 38 (38)
- Use Cream and make a slip knot, then ch 38.
Stitch count: 38 ch
Row 1
Quick read: sc in 2nd ch from hook, sc 1, hdc 1, dc 1, hdc 1, (sc 3, hdc 1, dc 1, hdc 1) 5 times, sc 2 (37)
- Work 1 sc in the 2nd chain from the hook.
- Work 1 sc in the next chain.
- Work 1 hdc in the next chain.
- Work 1 dc in the next chain.
- Work 1 hdc in the next chain.
- Work 1 sc in each of the next 3 chains.
- Work 1 hdc in the next chain.
- Work 1 dc in the next chain.
- Work 1 hdc in the next chain.
- Repeat steps 6 to 9 four more times (5 times in all).
- Work 1 sc in each of the next 2 chains.
Stitch count: 37 sts Check: 1 + 1 + 1 + 1 + 1 + (5 x 6) + 2 = 37
Row 2
Quick read: ch 1, turn, sc2tog, (sc 1, 3 sc in next st, sc 1, sc3tog) 5 times, sc 1, 3 sc in next st, sc 1, sc2tog (37)
- Ch 1 and turn. This ch 1 does not count as a stitch.
- Work sc2tog over the next 2 stitches (2 stitches become 1).
- Work 1 sc in the next stitch.
- Work 3 sc in the next stitch.
- Work 1 sc in the next stitch.
- Work sc3tog over the next 3 stitches (3 stitches become 1).
- Repeat steps 3 to 6 four more times (5 times in all).
- Work 1 sc in the next stitch.
- Work 3 sc in the next stitch.
- Work 1 sc in the next stitch.
- Work sc2tog over the next 2 stitches (2 stitches become 1).
Stitch count: 37 sc Check: 1 + (5 x 6) + 1 + 3 + 1 + 1 = 37 Positions: Decreases over stitches 1-2, 6-8, 12-14, 18-20, 24-26, 30-32 and 36-37 of the row before; increases in every 6th stitch of the row before, starting with stitch 4 (6 in all).
Row 2 sets the waves: you add 2 stitches at each of the 6 peaks, take 2 away in each of the 5 valleys and 1 at each end, so the row stays at 37.
Rows 3 to 5
Quick read: with Red, ch 1, turn, sc2tog, (sc 1, 3 sc in next st, sc 1, sc3tog) 5 times, sc 1, 3 sc in next st, sc 1, sc2tog (37)
- Change to Red and ch 1 and turn. This ch 1 does not count as a stitch.
- Work sc2tog over the next 2 stitches (2 stitches become 1).
- Work 1 sc in the next stitch.
- Work 3 sc in the next stitch.
- Work 1 sc in the next stitch.
- Work sc3tog over the next 3 stitches (3 stitches become 1).
- Repeat steps 3 to 6 four more times (5 times in all).
- Work 1 sc in the next stitch.
- Work 3 sc in the next stitch.
- Work 1 sc in the next stitch.
- Work sc2tog over the next 2 stitches (2 stitches become 1).
- Work this row 3 times in all: Rows 3, 4 and 5.
Stitch count: 37 sc (at the end of each row) Check: 1 + (5 x 6) + 1 + 3 + 1 + 1 = 37 Positions: Decreases over stitches 1-2, 6-8, 12-14, 18-20, 24-26, 30-32 and 36-37 of the row before; increases in every 6th stitch of the row before, starting with stitch 4 (6 in all).
Rows 6 to 7
Quick read: with Cream, ch 1, turn, sc2tog, (sc 1, 3 sc in next st, sc 1, sc3tog) 5 times, sc 1, 3 sc in next st, sc 1, sc2tog (37)
- Change to Cream and ch 1 and turn. This ch 1 does not count as a stitch.
- Work sc2tog over the next 2 stitches (2 stitches become 1).
- Work 1 sc in the next stitch.
- Work 3 sc in the next stitch.
- Work 1 sc in the next stitch.
- Work sc3tog over the next 3 stitches (3 stitches become 1).
- Repeat steps 3 to 6 four more times (5 times in all).
- Work 1 sc in the next stitch.
- Work 3 sc in the next stitch.
- Work 1 sc in the next stitch.
- Work sc2tog over the next 2 stitches (2 stitches become 1).
- Work this row 2 times in all: Rows 6 and 7.
Stitch count: 37 sc (at the end of each row) Check: 1 + (5 x 6) + 1 + 3 + 1 + 1 = 37 Positions: Decreases over stitches 1-2, 6-8, 12-14, 18-20, 24-26, 30-32 and 36-37 of the row before; increases in every 6th stitch of the row before, starting with stitch 4 (6 in all).
Rows 8 to 10
Quick read: with Red, ch 1, turn, sc2tog, (sc 1, 3 sc in next st, sc 1, sc3tog) 5 times, sc 1, 3 sc in next st, sc 1, sc2tog (37)
- Change to Red and ch 1 and turn. This ch 1 does not count as a stitch.
- Work sc2tog over the next 2 stitches (2 stitches become 1).
- Work 1 sc in the next stitch.
- Work 3 sc in the next stitch.
- Work 1 sc in the next stitch.
- Work sc3tog over the next 3 stitches (3 stitches become 1).
- Repeat steps 3 to 6 four more times (5 times in all).
- Work 1 sc in the next stitch.
- Work 3 sc in the next stitch.
- Work 1 sc in the next stitch.
- Work sc2tog over the next 2 stitches (2 stitches become 1).
- Work this row 3 times in all: Rows 8, 9 and 10.
Stitch count: 37 sc (at the end of each row) Check: 1 + (5 x 6) + 1 + 3 + 1 + 1 = 37 Positions: Decreases over stitches 1-2, 6-8, 12-14, 18-20, 24-26, 30-32 and 36-37 of the row before; increases in every 6th stitch of the row before, starting with stitch 4 (6 in all).
Rows 11 to 12
Quick read: with Cream, ch 1, turn, sc2tog, (sc 1, 3 sc in next st, sc 1, sc3tog) 5 times, sc 1, 3 sc in next st, sc 1, sc2tog (37)
- Change to Cream and ch 1 and turn. This ch 1 does not count as a stitch.
- Work sc2tog over the next 2 stitches (2 stitches become 1).
- Work 1 sc in the next stitch.
- Work 3 sc in the next stitch.
- Work 1 sc in the next stitch.
- Work sc3tog over the next 3 stitches (3 stitches become 1).
- Repeat steps 3 to 6 four more times (5 times in all).
- Work 1 sc in the next stitch.
- Work 3 sc in the next stitch.
- Work 1 sc in the next stitch.
- Work sc2tog over the next 2 stitches (2 stitches become 1).
- Work this row 2 times in all: Rows 11 and 12.
Stitch count: 37 sc (at the end of each row) Check: 1 + (5 x 6) + 1 + 3 + 1 + 1 = 37 Positions: Decreases over stitches 1-2, 6-8, 12-14, 18-20, 24-26, 30-32 and 36-37 of the row before; increases in every 6th stitch of the row before, starting with stitch 4 (6 in all).
Rows 13 to 14
Quick read: with Red, ch 1, turn, sc2tog, (sc 1, 3 sc in next st, sc 1, sc3tog) 5 times, sc 1, 3 sc in next st, sc 1, sc2tog (37)
- Change to Red and ch 1 and turn. This ch 1 does not count as a stitch.
- Work sc2tog over the next 2 stitches (2 stitches become 1).
- Work 1 sc in the next stitch.
- Work 3 sc in the next stitch.
- Work 1 sc in the next stitch.
- Work sc3tog over the next 3 stitches (3 stitches become 1).
- Repeat steps 3 to 6 four more times (5 times in all).
- Work 1 sc in the next stitch.
- Work 3 sc in the next stitch.
- Work 1 sc in the next stitch.
- Work sc2tog over the next 2 stitches (2 stitches become 1).
- Work this row 2 times in all: Rows 13 and 14.
Stitch count: 37 sc (at the end of each row) Check: 1 + (5 x 6) + 1 + 3 + 1 + 1 = 37 Positions: Decreases over stitches 1-2, 6-8, 12-14, 18-20, 24-26, 30-32 and 36-37 of the row before; increases in every 6th stitch of the row before, starting with stitch 4 (6 in all).
Row 15
Quick read: ch 2, turn, dc 1, hdc 1, (sc 3, hdc 1, dc 1, hdc 1) 5 times, sc 3, hdc 1, dc 1 (37)
- Ch 2. These chains do not count as stitches.
- Turn.
- Work 1 dc in the next stitch.
- Work 1 hdc in the next stitch.
- Work 1 sc in each of the next 3 stitches.
- Work 1 hdc in the next stitch.
- Work 1 dc in the next stitch.
- Work 1 hdc in the next stitch.
- Repeat steps 5 to 8 four more times (5 times in all).
- Work 1 sc in each of the next 3 stitches.
- Work 1 hdc in the next stitch.
- Work 1 dc in the next stitch.
Stitch count: 37 sts Check: 1 + 1 + (5 x 6) + 3 + 1 + 1 = 37 What it looks like now: A flat piece 37 stitches wide, after 15 rows.
Fasten off. The 3 sc of each peak sit on top of the peak below (the 4th, 10th, 16th, 22nd, 28th and 34th stitches) and each sc3tog sits on top of the sc3tog below. Row 1 and Row 15 fill the waves with taller stitches, so the top and bottom edges are straight. The ch 2 at the start of Row 15 does not count as a stitch.
Count table: Body
| Row | Start count | Change | End count |
|---|---|---|---|
| Foundation chain | 0 | +38 | 38 ch |
| 1 | 38 | -1 | 37 sts |
| 2 | 37 | 0 | 37 sc |
| 3 | 37 | 0 | 37 sc |
| 4 | 37 | 0 | 37 sc |
| 5 | 37 | 0 | 37 sc |
| 6 | 37 | 0 | 37 sc |
| 7 | 37 | 0 | 37 sc |
| 8 | 37 | 0 | 37 sc |
| 9 | 37 | 0 | 37 sc |
| 10 | 37 | 0 | 37 sc |
| 11 | 37 | 0 | 37 sc |
| 12 | 37 | 0 | 37 sc |
| 13 | 37 | 0 | 37 sc |
| 14 | 37 | 0 | 37 sc |
| 15 | 37 | 0 | 37 sts |
Straps
Make 2 Button Straps in Red (see Button Straps at the start of the designs).
Assembly
-
Weave in all ends on the wrong side.
-
Block the band lightly (see Finishing) so it lies flat and straight.
-
Sew a button on the right side of the band beside the right short edge, 2 stitches in (its centre 1.2 cm / 0.5 in from the edge): one on Row 14, about 0.8 cm / 0.3 in below the top edge, and one on Row 4, about 1.8 cm / 0.75 in above the bottom edge.
-
Wrap the cozy around your mug, right side out, with the handle on your right and the right short edge right against the front of the handle, so the gap is behind the handle and the front of the cozy faces you. Slip each strap ring over its button, pass the strap through the handle and pin its plain end to the wrong side of the left short edge at the same height as its button, so the band sits snug; the plain end overlaps the band by at least 1.5 cm / 0.5 in. Take the cozy off and sew the plain ends in place.
Blocking
Pin the Peppermint Ripple out straight along its top and bottom edges while blocking, so the waves lie even.
- Place a stitch marker in the middle sc of every peak on Row 2; it shows where the next 3 sc go.
- If the waves lean, count the 6 sts of each repeat again; one missing increase is the usual cause.
Common mistakes and fixes
| Problem | Cause | Fix |
|---|---|---|
| The piece grows by 1 stitch every row. | The turning ch 1 was worked as a stitch. | Skip the ch 1. You should have 37 stitches at the end of Row 2. |
| Row 1 has 38 stitches instead of 37. | The first stitch went into the 1st chain from the hook. | Start in the 2nd chain from the hook. |
| A small step shows where the colour changes. | The new colour was started on a new stitch. | Finish the last stitch of the old colour with the new colour. Keep the steps at the back. |
Troubleshooting for this piece
| Problem | Cause | Fix |
|---|---|---|
| The sides are wavy, or one end is wider | The stitch count changed by one on some rows, often at the turning chain | Count the stitches at the end of every row and compare with the Count table. Undo to the last correct row. Use a marker in the first stitch. |
| The finished piece is bigger or smaller than the size given | Your tension is different from the gauge, or the yarn is thicker or thinner | Make a gauge swatch and compare it with the Gauge section. Change the hook size to match, or use the yarn named in Materials. |
3. Fireside Rib
A cream ribbed cozy that looks knitted. The band is worked sideways in single crochet through the back loop only, so the ribs run from the top of the mug to the bottom. Two rows of red finish the top and bottom edges.
Overview
| Detail | |
|---|---|
| Finished size | About 21 cm / 8.25 in long and 8 cm / 3.25 in tall, plus two straps; fits a standard 11 to 12 oz mug |
| Colours | Cream, Red |
| Yarn used | About 28 m / 31 yd in total (Cream 16 m, Red 12 m), straps included |
| Skill level | Beginner |
| Parts made separately | Body x 1, Button Strap x 2 |
| Rounds and rows | 44 |
| What it involves | It has many rows, so keep your place with a marker. You turn at the end of each row. You change colour for the edges, worked into the row ends. |
Body
Colour: Cream · Hook: 4 mm (US G/6) · Make: 1
Foundation chain
Quick read: with Cream, ch 11 (11)
- Use Cream and make a slip knot, then ch 11.
Stitch count: 11 ch
Row 1
Quick read: sc in 2nd ch from hook, sc in each ch across (10)
- Work 1 sc in the 2nd chain from the hook.
- Work 1 sc in each chain to the end (9 chains).
Stitch count: 10 sc Check: 1 + 9 = 10
Rows 2 to 40
Quick read: ch 1, turn, sc in BLO in each st across (10)
- Ch 1 and turn. This ch 1 does not count as a stitch.
- Work 1 sc in the back loop only of each stitch to the end of the row (10 stitches).
- Work this row 39 times in all: Rows 2 to 40.
Stitch count: 10 sc (at the end of each row) What it looks like now: A flat piece 10 stitches wide, after 40 rows.
Check the length before you fasten off: 40 rows should measure about 21 cm / 8.25 in; add or remove 2 rows if they do not. Fasten off Cream. The band is 6 cm / 2.4 in wide, with the ribs running across its width.
Count table: Body
| Row | Start count | Change | End count |
|---|---|---|---|
| Foundation chain | 0 | +11 | 11 ch |
| 1 | 11 | -1 | 10 sc |
| 2 | 10 | 0 | 10 sc |
| 3 | 10 | 0 | 10 sc |
| 4 | 10 | 0 | 10 sc |
| 5 | 10 | 0 | 10 sc |
| 6 | 10 | 0 | 10 sc |
| 7 | 10 | 0 | 10 sc |
| 8 | 10 | 0 | 10 sc |
| 9 | 10 | 0 | 10 sc |
| 10 | 10 | 0 | 10 sc |
| 11 | 10 | 0 | 10 sc |
| 12 | 10 | 0 | 10 sc |
| 13 | 10 | 0 | 10 sc |
| 14 | 10 | 0 | 10 sc |
| 15 | 10 | 0 | 10 sc |
| 16 | 10 | 0 | 10 sc |
| 17 | 10 | 0 | 10 sc |
| 18 | 10 | 0 | 10 sc |
| 19 | 10 | 0 | 10 sc |
| 20 | 10 | 0 | 10 sc |
| 21 | 10 | 0 | 10 sc |
| 22 | 10 | 0 | 10 sc |
| 23 | 10 | 0 | 10 sc |
| 24 | 10 | 0 | 10 sc |
| 25 | 10 | 0 | 10 sc |
| 26 | 10 | 0 | 10 sc |
| 27 | 10 | 0 | 10 sc |
| 28 | 10 | 0 | 10 sc |
| 29 | 10 | 0 | 10 sc |
| 30 | 10 | 0 | 10 sc |
| 31 | 10 | 0 | 10 sc |
| 32 | 10 | 0 | 10 sc |
| 33 | 10 | 0 | 10 sc |
| 34 | 10 | 0 | 10 sc |
| 35 | 10 | 0 | 10 sc |
| 36 | 10 | 0 | 10 sc |
| 37 | 10 | 0 | 10 sc |
| 38 | 10 | 0 | 10 sc |
| 39 | 10 | 0 | 10 sc |
| 40 | 10 | 0 | 10 sc |
Top Edge
Colour: Red · Hook: 4 mm (US G/6) · Make: 1
With the right side facing, join Red with a sl st in the first row end of one long edge.
Edge row 1
Quick read: with Red, ch 1, sc in each row end along the edge (40)
- Use Red and ch 1. It does not count as a stitch.
- Work 1 sc in each row end along the edge.
Stitch count: 40 sc
Edge row 2
Quick read: ch 1, turn, sc in each st across (40)
- Ch 1 and turn. This ch 1 does not count as a stitch.
- Work 1 sc in each stitch to the end of the row (40 stitches).
Stitch count: 40 sc
Fasten off.
Count table: Top Edge
| Row | Start count | Change | End count |
|---|---|---|---|
| 1 | 0 | +40 | 40 sc |
| 2 | 40 | 0 | 40 sc |
Bottom Edge
Colour: Red · Hook: 4 mm (US G/6) · Make: 1
With the right side facing, join Red with a sl st in the first row end of the other long edge.
Edge row 1
Quick read: with Red, ch 1, sc in each row end along the edge (40)
- Use Red and ch 1. It does not count as a stitch.
- Work 1 sc in each row end along the edge.
Stitch count: 40 sc
Edge row 2
Quick read: ch 1, turn, sc in each st across (40)
- Ch 1 and turn. This ch 1 does not count as a stitch.
- Work 1 sc in each stitch to the end of the row (40 stitches).
Stitch count: 40 sc
Fasten off. The band is now about 8 cm / 3.25 in tall.
Count table: Bottom Edge
| Row | Start count | Change | End count |
|---|---|---|---|
| 1 | 0 | +40 | 40 sc |
| 2 | 40 | 0 | 40 sc |
Straps
Make 2 Button Straps in Red (see Button Straps at the start of the designs).
Assembly
-
Weave in all ends on the wrong side.
-
Block the band lightly (see Finishing) so it lies flat and straight.
-
Sew a button on the right side of the band beside the right short edge, 2 stitches in (its centre 1.2 cm / 0.5 in from the edge): one about 0.8 cm / 0.3 in below the top edge, on the red edge, and one about 1.8 cm / 0.75 in above the bottom edge.
-
Wrap the cozy around your mug, right side out, with the handle on your right and the right short edge right against the front of the handle, so the gap is behind the handle and the front of the cozy faces you. Slip each strap ring over its button, pass the strap through the handle and pin its plain end to the wrong side of the left short edge at the same height as its button, so the band sits snug; the plain end overlaps the band by at least 1.5 cm / 0.5 in. Take the cozy off and sew the plain ends in place.
Blocking
Block the band lightly (see Finishing) so it lies flat and straight.
- Count the ribs instead of the rows: every 2 rows make one raised ridge on each side.
- Work the edge stitches at your normal tension. If an edge ripples, work it again and skip every 10th row end (36 sc).
Common mistakes and fixes
| Problem | Cause | Fix |
|---|---|---|
| The piece grows by 1 stitch every row. | The turning ch 1 was worked as a stitch. | Skip the ch 1. You should have 10 stitches at the end of Row 40. |
| Row 1 has 11 stitches instead of 10. | The first stitch went into the 1st chain from the hook. | Start in the 2nd chain from the hook. |
| No ridge shows at Rows 2 to 40. | The row was worked through both loops. | Undo the row and work it into the back loop only. |
Troubleshooting for this piece
| Problem | Cause | Fix |
|---|---|---|
| The sides are wavy, or one end is wider | The stitch count changed by one on some rows, often at the turning chain | Count the stitches at the end of every row and compare with the Count table. Undo to the last correct row. Use a marker in the first stitch. |
| The finished piece is bigger or smaller than the size given | Your tension is different from the gauge, or the yarn is thicker or thinner | Make a gauge swatch and compare it with the Gauge section. Change the hook size to match, or use the yarn named in Materials. |
4. Evergreen Moss
Forest green moss stitch (also called linen stitch) between two gold rows. It is a firm, woven looking texture that stays flat and keeps the heat in.
Overview
| Detail | |
|---|---|
| Finished size | About 21 cm / 8.25 in long and 7.5 cm / 3 in tall, plus two straps; fits a standard 11 to 12 oz mug |
| Colours | Green, Gold |
| Yarn used | About 22 m / 25 yd in total (Green 18 m, Gold 4 m), straps included |
| Skill level | Easy |
| Parts made separately | Body x 1, Button Strap x 2 |
| Rounds and rows | 14 |
| What it involves | You change colour. You turn at the end of each row. |
Body
Colours: Gold, Green · Hook: 4 mm (US G/6) · Make: 1
Foundation chain
Quick read: with Gold, ch 37 (37)
- Use Gold and make a slip knot, then ch 37.
Stitch count: 37 ch
Row 1
Quick read: sc in 2nd ch from hook, sc in each ch across (36)
- Work 1 sc in the 2nd chain from the hook.
- Work 1 sc in each chain to the end (35 chains).
Stitch count: 36 sc Check: 1 + 35 = 36
Row 2
Quick read: with Green, ch 1, turn, sc 1, (ch 1, skip 1, sc 1) 17 times, sc 1 (36)
- Change to Green and ch 1 and turn. This ch 1 does not count as a stitch.
- Work 1 sc in the next stitch.
- Ch 1. It counts as 1 stitch.
- Skip the next stitch.
- Work 1 sc in the next stitch.
- Repeat steps 3 to 5 16 more times (17 times in all).
- Work 1 sc in the next stitch.
Stitch count: 36 sts Check: 1 + (17 x 2) + 1 = 36
Rows 3 to 13
Quick read: ch 1, turn, sc 1, (ch 1, skip 1, sc in next ch 1 space) 17 times, sc 1 (36)
- Ch 1 and turn. This ch 1 does not count as a stitch.
- Work 1 sc in the next stitch.
- Ch 1. It counts as 1 stitch.
- Skip the next stitch.
- Work 1 sc in the next ch 1 space.
- Repeat steps 3 to 5 16 more times (17 times in all).
- Work 1 sc in the next stitch.
- Work this row 11 times in all: Rows 3, 4, 5, 6, 7, 8, 9, 10, 11, 12 and 13.
Stitch count: 36 sts (at the end of each row) Check: 1 + (17 x 2) + 1 = 36
Row 14
Quick read: with Gold, ch 1, turn, sc 1, (sc in next st, sc in next ch 1 space) 17 times, sc 1 (36)
- Change to Gold and ch 1 and turn. This ch 1 does not count as a stitch.
- Work 1 sc in the next stitch.
- Work 1 sc in the next stitch.
- Work 1 sc in the next ch 1 space.
- Repeat steps 3 and 4 16 more times (17 times in all).
- Work 1 sc in the next stitch.
Stitch count: 36 sc Check: 1 + (17 x 2) + 1 = 36 What it looks like now: A flat piece 36 stitches wide, after 14 rows.
Fasten off. In moss stitch each ch 1 space counts as one stitch, so every row keeps 36 stitches. From Row 3 the sc always goes into the ch 1 space and the ch 1 always skips the sc below.
Count table: Body
| Row | Start count | Change | End count |
|---|---|---|---|
| Foundation chain | 0 | +37 | 37 ch |
| 1 | 37 | -1 | 36 sc |
| 2 | 36 | 0 | 36 sts |
| 3 | 36 | 0 | 36 sts |
| 4 | 36 | 0 | 36 sts |
| 5 | 36 | 0 | 36 sts |
| 6 | 36 | 0 | 36 sts |
| 7 | 36 | 0 | 36 sts |
| 8 | 36 | 0 | 36 sts |
| 9 | 36 | 0 | 36 sts |
| 10 | 36 | 0 | 36 sts |
| 11 | 36 | 0 | 36 sts |
| 12 | 36 | 0 | 36 sts |
| 13 | 36 | 0 | 36 sts |
| 14 | 36 | 0 | 36 sc |
Straps
Make 2 Button Straps in Green (see Button Straps at the start of the designs).
Assembly
-
Weave in all ends on the wrong side.
-
Block the band lightly (see Finishing) so it lies flat and straight.
-
Sew a button on the right side of the band beside the right short edge, 2 stitches in (its centre 1.2 cm / 0.5 in from the edge): one on Row 13, about 0.8 cm / 0.3 in below the top edge, and one on Row 4, about 1.8 cm / 0.75 in above the bottom edge.
-
Wrap the cozy around your mug, right side out, with the handle on your right and the right short edge right against the front of the handle, so the gap is behind the handle and the front of the cozy faces you. Slip each strap ring over its button, pass the strap through the handle and pin its plain end to the wrong side of the left short edge at the same height as its button, so the band sits snug; the plain end overlaps the band by at least 1.5 cm / 0.5 in. Take the cozy off and sew the plain ends in place.
Blocking
Block the band lightly (see Finishing) so it lies flat and straight.
- Do not count the turning ch 1; do count every ch 1 space.
- If a row ends with the wrong stitch, check that each sc went into a ch 1 space, not into an sc.
- Moss stitch rows can come out a little shorter than sc rows. Measure after Row 13: if the band is under 6.5 cm / 2.5 in tall, work Row 3 once or twice more before the Gold row.
Common mistakes and fixes
| Problem | Cause | Fix |
|---|---|---|
| The piece grows by 1 stitch every row. | The turning ch 1 was worked as a stitch. | Skip the ch 1. You should have 36 stitches at the end of Row 2. |
| Row 1 has 37 stitches instead of 36. | The first stitch went into the 1st chain from the hook. | Start in the 2nd chain from the hook. |
| A small step shows where the colour changes. | The new colour was started on a new stitch. | Finish the last stitch of the old colour with the new colour. Keep the steps at the back. |
Troubleshooting for this piece
| Problem | Cause | Fix |
|---|---|---|
| The sides are wavy, or one end is wider | The stitch count changed by one on some rows, often at the turning chain | Count the stitches at the end of every row and compare with the Count table. Undo to the last correct row. Use a marker in the first stitch. |
| The finished piece is bigger or smaller than the size given | Your tension is different from the gauge, or the yarn is thicker or thinner | Make a gauge swatch and compare it with the Gauge section. Change the hook size to match, or use the yarn named in Materials. |
5. Snowberry Bobble
Soft cream single crochet with three rows of eight round red bobbles that stand out like berries. The bobbles are worked on wrong side rows, so they push out to the right side, and every bobble row is the same so they line up in neat columns.
Overview
| Detail | |
|---|---|
| Finished size | About 21 cm / 8.25 in long and 8 cm / 3.25 in tall, plus two straps; fits a standard 11 to 12 oz mug |
| Colours | Cream, Red |
| Yarn used | About 37 m / 41 yd in total (Cream 27 m, Red 10 m), straps included |
| Skill level | Easy |
| Parts made separately | Body x 1, Button Strap x 2 |
| Rounds and rows | 15 |
| What it involves | It has bobbles in a second colour. You turn at the end of each row. |
Body
Colours: Cream, Red · Hook: 4 mm (US G/6) · Make: 1
In this design Row 1 is a wrong side row, so the bobble rows (Rows 3, 7 and 11) are wrong side rows too and the bobbles push out to the right side; mark Row 2 as the right side.
Foundation chain
Quick read: with Cream, ch 37 (37)
- Use Cream and make a slip knot, then ch 37.
Stitch count: 37 ch
Row 1
Quick read: sc in 2nd ch from hook, sc in each ch across (36)
- Work 1 sc in the 2nd chain from the hook.
- Work 1 sc in each chain to the end (35 chains).
Stitch count: 36 sc Check: 1 + 35 = 36
Row 2
Quick read: ch 1, turn, sc in each st across (36)
- Ch 1 and turn. This ch 1 does not count as a stitch.
- Work 1 sc in each stitch to the end of the row (36 stitches).
Stitch count: 36 sc
Row 3 (wrong side)
Quick read: ch 1, turn, sc 2 in Cream, (bobble in Red, sc 3 in Cream) 7 times, bobble in Red, sc 5 in Cream (36)
- Ch 1 and turn. This ch 1 does not count as a stitch.
- Work 1 sc in each of the next 2 stitches.
- Change to Red and work 1 bobble in the next stitch.
- Change to Cream and work 1 sc in each of the next 3 stitches.
- Repeat steps 3 and 4 six more times (7 times in all).
- Change to Red and work 1 bobble in the next stitch.
- Change to Cream and work 1 sc in each of the next 5 stitches.
Stitch count: 36 sts Check: 2 + (7 x 4) + 1 + 5 = 36
Each bobble counts as 1 stitch, so your bobble row keeps the same 36 stitches as a plain row.
Rows 4 to 6
Quick read: with Cream, ch 1, turn, sc in each st across (36)
- Ch 1 and turn. This ch 1 does not count as a stitch.
- Work 1 sc in each stitch to the end of the row (36 stitches).
- Work this row 3 times in all: Rows 4, 5 and 6.
Stitch count: 36 sc (at the end of each row)
Row 7 (wrong side)
Quick read: ch 1, turn, sc 2 in Cream, (bobble in Red, sc 3 in Cream) 7 times, bobble in Red, sc 5 in Cream (36)
- Ch 1 and turn. This ch 1 does not count as a stitch.
- Work 1 sc in each of the next 2 stitches.
- Change to Red and work 1 bobble in the next stitch.
- Change to Cream and work 1 sc in each of the next 3 stitches.
- Repeat steps 3 and 4 six more times (7 times in all).
- Change to Red and work 1 bobble in the next stitch.
- Change to Cream and work 1 sc in each of the next 5 stitches.
Stitch count: 36 sts Check: 2 + (7 x 4) + 1 + 5 = 36
Rows 8 to 10
Quick read: with Cream, ch 1, turn, sc in each st across (36)
- Ch 1 and turn. This ch 1 does not count as a stitch.
- Work 1 sc in each stitch to the end of the row (36 stitches).
- Work this row 3 times in all: Rows 8, 9 and 10.
Stitch count: 36 sc (at the end of each row)
Row 11 (wrong side)
Quick read: ch 1, turn, sc 2 in Cream, (bobble in Red, sc 3 in Cream) 7 times, bobble in Red, sc 5 in Cream (36)
- Ch 1 and turn. This ch 1 does not count as a stitch.
- Work 1 sc in each of the next 2 stitches.
- Change to Red and work 1 bobble in the next stitch.
- Change to Cream and work 1 sc in each of the next 3 stitches.
- Repeat steps 3 and 4 six more times (7 times in all).
- Change to Red and work 1 bobble in the next stitch.
- Change to Cream and work 1 sc in each of the next 5 stitches.
Stitch count: 36 sts Check: 2 + (7 x 4) + 1 + 5 = 36
Rows 12 to 15
Quick read: with Cream, ch 1, turn, sc in each st across (36)
- Ch 1 and turn. This ch 1 does not count as a stitch.
- Work 1 sc in each stitch to the end of the row (36 stitches).
- Work this row 4 times in all: Rows 12, 13, 14 and 15.
Stitch count: 36 sc (at the end of each row) What it looks like now: A flat piece 36 stitches wide, after 15 rows.
Fasten off. On the bobble rows, carry Red loosely along the side facing you between bobbles (see Bobble) and cut it after the last bobble, leaving a 10 cm / 4 in tail. Each bobble row has 8 bobbles; the last 5 stitches, by the right short edge, stay plain so the buttons sit on cream.
Count table: Body
| Row | Start count | Change | End count |
|---|---|---|---|
| Foundation chain | 0 | +37 | 37 ch |
| 1 | 37 | -1 | 36 sc |
| 2 | 36 | 0 | 36 sc |
| 3 | 36 | 0 | 36 sts |
| 4 | 36 | 0 | 36 sc |
| 5 | 36 | 0 | 36 sc |
| 6 | 36 | 0 | 36 sc |
| 7 | 36 | 0 | 36 sts |
| 8 | 36 | 0 | 36 sc |
| 9 | 36 | 0 | 36 sc |
| 10 | 36 | 0 | 36 sc |
| 11 | 36 | 0 | 36 sts |
| 12 | 36 | 0 | 36 sc |
| 13 | 36 | 0 | 36 sc |
| 14 | 36 | 0 | 36 sc |
| 15 | 36 | 0 | 36 sc |
Straps
Make 2 Button Straps in Cream (see Button Straps at the start of the designs).
Assembly
-
Weave in all ends on the wrong side.
-
Block the band lightly (see Finishing) so it lies flat and straight.
-
Sew a button on the right side of the band beside the right short edge, 2 stitches in (its centre 1.2 cm / 0.5 in from the edge): one on Row 14, about 0.8 cm / 0.3 in below the top edge, and one on Row 4, about 1.8 cm / 0.75 in above the bottom edge.
-
Wrap the cozy around your mug, right side out, with the handle on your right and the right short edge right against the front of the handle, so the gap is behind the handle and the front of the cozy faces you. Slip each strap ring over its button, pass the strap through the handle and pin its plain end to the wrong side of the left short edge at the same height as its button, so the band sits snug; the plain end overlaps the band by at least 1.5 cm / 0.5 in. Take the cozy off and sew the plain ends in place.
Blocking
Block the band lightly (see Finishing) so it lies flat and straight.
- Push each bobble to the right side with your finger as you work the next stitch.
- Work the sc right after a bobble firmly so the bobble stays round.
Common mistakes and fixes
| Problem | Cause | Fix |
|---|---|---|
| The piece grows by 1 stitch every row. | The turning ch 1 was worked as a stitch. | Skip the ch 1. You should have 36 stitches at the end of Row 2. |
| Row 1 has 37 stitches instead of 36. | The first stitch went into the 1st chain from the hook. | Start in the 2nd chain from the hook. |
| Your piece is bigger or smaller than about 21 cm / 8.25 in long and 8 cm / 3.25 in tall, plus two straps; fits a standard 11 to 12 oz mug. | Your tension is different from the gauge. | Check your gauge. Use a smaller hook if it is too big and a bigger hook if it is too small. |
Troubleshooting for this piece
| Problem | Cause | Fix |
|---|---|---|
| The sides are wavy, or one end is wider | The stitch count changed by one on some rows, often at the turning chain | Count the stitches at the end of every row and compare with the Count table. Undo to the last correct row. Use a marker in the first stitch. |
| The finished piece is bigger or smaller than the size given | Your tension is different from the gauge, or the yarn is thicker or thinner | Make a gauge swatch and compare it with the Gauge section. Change the hook size to match, or use the yarn named in Materials. |
6. Little Christmas Tree
A cream cozy with a three tier green tree on a short trunk and a small gold star. The tree is worked flat in rows and sewn on, so the band itself is pure beginner single crochet.
Overview
| Detail | |
|---|---|
| Finished size | About 21 cm / 8.25 in long and 8 cm / 3.25 in tall, plus two straps; fits a standard 11 to 12 oz mug |
| Colours | Cream, Green, Gold |
| Yarn used | About 32 m / 35 yd in total (Cream 28 m, Green 3 m, Gold 1 m), straps included |
| Skill level | Beginner |
| Parts made separately | Body x 1, Tree x 1, Trunk x 1, Star x 1, Button Strap x 2 |
| Rounds and rows | 28 |
| What it involves | It has a picot star, and several parts are sewn together. You turn at the end of each row. You add and take away stitches to shape the tree. |
Body
Colour: Cream · Hook: 4 mm (US G/6) · Make: 1
Foundation chain
Quick read: with Cream, ch 37 (37)
- Use Cream and make a slip knot, then ch 37.
Stitch count: 37 ch
Row 1
Quick read: sc in 2nd ch from hook, sc in each ch across (36)
- Work 1 sc in the 2nd chain from the hook.
- Work 1 sc in each chain to the end (35 chains).
Stitch count: 36 sc Check: 1 + 35 = 36
Rows 2 to 15
Quick read: ch 1, turn, sc in each st across (36)
- Ch 1 and turn. This ch 1 does not count as a stitch.
- Work 1 sc in each stitch to the end of the row (36 stitches).
- Work this row 14 times in all: Rows 2, 3, 4, 5, 6, 7, 8, 9, 10, 11, 12, 13, 14 and 15.
Stitch count: 36 sc (at the end of each row) What it looks like now: A flat piece 36 stitches wide, after 15 rows.
Fasten off.
Count table: Body
| Row | Start count | Change | End count |
|---|---|---|---|
| Foundation chain | 0 | +37 | 37 ch |
| 1 | 37 | -1 | 36 sc |
| 2 | 36 | 0 | 36 sc |
| 3 | 36 | 0 | 36 sc |
| 4 | 36 | 0 | 36 sc |
| 5 | 36 | 0 | 36 sc |
| 6 | 36 | 0 | 36 sc |
| 7 | 36 | 0 | 36 sc |
| 8 | 36 | 0 | 36 sc |
| 9 | 36 | 0 | 36 sc |
| 10 | 36 | 0 | 36 sc |
| 11 | 36 | 0 | 36 sc |
| 12 | 36 | 0 | 36 sc |
| 13 | 36 | 0 | 36 sc |
| 14 | 36 | 0 | 36 sc |
| 15 | 36 | 0 | 36 sc |
Tree
Colour: Green · Hook: 4 mm (US G/6) · Make: 1
Foundation chain
Quick read: with Green, ch 11 (11)
- Use Green and make a slip knot, then ch 11.
Stitch count: 11 ch
Row 1
Quick read: sc in 2nd ch from hook, sc in each ch across (10)
- Work 1 sc in the 2nd chain from the hook.
- Work 1 sc in each chain to the end (9 chains).
Stitch count: 10 sc Check: 1 + 9 = 10
Row 2
Quick read: ch 1, turn, sc2tog, sc 6, sc2tog (8)
- Ch 1 and turn. This ch 1 does not count as a stitch.
- Work sc2tog over the next 2 stitches (2 stitches become 1).
- Work 1 sc in each of the next 6 stitches.
- Work sc2tog over the next 2 stitches (2 stitches become 1).
Stitch count: 8 sc Check: 1 + 6 + 1 = 8 Positions: Decreases over stitches 1-2 and 9-10 of the row before.
Row 3
Quick read: ch 1, turn, sc2tog, sc 4, sc2tog (6)
- Ch 1 and turn. This ch 1 does not count as a stitch.
- Work sc2tog over the next 2 stitches (2 stitches become 1).
- Work 1 sc in each of the next 4 stitches.
- Work sc2tog over the next 2 stitches (2 stitches become 1).
Stitch count: 6 sc Check: 1 + 4 + 1 = 6 Positions: Decreases over stitches 1-2 and 7-8 of the row before. What it looks like now: The flat piece is getting narrower and is now 6 stitches wide, after 3 rows.
Row 4
Quick read: ch 1, turn, 2 sc in next st, sc 4, 2 sc in next st (8)
- Ch 1 and turn. This ch 1 does not count as a stitch.
- Work 2 sc in the next stitch.
- Work 1 sc in each of the next 4 stitches.
- Work 2 sc in the next stitch.
Stitch count: 8 sc Check: 2 + 4 + 2 = 8 Positions: Increases in stitches 1 and 6 of the row before.
Row 5
Quick read: ch 1, turn, sc2tog, sc 4, sc2tog (6)
- Ch 1 and turn. This ch 1 does not count as a stitch.
- Work sc2tog over the next 2 stitches (2 stitches become 1).
- Work 1 sc in each of the next 4 stitches.
- Work sc2tog over the next 2 stitches (2 stitches become 1).
Stitch count: 6 sc Check: 1 + 4 + 1 = 6 Positions: Decreases over stitches 1-2 and 7-8 of the row before.
Row 6
Quick read: ch 1, turn, sc2tog, sc 2, sc2tog (4)
- Ch 1 and turn. This ch 1 does not count as a stitch.
- Work sc2tog over the next 2 stitches (2 stitches become 1).
- Work 1 sc in each of the next 2 stitches.
- Work sc2tog over the next 2 stitches (2 stitches become 1).
Stitch count: 4 sc Check: 1 + 2 + 1 = 4 Positions: Decreases over stitches 1-2 and 5-6 of the row before. What it looks like now: The flat piece is getting narrower and is now 4 stitches wide, after 6 rows.
Row 7
Quick read: ch 1, turn, 2 sc in next st, sc 2, 2 sc in next st (6)
- Ch 1 and turn. This ch 1 does not count as a stitch.
- Work 2 sc in the next stitch.
- Work 1 sc in each of the next 2 stitches.
- Work 2 sc in the next stitch.
Stitch count: 6 sc Check: 2 + 2 + 2 = 6 Positions: Increases in stitches 1 and 4 of the row before.
Row 8
Quick read: ch 1, turn, sc2tog, sc 2, sc2tog (4)
- Ch 1 and turn. This ch 1 does not count as a stitch.
- Work sc2tog over the next 2 stitches (2 stitches become 1).
- Work 1 sc in each of the next 2 stitches.
- Work sc2tog over the next 2 stitches (2 stitches become 1).
Stitch count: 4 sc Check: 1 + 2 + 1 = 4 Positions: Decreases over stitches 1-2 and 5-6 of the row before.
Row 9
Quick read: ch 1, turn, sc2tog, sc2tog (2)
- Ch 1 and turn. This ch 1 does not count as a stitch.
- Work sc2tog over the next 2 stitches (2 stitches become 1).
- Work sc2tog over the next 2 stitches (2 stitches become 1).
Stitch count: 2 sc Check: 1 + 1 = 2 Positions: Decreases over stitches 1-2 and 3-4 of the row before. What it looks like now: The flat piece is getting narrower and is now 2 stitches wide, after 9 rows.
Fasten off, leaving a 40 cm / 16 in tail for sewing. The increase rows (Rows 4 and 7) make the step out at the bottom of each tier. The tree is about 5.9 cm / 2.25 in wide at the base and 4.7 cm / 1.75 in tall.
Count table: Tree
| Row | Start count | Change | End count |
|---|---|---|---|
| Foundation chain | 0 | +11 | 11 ch |
| 1 | 11 | -1 | 10 sc |
| 2 | 10 | -2 | 8 sc |
| 3 | 8 | -2 | 6 sc |
| 4 | 6 | +2 | 8 sc |
| 5 | 8 | -2 | 6 sc |
| 6 | 6 | -2 | 4 sc |
| 7 | 4 | +2 | 6 sc |
| 8 | 6 | -2 | 4 sc |
| 9 | 4 | -2 | 2 sc |
Trunk
Colour: Green · Hook: 4 mm (US G/6) · Make: 1
Foundation chain
Quick read: with Green, ch 4 (4)
- Use Green and make a slip knot, then ch 4.
Stitch count: 4 ch
Row 1
Quick read: sc in 2nd ch from hook, sc in each ch across (3)
- Work 1 sc in the 2nd chain from the hook.
- Work 1 sc in each chain to the end (2 chains).
Stitch count: 3 sc Check: 1 + 2 = 3
Row 2
Quick read: ch 1, turn, sc in each st across (3)
- Ch 1 and turn. This ch 1 does not count as a stitch.
- Work 1 sc in each stitch to the end of the row (3 stitches).
Stitch count: 3 sc What it looks like now: A flat piece 3 stitches wide, after 2 rows.
Fasten off, leaving a 20 cm / 8 in tail for sewing. The trunk is about 1.8 cm / 0.75 in wide and 1 cm / 0.4 in long.
Count table: Trunk
| Row | Start count | Change | End count |
|---|---|---|---|
| Foundation chain | 0 | +4 | 4 ch |
| 1 | 4 | -1 | 3 sc |
| 2 | 3 | 0 | 3 sc |
Star
Colour: Gold · Hook: 4 mm (US G/6) · Make: 1
Round 1
Quick read: with Gold, 5 sc in MR (5)
- Use Gold and make a magic ring.
- Work 5 sc into the ring.
- Pull the tail to close the ring.
Stitch count: 5 sc
Round 2
Quick read: (sl st in next st, picot) 5 times (5)
- Work 1 sl st in the next stitch.
- Make 1 picot (see Magic Ring and Picot in Techniques).
- Repeat steps 1 and 2 four more times (5 times in all).
Stitch count: 5 sl st Check: 5 repeats x 1 st = 5 Positions: Picot after stitches 1, 2, 3, 4 and 5 of this round.
Join with a sl st in the first sl st and fasten off, leaving a 20 cm / 8 in tail. The star is about 1.5 cm / 0.6 in across.
Count table: Star
| Round | Start count | Change | End count |
|---|---|---|---|
| 1 | MR | +5 | 5 sc |
| 2 | 5 | 0 | 5 sl st |
Straps
Make 2 Button Straps in Cream (see Button Straps at the start of the designs).
Assembly
-
Weave in all ends on the wrong side.
-
Block the band lightly (see Finishing) so it lies flat and straight.
-
Place the trunk on the right side of the band over Rows 1 and 2, its lower end on the bottom edge, and the tree just above it, the bottom of the tree on top of Row 2, about 1 cm / 0.4 in above the bottom edge. Centre both between the 10th and 11th stitches from the right short edge (about 5.9 cm / 2.25 in in), so the tree covers stitches 6 to 15, and hold them with pins. On the mug the tree sits near the middle of the front, clear of the buttons.
-
Whip stitch all round the tree and the trunk with the Green tails, going through their outer loops only.
-
Sew the star with its lower point on the top of the tree and one point straight up; its centre sits about 1.3 cm / 0.5 in below the top edge.
-
Sew a button on the right side of the band beside the right short edge, 2 stitches in (its centre 1.2 cm / 0.5 in from the edge): one on Row 14, about 0.8 cm / 0.3 in below the top edge, and one on Row 4, about 1.8 cm / 0.75 in above the bottom edge.
-
Wrap the cozy around your mug, right side out, with the handle on your right and the right short edge right against the front of the handle, so the gap is behind the handle and the front of the cozy faces you. Slip each strap ring over its button, pass the strap through the handle and pin its plain end to the wrong side of the left short edge at the same height as its button, so the band sits snug; the plain end overlaps the band by at least 1.5 cm / 0.5 in. Take the cozy off and sew the plain ends in place.
Blocking
Block the band lightly (see Finishing) so it lies flat and straight.
- Sew the tree with small stitches through its outer loops only; the edge stays crisp.
- Leave the star points free so they stand out.
Common mistakes and fixes
| Problem | Cause | Fix |
|---|---|---|
| You have 7 stitches after Row 4 instead of 8. | An increase was missed. | Count the increases. There should be 2. Undo back to the missing one and work it again. |
| You have 9 stitches after Row 2 instead of 8. | A decrease was missed. | Count the decreases. There should be 2. Undo back to the missing one and work it again. |
| The piece grows by 1 stitch every row. | The turning ch 1 was worked as a stitch. | Skip the ch 1. You should have 36 stitches at the end of Row 15. |
| Row 1 has 37 stitches instead of 36. | The first stitch went into the 1st chain from the hook. | Start in the 2nd chain from the hook. |
| The count is too high after Round 2. | The picot parts were counted as stitches. | Do not count them. You should have 5 stitches. |
Troubleshooting for this piece
| Problem | Cause | Fix |
|---|---|---|
| The sides are wavy, or one end is wider | The stitch count changed by one on some rows, often at the turning chain | Count the stitches at the end of every row and compare with the Count table. Undo to the last correct row. Use a marker in the first stitch. |
| The points or petals are uneven | The tension changes from one point to the next, or a count is off by one | Check the Positions line and the counts for each point. Keep the same tension on every point. Shape them gently when you finish. |
| The finished piece is bigger or smaller than the size given | Your tension is different from the gauge, or the yarn is thicker or thinner | Make a gauge swatch and compare it with the Gauge section. Change the hook size to match, or use the yarn named in Materials. |
7. Nordic Diamond Band
A Scandinavian style colourwork band: a row of seven red diamonds, each with a cream cross in the middle, touching point to point, on cream and framed by two green stripes. It is worked in tapestry crochet, one sc at a time, following the written rows or the chart.
Overview
| Detail | |
|---|---|
| Finished size | About 21 cm / 8.25 in long and 8 cm / 3.25 in tall, plus two straps; fits a standard 11 to 12 oz mug |
| Colours | Cream, Green, Red |
| Yarn used | About 29 m / 32 yd in total (Cream 20 m, Green 6 m, Red 3 m), straps included |
| Skill level | Easy (tapestry crochet) |
| Parts made separately | Body x 1, Button Strap x 2 |
| Rounds and rows | 15 |
| What it involves | You change colour inside the row (tapestry crochet). You turn at the end of each row. |
Body
Colours: Cream, Green, Red · Hook: 4 mm (US G/6) · Make: 1
Foundation chain
Quick read: with Cream, ch 37 (37)
- Use Cream and make a slip knot, then ch 37.
Stitch count: 37 ch
Row 1
Quick read: with Cream, sc in 2nd ch from hook, sc in each ch across (36)
- Work 1 sc in the 2nd chain from the hook.
- Work 1 sc in each chain to the end (35 chains).
Stitch count: 36 sc Check: 1 + 35 = 36
Row 2
Quick read: ch 1, turn, sc in each st across (36)
- Ch 1 and turn. This ch 1 does not count as a stitch.
- Work 1 sc in each stitch to the end of the row (36 stitches).
Stitch count: 36 sc
Row 3
Quick read: ch 1, turn, with Green, sc in each st across (36)
- Change to Green and ch 1 and turn. This ch 1 does not count as a stitch.
- Work 1 sc in each stitch to the end of the row (36 stitches).
Stitch count: 36 sc
Row 4
Quick read: ch 1, turn, with Green, sc in each st across (36)
- Ch 1 and turn. This ch 1 does not count as a stitch.
- Work 1 sc in each stitch to the end of the row (36 stitches).
Stitch count: 36 sc
Row 5
Quick read: ch 1, turn, with Cream, sc in each st across (36)
- Change to Cream and ch 1 and turn. This ch 1 does not count as a stitch.
- Work 1 sc in each stitch to the end of the row (36 stitches).
Stitch count: 36 sc
Row 6
Quick read: ch 1, turn, sc 3 in Cream, (sc 1 in Red, sc 4 in Cream) 6 times, sc 1 in Red, sc 2 in Cream (36)
- Ch 1 and turn. This ch 1 does not count as a stitch.
- Work 1 sc in each of the next 3 stitches.
- Change to Red and work 1 sc in the next stitch.
- Change to Cream and work 1 sc in each of the next 4 stitches.
- Repeat steps 3 and 4 five more times (6 times in all).
- Change to Red and work 1 sc in the next stitch.
- Change to Cream and work 1 sc in each of the next 2 stitches.
Stitch count: 36 sc Check: 3 + (6 x 5) + 1 + 2 = 36
Row 7
Quick read: ch 1, turn, sc 1 in Cream, (sc 1 in Red, sc 1 in Cream, sc 1 in Red, sc 2 in Cream) 7 times (36)
- Ch 1 and turn. This ch 1 does not count as a stitch.
- Work 1 sc in the next stitch.
- Change to Red and work 1 sc in the next stitch.
- Change to Cream and work 1 sc in the next stitch.
- Change to Red and work 1 sc in the next stitch.
- Change to Cream and work 1 sc in each of the next 2 stitches.
- Repeat steps 3 to 6 six more times (7 times in all).
Stitch count: 36 sc Check: 1 + (7 x 5) = 36
Row 8
Quick read: ch 1, turn, sc 2 in Red, (sc 3 in Cream, sc 2 in Red) 6 times, sc 3 in Cream, sc 1 in Red (36)
- Ch 1 and turn. This ch 1 does not count as a stitch.
- Change to Red and work 1 sc in each of the next 2 stitches.
- Change to Cream and work 1 sc in each of the next 3 stitches.
- Change to Red and work 1 sc in each of the next 2 stitches.
- Repeat steps 3 and 4 five more times (6 times in all).
- Change to Cream and work 1 sc in each of the next 3 stitches.
- Change to Red and work 1 sc in the next stitch.
Stitch count: 36 sc Check: 2 + (6 x 5) + 3 + 1 = 36
Row 9
Quick read: ch 1, turn, sc 1 in Cream, (sc 1 in Red, sc 1 in Cream, sc 1 in Red, sc 2 in Cream) 7 times (36)
- Ch 1 and turn. This ch 1 does not count as a stitch.
- Change to Cream and work 1 sc in the next stitch.
- Change to Red and work 1 sc in the next stitch.
- Change to Cream and work 1 sc in the next stitch.
- Change to Red and work 1 sc in the next stitch.
- Change to Cream and work 1 sc in each of the next 2 stitches.
- Repeat steps 3 to 6 six more times (7 times in all).
Stitch count: 36 sc Check: 1 + (7 x 5) = 36
Row 10
Quick read: ch 1, turn, sc 3 in Cream, (sc 1 in Red, sc 4 in Cream) 6 times, sc 1 in Red, sc 2 in Cream (36)
- Ch 1 and turn. This ch 1 does not count as a stitch.
- Work 1 sc in each of the next 3 stitches.
- Change to Red and work 1 sc in the next stitch.
- Change to Cream and work 1 sc in each of the next 4 stitches.
- Repeat steps 3 and 4 five more times (6 times in all).
- Change to Red and work 1 sc in the next stitch.
- Change to Cream and work 1 sc in each of the next 2 stitches.
Stitch count: 36 sc Check: 3 + (6 x 5) + 1 + 2 = 36
Row 11
Quick read: ch 1, turn, with Cream, sc in each st across (36)
- Ch 1 and turn. This ch 1 does not count as a stitch.
- Work 1 sc in each stitch to the end of the row (36 stitches).
Stitch count: 36 sc
Row 12
Quick read: ch 1, turn, with Green, sc in each st across (36)
- Change to Green and ch 1 and turn. This ch 1 does not count as a stitch.
- Work 1 sc in each stitch to the end of the row (36 stitches).
Stitch count: 36 sc
Row 13
Quick read: ch 1, turn, with Green, sc in each st across (36)
- Ch 1 and turn. This ch 1 does not count as a stitch.
- Work 1 sc in each stitch to the end of the row (36 stitches).
Stitch count: 36 sc
Row 14
Quick read: ch 1, turn, with Cream, sc in each st across (36)
- Change to Cream and ch 1 and turn. This ch 1 does not count as a stitch.
- Work 1 sc in each stitch to the end of the row (36 stitches).
Stitch count: 36 sc
Row 15
Quick read: ch 1, turn, sc in each st across (36)
- Ch 1 and turn. This ch 1 does not count as a stitch.
- Work 1 sc in each stitch to the end of the row (36 stitches).
Stitch count: 36 sc What it looks like now: A flat piece 36 stitches wide, after 15 rows.
Fasten off. Rows 6 to 10 are the diamond band: 7 diamonds, each 5 sts wide and 5 rows tall, and 1 more st at the left short edge that matches the first st; carry the unused colour inside the stitches (see Tapestry Crochet). Every row is written in the order you work it, so even rows read the chart from left to right.
The flat Nordic band shows the 7 diamonds on Rows 6 to 10, with a green stripe of 2 rows above and below them.
Count table: Body
| Row | Start count | Change | End count |
|---|---|---|---|
| Foundation chain | 0 | +37 | 37 ch |
| 1 | 37 | -1 | 36 sc |
| 2 | 36 | 0 | 36 sc |
| 3 | 36 | 0 | 36 sc |
| 4 | 36 | 0 | 36 sc |
| 5 | 36 | 0 | 36 sc |
| 6 | 36 | 0 | 36 sc |
| 7 | 36 | 0 | 36 sc |
| 8 | 36 | 0 | 36 sc |
| 9 | 36 | 0 | 36 sc |
| 10 | 36 | 0 | 36 sc |
| 11 | 36 | 0 | 36 sc |
| 12 | 36 | 0 | 36 sc |
| 13 | 36 | 0 | 36 sc |
| 14 | 36 | 0 | 36 sc |
| 15 | 36 | 0 | 36 sc |
Chart
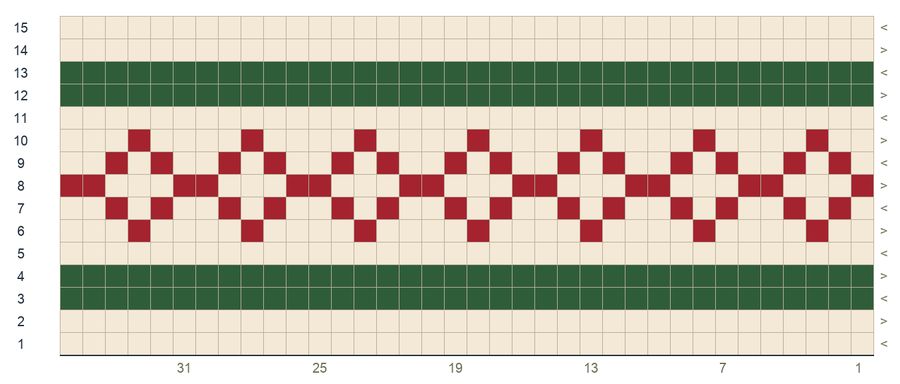
Your chart and your written rows match stitch for stitch, so follow whichever you find easier.
Straps
Make 2 Button Straps in Cream (see Button Straps at the start of the designs).
Assembly
-
Weave in all ends on the wrong side.
-
Block the band lightly (see Finishing) so it lies flat and straight.
-
Sew a button on the right side of the band beside the right short edge, 2 stitches in (its centre 1.2 cm / 0.5 in from the edge): one on Row 14, about 0.8 cm / 0.3 in below the top edge, and one on Row 4, about 1.8 cm / 0.75 in above the bottom edge.
-
Wrap the cozy around your mug, right side out, with the handle on your right and the right short edge right against the front of the handle, so the gap is behind the handle and the front of the cozy faces you. Slip each strap ring over its button, pass the strap through the handle and pin its plain end to the wrong side of the left short edge at the same height as its button, so the band sits snug; the plain end overlaps the band by at least 1.5 cm / 0.5 in. Take the cozy off and sew the plain ends in place.
Blocking
Block the band lightly (see Finishing) so it lies flat and straight.
- Follow the written row or the chart, whichever you prefer; they match stitch for stitch.
- Twist the two yarns at the end of every row so no gap forms at the edges.
Common mistakes and fixes
| Problem | Cause | Fix |
|---|---|---|
| The piece grows by 1 stitch every row. | The turning ch 1 was worked as a stitch. | Skip the ch 1. You should have 36 stitches at the end of Row 2. |
| Row 1 has 37 stitches instead of 36. | The first stitch went into the 1st chain from the hook. | Start in the 2nd chain from the hook. |
| A small step shows where the colour changes. | The new colour was started on a new stitch. | Finish the last stitch of the old colour with the new colour. Keep the steps at the back. |
Troubleshooting for this piece
| Problem | Cause | Fix |
|---|---|---|
| The sides are wavy, or one end is wider | The stitch count changed by one on some rows, often at the turning chain | Count the stitches at the end of every row and compare with the Count table. Undo to the last correct row. Use a marker in the first stitch. |
| The fabric puckers where the colour changes | The yarn carried at the back is pulled too tight | Let the carried yarn lie loose. Check the back of the work every few rows. Spread the stitches on the hook before you carry on. |
| The finished piece is bigger or smaller than the size given | Your tension is different from the gauge, or the yarn is thicker or thinner | Make a gauge swatch and compare it with the Gauge section. Change the hook size to match, or use the yarn named in Materials. |
8. Mistletoe Sprig
A cranberry red cozy in half double crochet with a sprig of five slender green mistletoe leaves and a little bud leaf, three cream berries and a thin red bow. The leaves and berries are tiny quick pieces, perfect for scraps.
Overview
| Detail | |
|---|---|
| Finished size | About 21 cm / 8.25 in long and 7.75 cm / 3 in tall, plus two straps; fits a standard 11 to 12 oz mug |
| Colours | Red, Green, Cream |
| Yarn used | About 31 m / 34 yd in total (Red 25 m, Green 4 m, Cream 2 m), straps included |
| Skill level | Easy |
| Parts made separately | Body x 1, Leaf x 5, Bud Leaf x 1, Berry x 3, Bow x 1, Button Strap x 2 |
| Rounds and rows | 14 |
| What it involves | It has picot points, and several parts are sewn together. You turn at the end of each row. |
Body
Colour: Red · Hook: 4 mm (US G/6) · Make: 1
Foundation chain
Quick read: with Red, ch 38 (38)
- Use Red and make a slip knot, then ch 38.
Stitch count: 38 ch
Row 1
Quick read: hdc in 3rd ch from hook, hdc in each ch across (36)
- Work 1 hdc in the 3rd chain from the hook.
- Work 1 hdc in each chain to the end (35 chains).
Stitch count: 36 hdc Check: 1 + 35 = 36
Rows 2 to 10
Quick read: ch 1, turn, hdc in each st across (36)
- Ch 1 and turn. This ch 1 does not count as a stitch.
- Work 1 hdc in each stitch to the end of the row (36 stitches).
- Work this row 9 times in all: Rows 2, 3, 4, 5, 6, 7, 8, 9 and 10.
Stitch count: 36 hdc (at the end of each row) What it looks like now: A flat piece 36 stitches wide, after 10 rows.
Fasten off. The ch 1 at the start of each row does not count as a stitch; work the first hdc into the first stitch.
Count table: Body
| Row | Start count | Change | End count |
|---|---|---|---|
| Foundation chain | 0 | +38 | 38 ch |
| 1 | 38 | -2 | 36 hdc |
| 2 | 36 | 0 | 36 hdc |
| 3 | 36 | 0 | 36 hdc |
| 4 | 36 | 0 | 36 hdc |
| 5 | 36 | 0 | 36 hdc |
| 6 | 36 | 0 | 36 hdc |
| 7 | 36 | 0 | 36 hdc |
| 8 | 36 | 0 | 36 hdc |
| 9 | 36 | 0 | 36 hdc |
| 10 | 36 | 0 | 36 hdc |
Leaf (make 5)
Colour: Green · Hook: 4 mm (US G/6) · Make: 5
Round 1
Quick read: with Green, ch 6, sl st in 2nd ch from hook, sc in next ch, hdc in next ch, sc in next ch, sl st in next ch, picot, working in the other side of the chain, sc in next ch, hdc in next ch, sc in next ch, sl st in next ch (9)
- Use Green and make a slip knot, then ch 6.
- Work 1 sl st in the 2nd chain from the hook.
- Work 1 sc in the next chain.
- Work 1 hdc in the next chain.
- Work 1 sc in the next chain.
- Work 1 sl st in the next chain.
- Make 1 picot (see Magic Ring and Picot in Techniques).
- Turn the work and go on along the other side of the chain, into its free loops.
- Work 1 sc in the next chain.
- Work 1 hdc in the next chain.
- Work 1 sc in the next chain.
- Work 1 sl st in the next chain.
Stitch count: 9 sts Check: 1 + 1 + 1 + 1 + 1 + 1 + 1 + 1 + 1 = 9
Fasten off, leaving a 25 cm / 10 in tail. Each leaf is slender and pointed, about 3 cm / 1.25 in long and 1.4 cm / 0.5 in wide.
Count table: Leaf
| Round | Start count | Change | End count |
|---|---|---|---|
| 1 | 0 | +9 | 9 sts |
Bud Leaf
Colour: Green · Hook: 4 mm (US G/6) · Make: 1
Round 1
Quick read: with Green, ch 3, sl st in 2nd ch from hook, sc in next ch, picot, working in the other side of the chain, sl st in next ch (3)
- Use Green and make a slip knot, then ch 3.
- Work 1 sl st in the 2nd chain from the hook.
- Work 1 sc in the next chain.
- Make 1 picot (see Magic Ring and Picot in Techniques).
- Turn the work and go on along the other side of the chain, into its free loops.
- Work 1 sl st in the next chain.
Stitch count: 3 sts
Fasten off, leaving a 20 cm / 8 in tail. The bud leaf is about 1 cm / 0.4 in long.
Count table: Bud Leaf
| Round | Start count | Change | End count |
|---|---|---|---|
| 1 | 0 | +3 | 3 sts |
Berry (make 3)
Colour: Cream · Hook: 4 mm (US G/6) · Make: 3
Work these rounds in a spiral. Do not join them. Move the marker up to the first stitch of each new round.
Round 1
Quick read: with Cream, 6 sc in MR (6)
- Use Cream and make a magic ring.
- Work 6 sc into the ring.
- Pull the tail to close the ring.
Stitch count: 6 sc
Round 2
Quick read: sc in each st around (6)
- Work 1 sc in each stitch around (6 stitches).
Stitch count: 6 sc
Fasten off, leaving a 20 cm / 8 in tail. Tuck the starting tail inside to fill the berry, then weave the long tail through the front loops of the 6 sts and pull tight to make a small round berry.
Count table: Berry
| Round | Start count | Change | End count |
|---|---|---|---|
| 1 | MR | +6 | 6 sc |
| 2 | 6 | 0 | 6 sc |
Bow
Colour: Red · Hook: 4 mm (US G/6) · Make: 1
Foundation chain
Quick read: with Red, ch 30 (30)
- Use Red and make a slip knot, then ch 30.
Stitch count: 30 ch
Fasten off and tie the chain into a small bow.
Count table: Bow
| Row | Start count | Change | End count |
|---|---|---|---|
| Foundation chain | 0 | +30 | 30 ch |
Straps
Make 2 Button Straps in Red (see Button Straps at the start of the designs).
Assembly
-
Weave in all ends on the wrong side.
-
Block the band lightly (see Finishing) so it lies flat and straight.
-
Mark the centre point of the sprig on the right side of the band: the 11th stitch from the right short edge (about 6.3 cm / 2.5 in in), at the top of Row 5 (about 3.9 cm / 1.5 in above the bottom edge). Pin the five leaves with their bases round the centre point, each base no more than about 1 cm / 0.4 in from it (the berries cover them), and their tips at these places, measured from the centre point: one to the left and a little up (tip about 2.3 cm / 0.9 in to the left and 0.7 cm / 0.25 in up), one to the right (tip about 2.8 cm / 1.1 in to the right, level with the centre point), one down and a little to the left (tip about 0.5 cm / 0.2 in to the left and 3.6 cm / 1.4 in down, about 0.3 cm / 0.1 in above the bottom edge), one down and out to the left (tip about 2.8 cm / 1.1 in to the left and 2 cm / 0.75 in down) and one down and out to the right (tip about 2.6 cm / 1 in to the right and 2.7 cm / 1 in down).
-
Sew each leaf down along its centre line with its Green tail, leaving the edges free so the leaves lift a little.
-
Sew the three berries in a small triangle over the centre point, one on top and two below. Tie the bow and sew its knot 1.6 cm / 0.6 in above the centre point, then sew the bud leaf pointing straight up above the bow, its tip about 2.7 cm / 1 in above the centre point (about 1.1 cm / 0.5 in below the top edge).
-
Sew a button on the right side of the band beside the right short edge, 2 stitches in (its centre 1.2 cm / 0.5 in from the edge): one at the top of Row 9, about 0.8 cm / 0.3 in below the top edge, and one on Row 3, about 1.9 cm / 0.75 in above the bottom edge.
-
Wrap the cozy around your mug, right side out, with the handle on your right and the right short edge right against the front of the handle, so the gap is behind the handle and the front of the cozy faces you. Slip each strap ring over its button, pass the strap through the handle and pin its plain end to the wrong side of the left short edge at the same height as its button, so the band sits snug; the plain end overlaps the band by at least 1.5 cm / 0.5 in. Take the cozy off and sew the plain ends in place.
Blocking
Block the band lightly (see Finishing) so it lies flat and straight.
- Sew the leaves through their centre lines only so the edges lift a little.
- Make the berries firm by pulling the closing tail tight before you sew them on.
Common mistakes and fixes
| Problem | Cause | Fix |
|---|---|---|
| The piece grows by 1 stitch every row. | The turning ch 1 was worked as a stitch. | Skip the ch 1. You should have 36 stitches at the end of Row 10. |
| The count is too high after Round 1. | The picot parts were counted as stitches. | Do not count them. You should have 9 stitches. |
| Your piece is bigger or smaller than about 21 cm / 8.25 in long and 7.75 cm / 3 in tall, plus two straps; fits a standard 11 to 12 oz mug. | Your tension is different from the gauge. | Check your gauge. Use a smaller hook if it is too big and a bigger hook if it is too small. |
Troubleshooting for this piece
| Problem | Cause | Fix |
|---|---|---|
| The points or petals are uneven | The tension changes from one point to the next, or a count is off by one | Check the counts for each leaf. Keep the same tension on every point. Shape them gently when you finish. |
| The finished piece is bigger or smaller than the size given | Your tension is different from the gauge, or the yarn is thicker or thinner | Make a gauge swatch and compare it with the Gauge section. Change the hook size to match, or use the yarn named in Materials. |
9. Wrapped Gift
A forest green cozy dressed like a wrapped present, with a red ribbon across and down and a big red bow with two notched tails. A favourite for gift giving: slip a gift card or tea bags inside the mug.
Overview
| Detail | |
|---|---|
| Finished size | About 21 cm / 8.25 in long and 8 cm / 3.25 in tall, plus two straps; fits a standard 11 to 12 oz mug |
| Colours | Green, Red |
| Yarn used | About 44 m / 49 yd in total (Green 28 m, Red 16 m), straps included |
| Skill level | Beginner |
| Parts made separately | Body x 1, Long Ribbon x 1, Short Ribbon x 1, Bow Loops x 1, Bow Centre x 1, Bow Tail x 2, Button Strap x 2 |
| Rounds and rows | 36 |
| What it involves | It has picot points, and several parts are sewn together. You turn at the end of each row. |
Body
Colour: Green · Hook: 4 mm (US G/6) · Make: 1
Foundation chain
Quick read: with Green, ch 37 (37)
- Use Green and make a slip knot, then ch 37.
Stitch count: 37 ch
Row 1
Quick read: sc in 2nd ch from hook, sc in each ch across (36)
- Work 1 sc in the 2nd chain from the hook.
- Work 1 sc in each chain to the end (35 chains).
Stitch count: 36 sc Check: 1 + 35 = 36
Rows 2 to 15
Quick read: ch 1, turn, sc in each st across (36)
- Ch 1 and turn. This ch 1 does not count as a stitch.
- Work 1 sc in each stitch to the end of the row (36 stitches).
- Work this row 14 times in all: Rows 2, 3, 4, 5, 6, 7, 8, 9, 10, 11, 12, 13, 14 and 15.
Stitch count: 36 sc (at the end of each row) What it looks like now: A flat piece 36 stitches wide, after 15 rows.
Fasten off.
Count table: Body
| Row | Start count | Change | End count |
|---|---|---|---|
| Foundation chain | 0 | +37 | 37 ch |
| 1 | 37 | -1 | 36 sc |
| 2 | 36 | 0 | 36 sc |
| 3 | 36 | 0 | 36 sc |
| 4 | 36 | 0 | 36 sc |
| 5 | 36 | 0 | 36 sc |
| 6 | 36 | 0 | 36 sc |
| 7 | 36 | 0 | 36 sc |
| 8 | 36 | 0 | 36 sc |
| 9 | 36 | 0 | 36 sc |
| 10 | 36 | 0 | 36 sc |
| 11 | 36 | 0 | 36 sc |
| 12 | 36 | 0 | 36 sc |
| 13 | 36 | 0 | 36 sc |
| 14 | 36 | 0 | 36 sc |
| 15 | 36 | 0 | 36 sc |
Long Ribbon
Colour: Red · Hook: 4 mm (US G/6) · Make: 1
Foundation chain
Quick read: with Red, ch 37 (37)
- Use Red and make a slip knot, then ch 37.
Stitch count: 37 ch
Row 1
Quick read: sc in 2nd ch from hook, sc in each ch across (36)
- Work 1 sc in the 2nd chain from the hook.
- Work 1 sc in each chain to the end (35 chains).
Stitch count: 36 sc Check: 1 + 35 = 36
Rows 2 to 3
Quick read: ch 1, turn, sc in each st across (36)
- Ch 1 and turn. This ch 1 does not count as a stitch.
- Work 1 sc in each stitch to the end of the row (36 stitches).
- Work this row 2 times in all: Rows 2 and 3.
Stitch count: 36 sc (at the end of each row) What it looks like now: A flat piece 36 stitches wide, after 3 rows.
Fasten off, leaving a 60 cm / 24 in tail.
Count table: Long Ribbon
| Row | Start count | Change | End count |
|---|---|---|---|
| Foundation chain | 0 | +37 | 37 ch |
| 1 | 37 | -1 | 36 sc |
| 2 | 36 | 0 | 36 sc |
| 3 | 36 | 0 | 36 sc |
Short Ribbon
Colour: Red · Hook: 4 mm (US G/6) · Make: 1
Foundation chain
Quick read: with Red, ch 15 (15)
- Use Red and make a slip knot, then ch 15.
Stitch count: 15 ch
Row 1
Quick read: sc in 2nd ch from hook, sc in each ch across (14)
- Work 1 sc in the 2nd chain from the hook.
- Work 1 sc in each chain to the end (13 chains).
Stitch count: 14 sc Check: 1 + 13 = 14
Rows 2 to 3
Quick read: ch 1, turn, sc in each st across (14)
- Ch 1 and turn. This ch 1 does not count as a stitch.
- Work 1 sc in each stitch to the end of the row (14 stitches).
- Work this row 2 times in all: Rows 2 and 3.
Stitch count: 14 sc (at the end of each row) What it looks like now: A flat piece 14 stitches wide, after 3 rows.
Fasten off, leaving a 40 cm / 16 in tail.
Count table: Short Ribbon
| Row | Start count | Change | End count |
|---|---|---|---|
| Foundation chain | 0 | +15 | 15 ch |
| 1 | 15 | -1 | 14 sc |
| 2 | 14 | 0 | 14 sc |
| 3 | 14 | 0 | 14 sc |
Bow Loops
Colour: Red · Hook: 4 mm (US G/6) · Make: 1
Foundation chain
Quick read: with Red, ch 23 (23)
- Use Red and make a slip knot, then ch 23.
Stitch count: 23 ch
Row 1
Quick read: sc in 2nd ch from hook, sc in each ch across (22)
- Work 1 sc in the 2nd chain from the hook.
- Work 1 sc in each chain to the end (21 chains).
Stitch count: 22 sc Check: 1 + 21 = 22
Rows 2 to 5
Quick read: ch 1, turn, sc in each st across (22)
- Ch 1 and turn. This ch 1 does not count as a stitch.
- Work 1 sc in each stitch to the end of the row (22 stitches).
- Work this row 4 times in all: Rows 2, 3, 4 and 5.
Stitch count: 22 sc (at the end of each row) What it looks like now: A flat piece 22 stitches wide, after 5 rows.
Fasten off. Fold both short ends to the middle, overlapping them by 0.5 cm, and stitch through all layers. The folded bow is about 6 cm / 2.4 in wide and 2.6 cm / 1 in tall.
Count table: Bow Loops
| Row | Start count | Change | End count |
|---|---|---|---|
| Foundation chain | 0 | +23 | 23 ch |
| 1 | 23 | -1 | 22 sc |
| 2 | 22 | 0 | 22 sc |
| 3 | 22 | 0 | 22 sc |
| 4 | 22 | 0 | 22 sc |
| 5 | 22 | 0 | 22 sc |
Bow Centre
Colour: Red · Hook: 4 mm (US G/6) · Make: 1
Foundation chain
Quick read: with Red, ch 11 (11)
- Use Red and make a slip knot, then ch 11.
Stitch count: 11 ch
Row 1
Quick read: sc in 2nd ch from hook, sc in each ch across (10)
- Work 1 sc in the 2nd chain from the hook.
- Work 1 sc in each chain to the end (9 chains).
Stitch count: 10 sc Check: 1 + 9 = 10
Row 2
Quick read: ch 1, turn, sc in each st across (10)
- Ch 1 and turn. This ch 1 does not count as a stitch.
- Work 1 sc in each stitch to the end of the row (10 stitches).
Stitch count: 10 sc What it looks like now: A flat piece 10 stitches wide, after 2 rows.
Fasten off, leaving a 20 cm / 8 in tail. Wrap it tightly around the middle of the Bow Loops and sew the ends together at the back.
Count table: Bow Centre
| Row | Start count | Change | End count |
|---|---|---|---|
| Foundation chain | 0 | +11 | 11 ch |
| 1 | 11 | -1 | 10 sc |
| 2 | 10 | 0 | 10 sc |
Bow Tail (make 2)
Colour: Red · Hook: 4 mm (US G/6) · Make: 2
Foundation chain
Quick read: with Red, ch 3 (3)
- Use Red and make a slip knot, then ch 3.
Stitch count: 3 ch
Row 1
Quick read: sc in 2nd ch from hook, sc in each ch across (2)
- Work 1 sc in the 2nd chain from the hook.
- Work 1 sc in the next chain.
Stitch count: 2 sc Check: 1 + 1 = 2
Rows 2 to 7
Quick read: ch 1, turn, sc in each st across (2)
- Ch 1 and turn. This ch 1 does not count as a stitch.
- Work 1 sc in each stitch to the end of the row (2 stitches).
- Work this row 6 times in all: Rows 2, 3, 4, 5, 6 and 7.
Stitch count: 2 sc (at the end of each row)
Row 8
Quick read: ch 1, turn, (sl st in next st, picot) 2 times (2)
- Ch 1 and turn. This ch 1 does not count as a stitch.
- Work 1 sl st in the next stitch.
- Make 1 picot (see Magic Ring and Picot in Techniques).
- Repeat steps 2 and 3 one more time (2 times in all).
Stitch count: 2 sl st Check: 2 repeats x 1 st = 2 Positions: Picot after stitches 1 and 2 of this row. What it looks like now: A flat piece 2 stitches wide, after 8 rows.
Fasten off. Row 8 makes two small points with a notch between them. Each tail is about 3.7 cm / 1.5 in long and 1.2 cm / 0.5 in wide.
Count table: Bow Tail
| Row | Start count | Change | End count |
|---|---|---|---|
| Foundation chain | 0 | +3 | 3 ch |
| 1 | 3 | -1 | 2 sc |
| 2 | 2 | 0 | 2 sc |
| 3 | 2 | 0 | 2 sc |
| 4 | 2 | 0 | 2 sc |
| 5 | 2 | 0 | 2 sc |
| 6 | 2 | 0 | 2 sc |
| 7 | 2 | 0 | 2 sc |
| 8 | 2 | 0 | 2 sl st |
Straps
Make 2 Button Straps in Green (see Button Straps at the start of the designs).
Assembly
-
Weave in all ends on the wrong side.
-
Block the band lightly (see Finishing) so it lies flat and straight.
-
Sew the Long Ribbon across the right side of the band over Rows 8 to 10, a little above the middle, matching its ends to the short edges.
-
Sew the Short Ribbon from the top edge to the bottom edge, crossing the Long Ribbon on the 11th stitch from the right short edge (about 6.2 cm / 2.5 in in), so the bow sits near the middle of the front, clear of the buttons.
-
Sew the plain end of each Bow Tail just below the crossing so the tails hang down and out at about 30 degrees from upright, their notched tips about 0.8 cm / 0.3 in above the bottom edge, then sew the bow over the crossing.
-
Sew a button on the right side of the band beside the right short edge, 2 stitches in (its centre 1.2 cm / 0.5 in from the edge): one on Row 14, about 0.8 cm / 0.3 in below the top edge, and one on Row 4, about 1.8 cm / 0.75 in above the bottom edge.
-
Wrap the cozy around your mug, right side out, with the handle on your right and the right short edge right against the front of the handle, so the gap is behind the handle and the front of the cozy faces you. Slip each strap ring over its button, pass the strap through the handle and pin its plain end to the wrong side of the left short edge at the same height as its button, so the band sits snug; the plain end overlaps the band by at least 1.5 cm / 0.5 in. Take the cozy off and sew the plain ends in place.
Blocking
Block the band lightly (see Finishing) so it lies flat and straight.
- Pin the ribbons first, wrap the cozy round the mug and check the bow sits at the front.
- Steam the bow loops lightly so they stay plump.
Common mistakes and fixes
| Problem | Cause | Fix |
|---|---|---|
| The piece grows by 1 stitch every row. | The turning ch 1 was worked as a stitch. | Skip the ch 1. You should have 36 stitches at the end of Row 15. |
| Row 1 has 37 stitches instead of 36. | The first stitch went into the 1st chain from the hook. | Start in the 2nd chain from the hook. |
| The count is too high after Row 8. | The picot parts were counted as stitches. | Do not count them. You should have 2 stitches. |
Troubleshooting for this piece
| Problem | Cause | Fix |
|---|---|---|
| The sides are wavy, or one end is wider | The stitch count changed by one on some rows, often at the turning chain | Count the stitches at the end of every row and compare with the Count table. Undo to the last correct row. Use a marker in the first stitch. |
| The points or petals are uneven | The tension changes from one point to the next, or a count is off by one | Check the Positions line and the counts for each point. Keep the same tension on every point. Shape them gently when you finish. |
| The finished piece is bigger or smaller than the size given | Your tension is different from the gauge, or the yarn is thicker or thinner | Make a gauge swatch and compare it with the Gauge section. Change the hook size to match, or use the yarn named in Materials. |
10. Cabin Check
A cosy red and cream checkerboard in tapestry crochet: blocks of 3 stitches and 3 rows, four blocks tall, between red border rows. It looks like a flannel blanket wrapped around your mug.
Overview
| Detail | |
|---|---|
| Finished size | About 21 cm / 8.25 in long and 8 cm / 3.25 in tall, plus two straps; fits a standard 11 to 12 oz mug |
| Colours | Red, Cream |
| Yarn used | About 31 m / 34 yd in total (Red 21 m, Cream 10 m), straps included |
| Skill level | Easy (tapestry crochet) |
| Parts made separately | Body x 1, Button Strap x 2 |
| Rounds and rows | 15 |
| What it involves | You change colour inside the row (tapestry crochet). You turn at the end of each row. |
Body
Colours: Red, Cream · Hook: 4 mm (US G/6) · Make: 1
Foundation chain
Quick read: with Red, ch 37 (37)
- Use Red and make a slip knot, then ch 37.
Stitch count: 37 ch
Row 1
Quick read: with Red, sc in 2nd ch from hook, sc in each ch across (36)
- Work 1 sc in the 2nd chain from the hook.
- Work 1 sc in each chain to the end (35 chains).
Stitch count: 36 sc Check: 1 + 35 = 36
Row 2
Quick read: ch 1, turn, (sc 3 in Red, sc 3 in Cream) 6 times (36)
- Ch 1 and turn. This ch 1 does not count as a stitch.
- Use Red and work 1 sc in each of the next 3 stitches.
- Change to Cream and work 1 sc in each of the next 3 stitches.
- Repeat steps 2 and 3 five more times (6 times in all).
Stitch count: 36 sc Check: 6 repeats x 6 sts = 36
Row 3
Quick read: ch 1, turn, (sc 3 in Cream, sc 3 in Red) 6 times (36)
- Ch 1 and turn. This ch 1 does not count as a stitch.
- Use Cream and work 1 sc in each of the next 3 stitches.
- Change to Red and work 1 sc in each of the next 3 stitches.
- Repeat steps 2 and 3 five more times (6 times in all).
Stitch count: 36 sc Check: 6 repeats x 6 sts = 36
Row 4
Quick read: ch 1, turn, (sc 3 in Red, sc 3 in Cream) 6 times (36)
- Ch 1 and turn. This ch 1 does not count as a stitch.
- Use Red and work 1 sc in each of the next 3 stitches.
- Change to Cream and work 1 sc in each of the next 3 stitches.
- Repeat steps 2 and 3 five more times (6 times in all).
Stitch count: 36 sc Check: 6 repeats x 6 sts = 36
Row 5
Quick read: ch 1, turn, (sc 3 in Red, sc 3 in Cream) 6 times (36)
- Ch 1 and turn. This ch 1 does not count as a stitch.
- Change to Red and work 1 sc in each of the next 3 stitches.
- Change to Cream and work 1 sc in each of the next 3 stitches.
- Repeat steps 2 and 3 five more times (6 times in all).
Stitch count: 36 sc Check: 6 repeats x 6 sts = 36
Row 6
Quick read: ch 1, turn, (sc 3 in Cream, sc 3 in Red) 6 times (36)
- Ch 1 and turn. This ch 1 does not count as a stitch.
- Use Cream and work 1 sc in each of the next 3 stitches.
- Change to Red and work 1 sc in each of the next 3 stitches.
- Repeat steps 2 and 3 five more times (6 times in all).
Stitch count: 36 sc Check: 6 repeats x 6 sts = 36
Row 7
Quick read: ch 1, turn, (sc 3 in Red, sc 3 in Cream) 6 times (36)
- Ch 1 and turn. This ch 1 does not count as a stitch.
- Use Red and work 1 sc in each of the next 3 stitches.
- Change to Cream and work 1 sc in each of the next 3 stitches.
- Repeat steps 2 and 3 five more times (6 times in all).
Stitch count: 36 sc Check: 6 repeats x 6 sts = 36
Row 8
Quick read: ch 1, turn, (sc 3 in Red, sc 3 in Cream) 6 times (36)
- Ch 1 and turn. This ch 1 does not count as a stitch.
- Change to Red and work 1 sc in each of the next 3 stitches.
- Change to Cream and work 1 sc in each of the next 3 stitches.
- Repeat steps 2 and 3 five more times (6 times in all).
Stitch count: 36 sc Check: 6 repeats x 6 sts = 36
Row 9
Quick read: ch 1, turn, (sc 3 in Cream, sc 3 in Red) 6 times (36)
- Ch 1 and turn. This ch 1 does not count as a stitch.
- Use Cream and work 1 sc in each of the next 3 stitches.
- Change to Red and work 1 sc in each of the next 3 stitches.
- Repeat steps 2 and 3 five more times (6 times in all).
Stitch count: 36 sc Check: 6 repeats x 6 sts = 36
Row 10
Quick read: ch 1, turn, (sc 3 in Red, sc 3 in Cream) 6 times (36)
- Ch 1 and turn. This ch 1 does not count as a stitch.
- Use Red and work 1 sc in each of the next 3 stitches.
- Change to Cream and work 1 sc in each of the next 3 stitches.
- Repeat steps 2 and 3 five more times (6 times in all).
Stitch count: 36 sc Check: 6 repeats x 6 sts = 36
Row 11
Quick read: ch 1, turn, (sc 3 in Red, sc 3 in Cream) 6 times (36)
- Ch 1 and turn. This ch 1 does not count as a stitch.
- Change to Red and work 1 sc in each of the next 3 stitches.
- Change to Cream and work 1 sc in each of the next 3 stitches.
- Repeat steps 2 and 3 five more times (6 times in all).
Stitch count: 36 sc Check: 6 repeats x 6 sts = 36
Row 12
Quick read: ch 1, turn, (sc 3 in Cream, sc 3 in Red) 6 times (36)
- Ch 1 and turn. This ch 1 does not count as a stitch.
- Use Cream and work 1 sc in each of the next 3 stitches.
- Change to Red and work 1 sc in each of the next 3 stitches.
- Repeat steps 2 and 3 five more times (6 times in all).
Stitch count: 36 sc Check: 6 repeats x 6 sts = 36
Row 13
Quick read: ch 1, turn, (sc 3 in Red, sc 3 in Cream) 6 times (36)
- Ch 1 and turn. This ch 1 does not count as a stitch.
- Use Red and work 1 sc in each of the next 3 stitches.
- Change to Cream and work 1 sc in each of the next 3 stitches.
- Repeat steps 2 and 3 five more times (6 times in all).
Stitch count: 36 sc Check: 6 repeats x 6 sts = 36
Row 14
Quick read: with Red, ch 1, turn, sc in each st across (36)
- Change to Red and ch 1 and turn. This ch 1 does not count as a stitch.
- Work 1 sc in each stitch to the end of the row (36 stitches).
Stitch count: 36 sc
Row 15
Quick read: ch 1, turn, sc in each st across (36)
- Ch 1 and turn. This ch 1 does not count as a stitch.
- Work 1 sc in each stitch to the end of the row (36 stitches).
Stitch count: 36 sc What it looks like now: A flat piece 36 stitches wide, after 15 rows.
Fasten off. Row 1 is the bottom border and Rows 14 and 15 the top border. Change colour on the last yarn over of the stitch before each new block, and carry the unused colour inside the stitches so it never shows.
Count table: Body
| Row | Start count | Change | End count |
|---|---|---|---|
| Foundation chain | 0 | +37 | 37 ch |
| 1 | 37 | -1 | 36 sc |
| 2 | 36 | 0 | 36 sc |
| 3 | 36 | 0 | 36 sc |
| 4 | 36 | 0 | 36 sc |
| 5 | 36 | 0 | 36 sc |
| 6 | 36 | 0 | 36 sc |
| 7 | 36 | 0 | 36 sc |
| 8 | 36 | 0 | 36 sc |
| 9 | 36 | 0 | 36 sc |
| 10 | 36 | 0 | 36 sc |
| 11 | 36 | 0 | 36 sc |
| 12 | 36 | 0 | 36 sc |
| 13 | 36 | 0 | 36 sc |
| 14 | 36 | 0 | 36 sc |
| 15 | 36 | 0 | 36 sc |
Chart
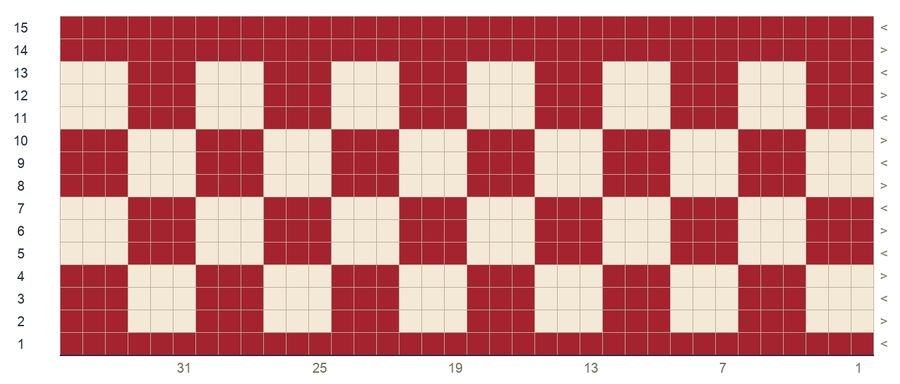
The chart shows the checks shifting every 3 rows, with 1 red row at the bottom and 2 at the top.
Straps
Make 2 Button Straps in Red (see Button Straps at the start of the designs).
Assembly
-
Weave in all ends on the wrong side.
-
Block the band lightly (see Finishing) so it lies flat and straight.
-
Sew a button on the right side of the band beside the right short edge, 2 stitches in (its centre 1.2 cm / 0.5 in from the edge): one on Row 14, about 0.8 cm / 0.3 in below the top edge, and one on Row 4, about 1.8 cm / 0.75 in above the bottom edge.
-
Wrap the cozy around your mug, right side out, with the handle on your right and the right short edge right against the front of the handle, so the gap is behind the handle and the front of the cozy faces you. Slip each strap ring over its button, pass the strap through the handle and pin its plain end to the wrong side of the left short edge at the same height as its button, so the band sits snug; the plain end overlaps the band by at least 1.5 cm / 0.5 in. Take the cozy off and sew the plain ends in place.
Blocking
Block the band lightly (see Finishing) so it lies flat and straight.
- Change colour on the last yarn over of the 3rd stitch of every block for sharp corners.
- Check your blocks against the chart at the end of each 3 row band.
Common mistakes and fixes
| Problem | Cause | Fix |
|---|---|---|
| The piece grows by 1 stitch every row. | The turning ch 1 was worked as a stitch. | Skip the ch 1. You should have 36 stitches at the end of Row 2. |
| Row 1 has 37 stitches instead of 36. | The first stitch went into the 1st chain from the hook. | Start in the 2nd chain from the hook. |
| Your piece is bigger or smaller than about 21 cm / 8.25 in long and 8 cm / 3.25 in tall, plus two straps; fits a standard 11 to 12 oz mug. | Your tension is different from the gauge. | Check your gauge. Use a smaller hook if it is too big and a bigger hook if it is too small. |
Troubleshooting for this piece
| Problem | Cause | Fix |
|---|---|---|
| The sides are wavy, or one end is wider | The stitch count changed by one on some rows, often at the turning chain | Count the stitches at the end of every row and compare with the Count table. Undo to the last correct row. Use a marker in the first stitch. |
| The finished piece is bigger or smaller than the size given | Your tension is different from the gauge, or the yarn is thicker or thinner | Make a gauge swatch and compare it with the Gauge section. Change the hook size to match, or use the yarn named in Materials. |
Finishing and Blocking
-
Weave in every end on the wrong side, through stitches of the same colour, for at least 5 cm / 2 in.
-
Block each band: pin it flat to the finished size, mist it with water and leave it to dry. Acrylic can be steamed lightly from above; never press the iron onto the yarn.
-
Pin the Peppermint Ripple out straight along its top and bottom edges while blocking, so the waves lie even.
-
Try every cozy on the mug before you sew the straps; mugs vary, and the pinned straps are easy to move.
- Block all ten bands together so they are the same size.
- Store finished cozies flat, not folded, to keep the edges straight.
Final count checklist
| Done | Piece | Part | Last round or row | Stitch count |
|---|---|---|---|---|
| ☐ | 1. Hearthside Stripe | Body | Row 14 | 36 sc |
| ☐ | 2. Peppermint Ripple | Body | Row 15 | 37 sts |
| ☐ | 3. Fireside Rib | Body | Row 40 | 10 sc |
| ☐ | 3. Fireside Rib | Top Edge | Edge row 2 | 40 sc |
| ☐ | 3. Fireside Rib | Bottom Edge | Edge row 2 | 40 sc |
| ☐ | 4. Evergreen Moss | Body | Row 14 | 36 sc |
| ☐ | 5. Snowberry Bobble | Body | Row 15 | 36 sc |
| ☐ | 6. Little Christmas Tree | Body | Row 15 | 36 sc |
| ☐ | 6. Little Christmas Tree | Tree | Row 9 | 2 sc |
| ☐ | 6. Little Christmas Tree | Trunk | Row 2 | 3 sc |
| ☐ | 6. Little Christmas Tree | Star | Round 2 | 5 sl st |
| ☐ | 7. Nordic Diamond Band | Body | Row 15 | 36 sc |
| ☐ | 8. Mistletoe Sprig | Body | Row 10 | 36 hdc |
| ☐ | 8. Mistletoe Sprig | Leaf | Round 1 | 9 sts |
| ☐ | 8. Mistletoe Sprig | Bud Leaf | Round 1 | 3 sts |
| ☐ | 8. Mistletoe Sprig | Berry | Round 2 | 6 sc |
| ☐ | 8. Mistletoe Sprig | Bow | Foundation chain | 30 ch |
| ☐ | 9. Wrapped Gift | Body | Row 15 | 36 sc |
| ☐ | 9. Wrapped Gift | Long Ribbon | Row 3 | 36 sc |
| ☐ | 9. Wrapped Gift | Short Ribbon | Row 3 | 14 sc |
| ☐ | 9. Wrapped Gift | Bow Loops | Row 5 | 22 sc |
| ☐ | 9. Wrapped Gift | Bow Centre | Row 2 | 10 sc |
| ☐ | 9. Wrapped Gift | Bow Tail | Row 8 | 2 sl st |
| ☐ | 10. Cabin Check | Body | Row 15 | 36 sc |
| ☐ | Every cozy | Button Strap (x 2) | Row 3 | 14 sc | | ☐ | Every cozy | Strap Ring (x 2) | Round 1 | 12 sc |
Total: 26 counts to check
Care and washing
- Hand wash in cool water with a little wool wash, press out the water in a towel and dry flat.
- Keep the cozy off the mug in the microwave and the dishwasher.
- Remove the cozy before washing the mug.
More Christmas crochet beyond these ten cozies
These ten patterns make the cozies themselves. Picking one is a different job. Want help first with mug fit, yarn or which design suits a gift? See 10 Crochet Mug Cozy Patterns for Christmas Cups and Mugs.
A cozy sits well on a coaster. So your next project could come from Crochet Coaster Patterns: Round, Square and Christmas Coasters. Every free set on the site, each with its stitch counts, is in Free Crochet Patterns with Step by Step Photos.
Variations
Colour swaps
| Colour in the pattern | Swap idea |
|---|---|
| Red | Burgundy or bright pink |
| Cream | White or pale grey |
| Green | Sage or emerald |
| Gold | Mustard, silver or a metallic yarn |
The stitch counts stay the same. Only the colour changes. Keep one colour darker than the others so the details still show.
Bigger or smaller
For a mug of a different size, follow the Fit Guide in this pattern. It says what to change in the foundation chain and in the height.
Frequently asked questions
Can I use a different yarn?
Yes. Pick a yarn in the same weight category as the Materials section and make a gauge swatch first. Change the hook until your swatch matches the gauge, so the band keeps its length. Use the same yarn for every cozy so they all fit the same mug.
Can I use a different hook?
Yes, if your swatch matches the Gauge section. Many crocheters work tighter or looser than the hook size shown, so trust your swatch, not the hook size.
I am left-handed. Can I follow this pattern?
Yes. Many left-handed crocheters follow the written steps as they are and get a mirror image. You can also mirror the directions: wherever the guide says right, hold or work on the left.
This guide uses US terms. What are the UK names?
The stitch names differ between US and UK patterns. US single crochet (sc) is UK double crochet (dc). US half double crochet (hdc) is UK half treble (htr). US double crochet (dc) is UK treble (tr). US treble (tr) is UK double treble (dtr). The Abbreviations table in this guide lists the ones this pattern uses.
How do I wash the finished piece?
Follow the care label of your yarn first. The Care and washing section of this guide gives the steps: hand wash in cool water, press out the water in a towel and dry flat.
Can I make it bigger or smaller?
Yes. Keep the yarn from the Materials section, and change the hook only to match the gauge. The Fit Guide says what to change for a bigger or smaller mug: the foundation chain (the rows for the sideways Fireside Rib) and, for a large mug, the height. If you add or remove rows yourself, the Count tables and the final checklist no longer apply to those rows.
My stitch count does not match the guide. What do I do?
Stop and count. Compare your stitches with the Stitch count line and the Count table for that round. Undo to the last round that matches. Use a stitch marker in the first stitch of each round, and count again at the end of every round.
Questions makers ask
Are these crochet mug cozy patterns free?
Yes. All 10 crochet mug cozy patterns are free to read on this page: every row of every band, the button straps, the sewn trees, leaves and bows, both colourwork charts and the final count checklist. Each row ends with its stitch count, so you can check your work as you go.
What size mug do these crochet mug cozies fit?
As written, each cozy fits a standard 11 to 12 oz mug about 25 to 27 cm (10 to 10.5 in) around, measured at the widest part below the handle. The Fit Guide changes the foundation chain for a small 8 to 10 oz mug, and adds stitches and 2 rows for a large 14 to 16 oz mug.
How much yarn does a crochet mug cozy take?
One crochet mug cozy takes 22 to 44 m (25 to 49 yd) of weight 4 (medium, worsted) yarn, straps included. The Evergreen Moss uses the least and the Wrapped Gift the most. All ten together take about 125 m of Red, 120 m of Cream, 70 m of Green and 5 m of Gold.
Which crochet mug cozy is easiest to make?
The Hearthside Stripe is the easiest, because its band is single crochet in five stripes and the pattern calls it the base for every other cozy. It is labelled Beginner, like the Fireside Rib, the Little Christmas Tree and the Wrapped Gift. The Nordic Diamond Band and the Cabin Check take longest, about 2 to 3 hours.
How do the button straps close a crochet mug cozy?
Each strap has a round ring at one end that slips over a 15 mm (0.6 in) button sewn beside the handle. The strap passes through the handle, and its plain end is sewn to the other short edge. Two straps close a gap of 3 to 6.5 cm (1.25 to 2.5 in) at the handle.